S3.15 Strength System Base Owner's Manual - Precor
S3.15 Strength System Base Owner's Manual - Precor
S3.15 Strength System Base Owner's Manual - Precor

Create successful ePaper yourself
Turn your PDF publications into a flip-book with our unique Google optimized e-Paper software.
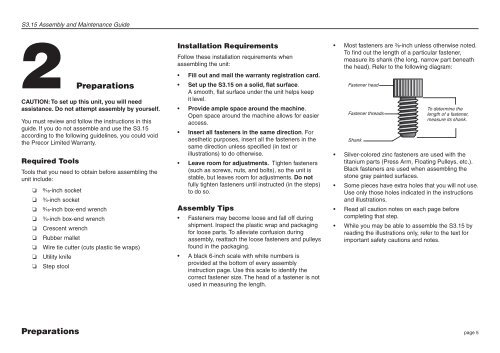
<strong>S3.15</strong> Assembly and Maintenance Guide2 PreparationsCAUTION: To set up this unit, you will needassistance. Do not attempt assembly by yourself.You must review and follow the instructions in thisguide. If you do not assemble and use the <strong>S3.15</strong>according to the following guidelines, you could voidthe <strong>Precor</strong> Limited Warranty.Required ToolsTools that you need to obtain before assembling theunit include:❏❏❏❏❏❏❏❏❏⁹⁄₁₆-inch socket³⁄₄-inch socket⁹⁄₁₆-inch box-end wrench³⁄₄-inch box-end wrenchCrescent wrenchRubber malletWire tie cutter (cuts plastic tie wraps)Utility knifeStep stoolInstallation RequirementsFollow these installation requirements whenassembling the unit:• Fill out and mail the warranty registration card.• Set up the <strong>S3.15</strong> on a solid, flat surface.A smooth, flat surface under the unit helps keepit level.• Provide ample space around the machine.Open space around the machine allows for easieraccess.• Insert all fasteners in the same direction. Foraesthetic purposes, insert all the fasteners in thesame direction unless specified (in text orillustrations) to do otherwise.• Leave room for adjustments. Tighten fasteners(such as screws, nuts, and bolts), so the unit isstable, but leaves room for adjustments. Do notfully tighten fasteners until instructed (in the steps)to do so.Assembly Tips• Fasteners may become loose and fall off duringshipment. Inspect the plastic wrap and packagingfor loose parts. To alleviate confusion duringassembly, reattach the loose fasteners and pulleysfound in the packaging.• A black 6-inch scale with white numbers isprovided at the bottom of every assemblyinstruction page. Use this scale to identify thecorrect fastener size. The head of a fastener is notused in measuring the length.• Most fasteners are ³⁄₈-inch unless otherwise noted.To find out the length of a particular fastener,measure its shank (the long, narrow part beneaththe head). Refer to the following diagram:Fastener headFastener threadsShankTo determine thelength of a fastener,measure its shank.• Silver-colored zinc fasteners are used with thetitanium parts (Press Arm, Floating Pulleys, etc.).Black fasteners are used when assembling thestone gray painted surfaces.• Some pieces have extra holes that you will not use.Use only those holes indicated in the instructionsand illustrations.• Read all caution notes on each page beforecompleting that step.• While you may be able to assemble the <strong>S3.15</strong> byreading the illustrations only, refer to the text forimportant safety cautions and notes.Preparationspage 5