P3838_3 Mira Fino.pmd - QS Supplies
P3838_3 Mira Fino.pmd - QS Supplies
P3838_3 Mira Fino.pmd - QS Supplies

You also want an ePaper? Increase the reach of your titles
YUMPU automatically turns print PDFs into web optimized ePapers that Google loves.
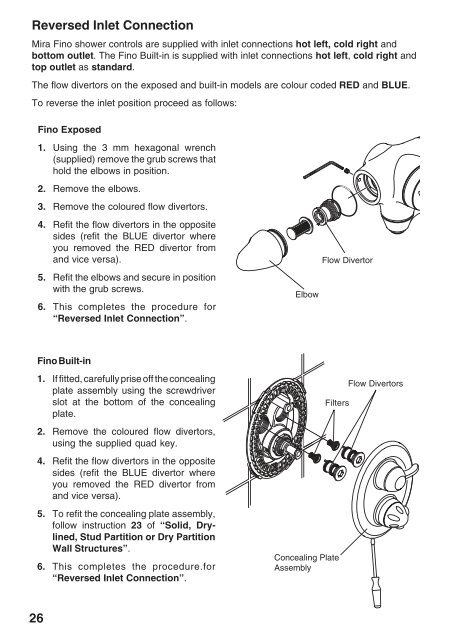
Reversed Inlet Connection<strong>Mira</strong> <strong>Fino</strong> shower controls are supplied with inlet connections hot left, cold right andbottom outlet. The <strong>Fino</strong> Built-in is supplied with inlet connections hot left, cold right andtop outlet as standard.The flow divertors on the exposed and built-in models are colour coded RED and BLUE.To reverse the inlet position proceed as follows:<strong>Fino</strong> Exposed1. Using the 3 mm hexagonal wrench(supplied) remove the grub screws thathold the elbows in position.2. Remove the elbows.3. Remove the coloured flow divertors.4. Refit the flow divertors in the oppositesides (refit the BLUE divertor whereyou removed the RED divertor fromand vice versa).5. Refit the elbows and secure in positionwith the grub screws.6. This completes the procedure for“Reversed Inlet Connection”.ElbowFlow Divertor<strong>Fino</strong> Built-in1. If fitted, carefully prise off the concealingplate assembly using the screwdriverslot at the bottom of the concealingplate.2. Remove the coloured flow divertors,using the supplied quad key.4. Refit the flow divertors in the oppositesides (refit the BLUE divertor whereyou removed the RED divertor fromand vice versa).FiltersFlow Divertors5. To refit the concealing plate assembly,follow instruction 23 of “Solid, Drylined,Stud Partition or Dry PartitionWall Structures”.6. This completes the procedure.for“Reversed Inlet Connection”.Concealing PlateAssembly26