Network Camera Server VB101
Network Camera Server VB101
Network Camera Server VB101
- No tags were found...

Create successful ePaper yourself
Turn your PDF publications into a flip-book with our unique Google optimized e-Paper software.
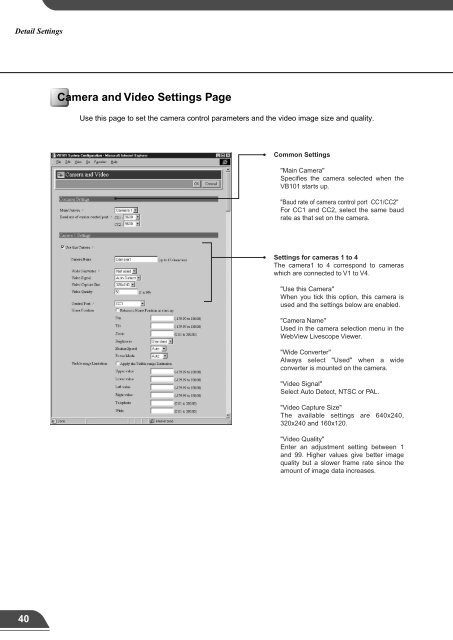
Detail SettingsDetail Settings<strong>Camera</strong> and Video Settings PageUse this page to set the camera control parameters and the video image size and quality.Common Settings"Main <strong>Camera</strong>"Specifies the camera selected when the<strong>VB101</strong> starts up."Baud rate of camera control port CC1/CC2"For CC1 and CC2, select the same baudrate as that set on the camera.Settings for cameras 1 to 4The camera1 to 4 correspond to cameraswhich are connected to V1 to V4."Use this <strong>Camera</strong>"When you tick this option, this camera isused and the settings below are enabled."Control Port"Four cameras can be connected, but onlytwo of those can be controlled. Whenthese cameras are connected to controlport CC1 or CC2, either can be selected.Select "Not controlled" for cameras thatare not connected or not controlled."Home Position"The reference position for the cameraused at start-up and for picture recording .When you tick the "Return to Homeposition at start-up" option, the settingsbelow are enabled."Pan"Sets the initial pan position of <strong>Camera</strong>.Enter an angle between -179.99 and180.00 degrees.3"<strong>Camera</strong> Name"Used in the camera selection menu in theWebView Livescope Viewer."Wide Converter"Always select "Used" when a wideconverter is mounted on the camera."Video Signal"Select Auto Detect, NTSC or PAL."Video Capture Size"The available settings are 640x240,320x240 and 160x120."Video Quality"Enter an adjustment setting between 1and 99. Higher values give better imagequality but a slower frame rate since theamount of image data increases."Visible range Limitation"If you tick the "Apply the Visible range Limitation" option, the settingsbelow are enabled. Use this setting to prevent clients from seeingcertain camera angles."Upper value, Lower value, Left value, Right value"Sets the extent of the field of view provided to users. Enter an anglebetween -179.99 and 180.00 for each setting.(Specify settings so that the upper value is greater than the lowervalue and the left value is lesser than the right value.)"Tilt"Sets the initial tilt position for thecamera. Enter an angle between -179.99 and 180.00 degrees."Zoom"Sets the initial value for the camera'sangle of zoom. Enter an angle between0.01 and 300.0."Brightness"Sets the target value for the camera'sauto exposure feature. Select"Standard" (for bright subjects) or"Brighter " (for dark subjects)."Shutter speed "Sets the camera shutter speed. SelectAuto, 1/60 or 1/100."Focus Mode"Sets the focusing mode for the camera.Select "Auto" (auto focus) or "Infinity"(focus fixed at infinity).Setup Procedures"Telephoto, Wide"Sets the zoom angles provided to users. Enter a horizontal anglefor the field of view of between 0.01 and 300.0 for each setting.(Specify settings so that the telephoto setting is lesser than orequal to the wide setting.)Click the [OK] button to change the settings. To discard the changes, click the[Cancel] button. This returns you to the settings title page.40 41