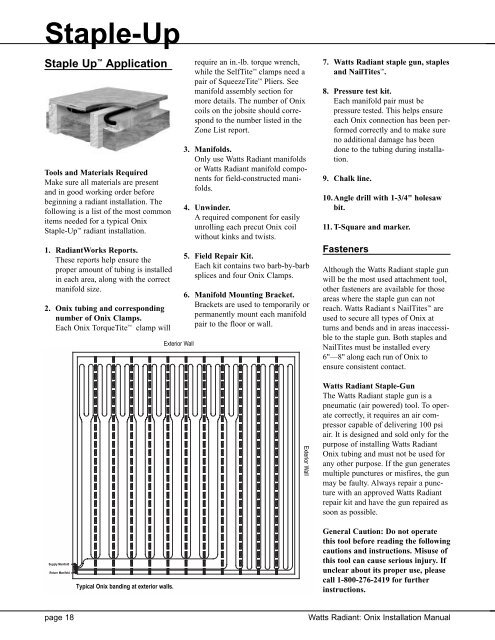
Staple-UpStaple Up ApplicationTools and Materials RequiredMake sure all materials are presentand in good working order beforebeginning a radiant installation. Thefollowing is a list of the most commonitems needed for a typical <strong>Onix</strong>Staple-Up radiant installation.1. RadiantWorks Reports.These reports help ensure theproper amount of tubing is installedin each area, along with the correctmanifold size.2. <strong>Onix</strong> tubing and correspondingnumber of <strong>Onix</strong> Clamps.Each <strong>Onix</strong> TorqueTite clamp willExterior Wallrequire an in.-lb. torque wrench,while the SelfTite clamps need apair of SqueezeTite Pliers. Seemanifold assembly section formore details. The number of <strong>Onix</strong>coils on the jobsite should correspondto the number listed in theZone List report.3. Manifolds.Only use Watts Radiant manifoldsor Watts Radiant manifold componentsfor field-constructed manifolds.4. Unwinder.A required component for easilyunrolling each precut <strong>Onix</strong> coilwithout kinks and twists.5. Field Repair Kit.Each kit contains two barb-by-barbsplices and four <strong>Onix</strong> Clamps.6. Manifold Mounting Bracket.Brackets are used to temporarily orpermanently mount each manifoldpair to the floor or wall.Exterior Wall7. Watts Radiant staple gun, staplesand NailTites .8. Pressure test kit.Each manifold pair must bepressure tested. This helps ensureeach <strong>Onix</strong> connection has been performedcorrectly and to make sureno additional damage has beendone to the tubing during installation.9. Chalk line.10.Angle drill with 1-3/4" holesawbit.11.T-Square and marker.FastenersAlthough the Watts Radiant staple gunwill be the most used attachment tool,other fasteners are available for thoseareas where the staple gun can notreach. Watts Radiant s NailTites areused to secure all types of <strong>Onix</strong> atturns and bends and in areas inaccessibleto the staple gun. Both staples andNailTites must be installed every6"—8" along each run of <strong>Onix</strong> toensure consistent contact.Watts Radiant Staple-GunThe Watts Radiant staple gun is apneumatic (air powered) tool. To operatecorrectly, it requires an air compressorcapable of delivering 100 psiair. It is designed and sold only for thepurpose of installing Watts Radiant<strong>Onix</strong> tubing and must not be used forany other purpose. If the gun generatesmultiple punctures or misfires, the gunmay be faulty. Always repair a puncturewith an approved Watts Radiantrepair kit and have the gun repaired assoon as possible.Supply ManifoldReturn ManifoldTypical <strong>Onix</strong> banding at exterior walls.General Caution: Do not operatethis tool before reading the followingcautions and instructions. Misuse ofthis tool can cause serious injury. Ifunclear about its proper use, pleasecall 1-800-276-2419 for furtherinstructions.page 18Watts Radiant: <strong>Onix</strong> <strong>Installation</strong> <strong>Manual</strong>
1. This tool may discharge when airpressure is connected or disconnected.Make sure the tool isunloaded or pointed in a safe directionbefore connecting/disconnectinga pressure hose.2. Remember, any pneumatic staplegun is exactly that, a gun. Each staplegun has the ability to shoot staplesat a velocity sufficient to killor permanently injure anyonewithin range. Never point this toolat anything except a piece of <strong>Onix</strong>intending to be permanently fastened.Never squeeze the triggerwhen your finger, hand or anybody part is in front of or close tothe firing head.3. Always wear safety glasses withside shields before operating thistool. Other workmen or visitors tothe jobsite must wear adequate eyeprotection if they are within rangeof the tool. There is always a possibilitythat a staple could ricochetoff a nail or knot in the subfloorand injure a bystander. DO NOTattempt to staple into knots, even ifthe staple spacing needs to beextended. Never attempt to stapleinto concrete, metal, or any nonwoodensurface.4. Use the correct staple gun andquality Watts Radiant staples toprevent tool jamming and <strong>Onix</strong>punctures. Watts Radiant staplesare designed to a higher standardthan conventional staples.Occasionally a staple will misfireand puncture the <strong>Onix</strong> when thestaple clip is down to the last 5 to10 staples. Always check to see ifthe clip is getting low and insert anew clip to avoid this potentialproblem.Using the <strong>Onix</strong> Staple GunThe <strong>Onix</strong> staple gun is specially modifiedboth internally and externally byWatts Radiant. The <strong>Onix</strong> staple gun isfitted with a stainless steel guide plate(order 81005498) that is bolted to theunderside of the gun. If stapling 3/8"<strong>Onix</strong>, make sure the smaller 3/8"opening is at the front of the gun. Youshould see 3/8" <strong>Onix</strong> stamped on theguide plate at the front of the gun. Ifstapling 1/2" <strong>Onix</strong>, unbolt the guideplate and turn it around so the larger1/2" opening is at the front of thestaple gun. You should see 1/2"<strong>Onix</strong> stamped on the guide plate atthe front of the gun.To staple <strong>Onix</strong>, position the guideplate over the <strong>Onix</strong>. Make sure theguide plate, at both front and back, isplaced firmly against the surface.Before pulling the trigger, make surethat the tail end of the guide plate isalso centered over the <strong>Onix</strong>. If the tailof the guide plate is not centered overthe tubing, some of the staples maypuncture the <strong>Onix</strong>. When the guideplate has completely contacted theplywood and is centered over the<strong>Onix</strong> tubing, pull the trigger and firethe staple.To maintain good operation of thegun, 3 to 4 drops of pneumatic oil(5-weight, non-detergent machine oil)should be installed once daily duringuse into the air inlet of the staple gun.More oil drops may be used if the gunsees continuous heavy service, i.e.,more than 3–4 hours at a time.Staple-Up2. Do not install <strong>Onix</strong>, or any otherradiant system under floors containingan asphalt paper slip jointbetween the subfloor and finishedfloor, as an unpleasant smell mayresult.<strong>Installation</strong> Steps<strong>Installation</strong> procedures will changefrom job to job and are affected byhow the structure is built. Joist spacing,bracing and zoning details are justa few items that can affect how aStaple-Up is installed. The followingguidelines and examples cover themost common installation conditions.If unexpected circumstances arise,please contact Watts Radiant or aWatts Radiant Representative for assistance.The most common installation patternused in a Staple-Up application is asingle serpentine layout. Other layoutmethods, such as counter flow, can beused, depending on the project requirements.Step 1:Install ManifoldsWith the use of Watts Radiant s manifoldbrackets or manifold mountingenclosure, secure the manifolds to thejoist or wall enclosure. If the manifoldsare located in the wall above theradiant floor, drill holes to transfer<strong>Onix</strong> through the subfloor and into thejoist cavity below. If the manifolds arelocated in the joist bay, simply attachthe manifolds to the side of a joist orinstall a manifold enclosure horizontallyto the joist. Follow local codeguidelines when penetrating any framingmembers.<strong>Onix</strong> Cautions<strong>Onix</strong> Staple Plate1. Examine each <strong>Onix</strong> circuit after ithas been stapled in place. If the<strong>Onix</strong> has been over-compressed bya staple, remove the staple andapply a new one. The staple canacceptably deform the <strong>Onix</strong> slightly,1/16" or less, without causingany difficulties.<strong>Onix</strong>Good Staple<strong>Onix</strong> deformedtoo much.Watts Radiant: <strong>Onix</strong> <strong>Installation</strong> <strong>Manual</strong> page 19