Onix Installation Manual.qxd - Affordable Home Inspections
Onix Installation Manual.qxd - Affordable Home Inspections
Onix Installation Manual.qxd - Affordable Home Inspections
- No tags were found...

Create successful ePaper yourself
Turn your PDF publications into a flip-book with our unique Google optimized e-Paper software.
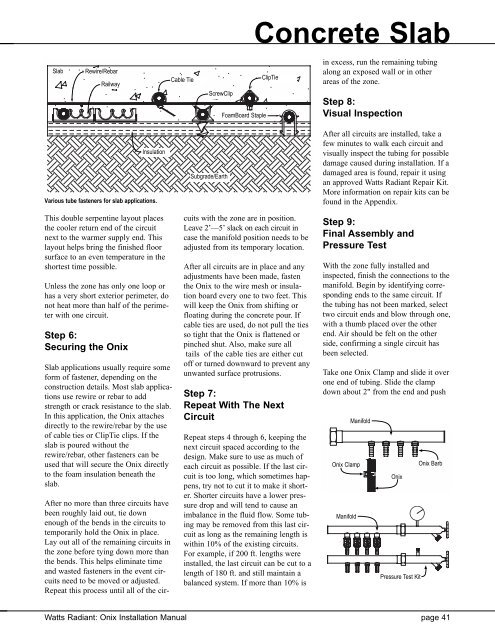
Concrete SlabSlabRewire/RebarRailwayCable TieScrewClipFoamBoard StapleClipTiein excess, run the remaining tubingalong an exposed wall or in otherareas of the zone.Step 8:Visual InspectionThis double serpentine layout placesthe cooler return end of the circuitnext to the warmer supply end. Thislayout helps bring the finished floorsurface to an even temperature in theshortest time possible.Unless the zone has only one loop orhas a very short exterior perimeter, donot heat more than half of the perimeterwith one circuit.Step 6:Securing the <strong>Onix</strong>InsulationVarious tube fasteners for slab applications.Slab applications usually require someform of fastener, depending on theconstruction details. Most slab applicationsuse rewire or rebar to addstrength or crack resistance to the slab.In this application, the <strong>Onix</strong> attachesdirectly to the rewire/rebar by the useof cable ties or ClipTie clips. If theslab is poured without therewire/rebar, other fasteners can beused that will secure the <strong>Onix</strong> directlyto the foam insulation beneath theslab.Subgrade/EarthAfter no more than three circuits havebeen roughly laid out, tie downenough of the bends in the circuits totemporarily hold the <strong>Onix</strong> in place.Lay out all of the remaining circuits inthe zone before tying down more thanthe bends. This helps eliminate timeand wasted fasteners in the event circuitsneed to be moved or adjusted.Repeat this process until all of the circuitswith the zone are in position.Leave 2’—5’ slack on each circuit incase the manifold position needs to beadjusted from its temporary location.After all circuits are in place and anyadjustments have been made, fastenthe <strong>Onix</strong> to the wire mesh or insulationboard every one to two feet. Thiswill keep the <strong>Onix</strong> from shifting orfloating during the concrete pour. Ifcable ties are used, do not pull the tiesso tight that the <strong>Onix</strong> is flattened orpinched shut. Also, make sure alltails of the cable ties are either cutoff or turned downward to prevent anyunwanted surface protrusions.Step 7:Repeat With The NextCircuitRepeat steps 4 through 6, keeping thenext circuit spaced according to thedesign. Make sure to use as much ofeach circuit as possible. If the last circuitis too long, which sometimes happens,try not to cut it to make it shorter.Shorter circuits have a lower pressuredrop and will tend to cause animbalance in the fluid flow. Some tubingmay be removed from this last circuitas long as the remaining length iswithin 10% of the existing circuits.For example, if 200 ft. lengths wereinstalled, the last circuit can be cut to alength of 180 ft. and still maintain abalanced system. If more than 10% isAfter all circuits are installed, take afew minutes to walk each circuit andvisually inspect the tubing for possibledamage caused during installation. If adamaged area is found, repair it usingan approved Watts Radiant Repair Kit.More information on repair kits can befound in the Appendix.Step 9:Final Assembly andPressure TestWith the zone fully installed andinspected, finish the connections to themanifold. Begin by identifying correspondingends to the same circuit. Ifthe tubing has not been marked, selecttwo circuit ends and blow through one,with a thumb placed over the otherend. Air should be felt on the otherside, confirming a single circuit hasbeen selected.Take one <strong>Onix</strong> Clamp and slide it overone end of tubing. Slide the clampdown about 2" from the end and push<strong>Onix</strong> ClampManifoldManifold<strong>Onix</strong>Pressure Test Kit<strong>Onix</strong> BarbWatts Radiant: <strong>Onix</strong> <strong>Installation</strong> <strong>Manual</strong> page 41