Onix Installation Manual.qxd - Affordable Home Inspections
Onix Installation Manual.qxd - Affordable Home Inspections
Onix Installation Manual.qxd - Affordable Home Inspections
- No tags were found...

You also want an ePaper? Increase the reach of your titles
YUMPU automatically turns print PDFs into web optimized ePapers that Google loves.
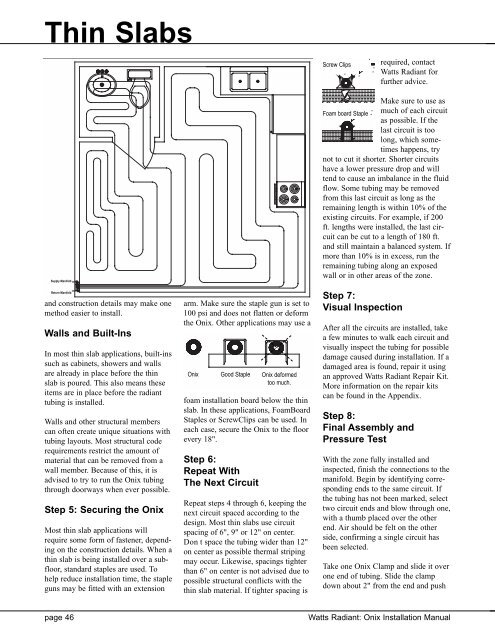
Thin SlabsScrew Clipsrequired, contactWatts Radiant forfurther advice.Supply ManifoldReturnReturn ManifManifoldifoldand construction details may make onemethod easier to install.Walls and Built-InsIn most thin slab applications, built-inssuch as cabinets, showers and wallsare already in place before the thinslab is poured. This also means theseitems are in place before the radianttubing is installed.Walls and other structural memberscan often create unique situations withtubing layouts. Most structural coderequirements restrict the amount ofmaterial that can be removed from awall member. Because of this, it isadvised to try to run the <strong>Onix</strong> tubingthrough doorways when ever possible.Step 5: Securing the <strong>Onix</strong>Most thin slab applications willrequire some form of fastener, dependingon the construction details. When athin slab is being installed over a subfloor,standard staples are used. Tohelp reduce installation time, the stapleguns may be fitted with an extensionarm. Make sure the staple gun is set to100 psi and does not flatten or deformthe <strong>Onix</strong>. Other applications may use a<strong>Onix</strong>Good Staplefoam installation board below the thinslab. In these applications, FoamBoardStaples or ScrewClips can be used. Ineach case, secure the <strong>Onix</strong> to the floorevery 18".Step 6:Repeat WithThe Next Circuit<strong>Onix</strong> deformedtoo much.Repeat steps 4 through 6, keeping thenext circuit spaced according to thedesign. Most thin slabs use circuitspacing of 6", 9" or 12" on center.Don t space the tubing wider than 12"on center as possible thermal stripingmay occur. Likewise, spacings tighterthan 6" on center is not advised due topossible structural conflicts with thethin slab material. If tighter spacing isMake sure to use asFoam board Staple much of each circuitas possible. If thelast circuit is toolong, which sometimeshappens, trynot to cut it shorter. Shorter circuitshave a lower pressure drop and willtend to cause an imbalance in the fluidflow. Some tubing may be removedfrom this last circuit as long as theremaining length is within 10% of theexisting circuits. For example, if 200ft. lengths were installed, the last circuitcan be cut to a length of 180 ft.and still maintain a balanced system. Ifmore than 10% is in excess, run theremaining tubing along an exposedwall or in other areas of the zone.Step 7:Visual InspectionAfter all the circuits are installed, takea few minutes to walk each circuit andvisually inspect the tubing for possibledamage caused during installation. If adamaged area is found, repair it usingan approved Watts Radiant Repair Kit.More information on the repair kitscan be found in the Appendix.Step 8:Final Assembly andPressure TestWith the zone fully installed andinspected, finish the connections to themanifold. Begin by identifying correspondingends to the same circuit. Ifthe tubing has not been marked, selecttwo circuit ends and blow through one,with a thumb placed over the otherend. Air should be felt on the otherside, confirming a single circuit hasbeen selected.Take one <strong>Onix</strong> Clamp and slide it overone end of tubing. Slide the clampdown about 2" from the end and pushpage 46Watts Radiant: <strong>Onix</strong> <strong>Installation</strong> <strong>Manual</strong>