Onix Installation Manual.qxd - Affordable Home Inspections
Onix Installation Manual.qxd - Affordable Home Inspections
Onix Installation Manual.qxd - Affordable Home Inspections
- No tags were found...

Create successful ePaper yourself
Turn your PDF publications into a flip-book with our unique Google optimized e-Paper software.
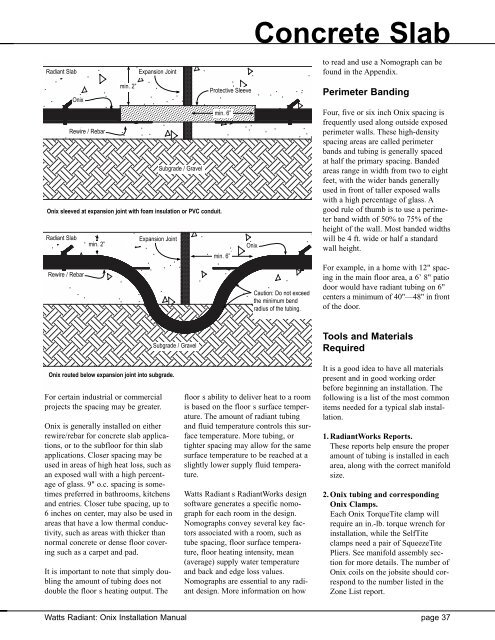
Radiant SlabExpansion JointConcrete Slabto read and use a Nomograph can befound in the Appendix.Radiant Slab<strong>Onix</strong>Rewire / RebarSubgrade / Gravel<strong>Onix</strong> sleeved at expansion joint with foam insulation or PVC conduit.Rewire / Rebarmin. 2”min. 2”Expansion JointProtective Sleevemin. 6”min. 6”<strong>Onix</strong>Caution: Do not exceedthe minimum bendradius of the tubing.Perimeter BandingFour, five or six inch <strong>Onix</strong> spacing isfrequently used along outside exposedperimeter walls. These high-densityspacing areas are called perimeterbands and tubing is generally spacedat half the primary spacing. Bandedareas range in width from two to eightfeet, with the wider bands generallyused in front of taller exposed wallswith a high percentage of glass. Agood rule of thumb is to use a perimeterband width of 50% to 75% of theheight of the wall. Most banded widthswill be 4 ft. wide or half a standardwall height.For example, in a home with 12" spacingin the main floor area, a 6’ 8" patiodoor would have radiant tubing on 6"centers a minimum of 40"—48" in frontof the door.Subgrade / GravelTools and MaterialsRequired<strong>Onix</strong> routed below expansion joint into subgrade.For certain industrial or commercialprojects the spacing may be greater.<strong>Onix</strong> is generally installed on eitherrewire/rebar for concrete slab applications,or to the subfloor for thin slabapplications. Closer spacing may beused in areas of high heat loss, such asan exposed wall with a high percentageof glass. 9" o.c. spacing is sometimespreferred in bathrooms, kitchensand entries. Closer tube spacing, up to6 inches on center, may also be used inareas that have a low thermal conductivity,such as areas with thicker thannormal concrete or dense floor coveringsuch as a carpet and pad.It is important to note that simply doublingthe amount of tubing does notdouble the floor s heating output. Thefloor s ability to deliver heat to a roomis based on the floor s surface temperature.The amount of radiant tubingand fluid temperature controls this surfacetemperature. More tubing, ortighter spacing may allow for the samesurface temperature to be reached at aslightly lower supply fluid temperature.Watts Radiant s RadiantWorks designsoftware generates a specific nomographfor each room in the design.Nomographs convey several key factorsassociated with a room, such astube spacing, floor surface temperature,floor heating intensity, mean(average) supply water temperatureand back and edge loss values.Nomographs are essential to any radiantdesign. More information on howIt is a good idea to have all materialspresent and in good working orderbefore beginning an installation. Thefollowing is a list of the most commonitems needed for a typical slab installation.1. RadiantWorks Reports.These reports help ensure the properamount of tubing is installed in eacharea, along with the correct manifoldsize.2. <strong>Onix</strong> tubing and corresponding<strong>Onix</strong> Clamps.Each <strong>Onix</strong> TorqueTite clamp willrequire an in.-lb. torque wrench forinstallation, while the SelfTiteclamps need a pair of SqueezeTitePliers. See manifold assembly sectionfor more details. The number of<strong>Onix</strong> coils on the jobsite should correspondto the number listed in theZone List report.Watts Radiant: <strong>Onix</strong> <strong>Installation</strong> <strong>Manual</strong> page 37