Onix Installation Manual.qxd - Affordable Home Inspections
Onix Installation Manual.qxd - Affordable Home Inspections
Onix Installation Manual.qxd - Affordable Home Inspections
- No tags were found...

You also want an ePaper? Increase the reach of your titles
YUMPU automatically turns print PDFs into web optimized ePapers that Google loves.
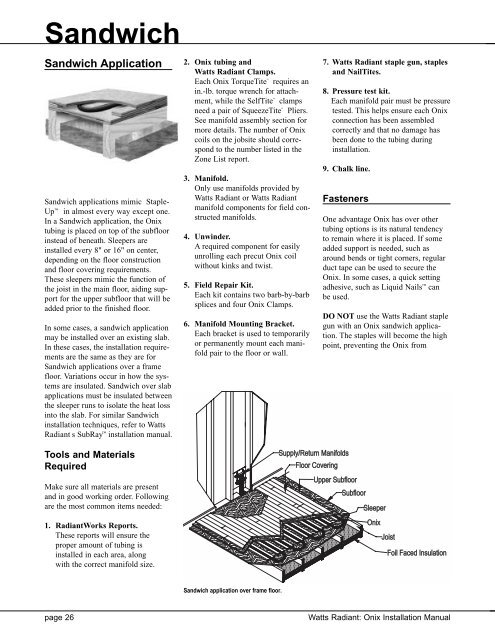
SandwichSandwich ApplicationSandwich applications mimic Staple-Up in almost every way except one.In a Sandwich application, the <strong>Onix</strong>tubing is placed on top of the subfloorinstead of beneath. Sleepers areinstalled every 8" or 16" on center,depending on the floor constructionand floor covering requirements.These sleepers mimic the function ofthe joist in the main floor, aiding supportfor the upper subfloor that will beadded prior to the finished floor.In some cases, a sandwich applicationmay be installed over an existing slab.In these cases, the installation requirementsare the same as they are forSandwich applications over a framefloor. Variations occur in how the systemsare insulated. Sandwich over slabapplications must be insulated betweenthe sleeper runs to isolate the heat lossinto the slab. For similar Sandwichinstallation techniques, refer to WattsRadiant s SubRay installation manual.2. <strong>Onix</strong> tubing andWatts Radiant Clamps.Each <strong>Onix</strong> TorqueTite “ requires anin.-lb. torque wrench for attachment,while the SelfTite “ clampsneed a pair of SqueezeTite “ Pliers.See manifold assembly section formore details. The number of <strong>Onix</strong>coils on the jobsite should correspondto the number listed in theZone List report.3. Manifold.Only use manifolds provided byWatts Radiant or Watts Radiantmanifold components for field constructedmanifolds.4. Unwinder.A required component for easilyunrolling each precut <strong>Onix</strong> coilwithout kinks and twist.5. Field Repair Kit.Each kit contains two barb-by-barbsplices and four <strong>Onix</strong> Clamps.6. Manifold Mounting Bracket.Each bracket is used to temporarilyor permanently mount each manifoldpair to the floor or wall.7. Watts Radiant staple gun, staplesand NailTites.8. Pressure test kit.Each manifold pair must be pressuretested. This helps ensure each <strong>Onix</strong>connection has been assembledcorrectly and that no damage hasbeen done to the tubing duringinstallation.9. Chalk line.FastenersOne advantage <strong>Onix</strong> has over othertubing options is its natural tendencyto remain where it is placed. If someadded support is needed, such asaround bends or tight corners, regularduct tape can be used to secure the<strong>Onix</strong>. In some cases, a quick settingadhesive, such as Liquid Nails canbe used.DO NOT use the Watts Radiant staplegun with an <strong>Onix</strong> sandwich application.The staples will become the highpoint, preventing the <strong>Onix</strong> fromTools and MaterialsRequiredMake sure all materials are presentand in good working order. Followingare the most common items needed:1. RadiantWorks Reports.These reports will ensure theproper amount of tubing isinstalled in each area, alongwith the correct manifold size.Supply/Return ManifoldsFlooror CoveringUpperSubfloorSubfloorSleeperer<strong>Onix</strong>JoistFoilFaced InsulationSandwich application over frame floor.page 26Watts Radiant: <strong>Onix</strong> <strong>Installation</strong> <strong>Manual</strong>