

BooTENDS TnRoITIoNAL SuurTERs STEp TooI Box ... - Wood Tools
BooTENDS TnRoITIoNAL SuurTERs STEp TooI Box ... - Wood Tools
BooTENDS TnRoITIoNAL SuurTERs STEp TooI Box ... - Wood Tools
- No tags were found...

Create successful ePaper yourself
Turn your PDF publications into a flip-book with our unique Google optimized e-Paper software.
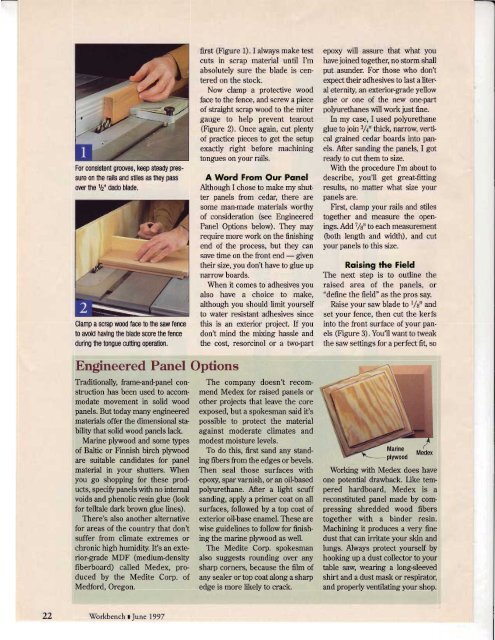
For consistent grooves, keep steady pressureon the rails and stiles as they passover the 1/2" dado blade,Clamp a scrap wood face to the saw fenceto avoid having the blade score the fenceduring the tongue cutting operation.first (Figure 1). I always make testcuts in scrap material until I'mabsolutely sure the blade is centeredon the stock.Now clamp a protective woodface to the fence, and screw a pieceof straight scrap wood to the mitergauge to help prevent tearoutFigure 2). Once again, cut plentyof practice pieces to get the setupexactly right before machiningtongues on your rails.A Word From Our PonelAlthough I chose to make my shutterpanels from cedar, there aresome man-made materials worthyof consideration (see EngineeredPanel Options below). They mayrequire more work on the finishingend of the process, but they cansave time on the front end - giventheir size, you don't have to glue upnarrow boards.When it comes to adhesives youalso have a choice to make,although you should limit yourselfto water resistant adhesive sincethis is an exterior project. If youdon't mind the mixing hassle andthe cost, resorcinol or a two-partepoxy will assure that what youhave joined together, no storm shallput asunder. For those who don'texpect their adhesives to last a literaleternity, an exterior-grade yellowglue or one of the new onepartpollurethanes will work just fine.In my case, I used polyurethaneglue to join 3hil thick, narrow, verticalgrained cedar boards into panels.After sanding the panels, I gotready to cut them to size.With the procedure I'm about todescribe, you'll get great-fittingresults, no matter what size yourpanels are.First, clamp your rails and stilestogether and measure the openings.Add 7/attto eachmeasurement(both length and width), and cutyour panels to this size.R.oising rhe FieldThe next step is to outline theraised area of the panels, or"define the field" as the pros say.Raise your saw blade to 1/arr andset your fence, then cut the kerfsinto the front surface of your panels(Figure 3). You'll want to tweakthe saw settings for a perfect fit, soEngineered Panel OptionsTraditionally, frameand-panel constructionhas been used to accommodatemovement in solid woodpanels. But today many engineeredmaterials offer the dimensional stabilitythat solid wood panels lack.Marine plywood and some typesof Baltic or Finnish birch plywoodare suitable candidates for panelmaterial in your shutters. Whenyou go shopping for these products,specifr panels with no internalvoids and phenolic resin glue (ookfor telltale dark brown glue lines).There's also another alternativefor areas of the country that don'tsuffer from climate extremes orchronic high humidity. It's an exterior-gradeMDF (medium-densityfiberboard) called Medex, producedby the Medite Corp. ofMedford, Oregon.The company doesn't recommendMedex for raised panels orother projects that leave the coreexposed, but a spokesman said it'spossible to protect the materialagainst moderate climates andmodest moisture levels-To do this, first sand any standingfibers from the edges or bevels.Then seal those surfaces withepoxy, spar varnish, or an oil-basedpolyurethane. After a light scuffsanding, apply a primer coat on allsurfaces, followed by a top coat ofexterior oil-bas enamel. These arewise guidelines to follow for finishingthe marine plywood as well.The Medite Corp. spokesmanalso suggests rounding over anysharp corners, because the film ofany sealer or top coat along a sharpedge is more likely to crack.Working with Medex does haveone potential drawback. Like temperedhardboard, Medex is areconstituted panel made by compressingshredded wood fiberstogether with a binder resin.Machining it produces a very finedust that can irritate your skin andlungs. Always protect yourself byhooking up a dust collector to yourtable saw, wearing a long-sleevedshirt and a dust mask or respirator,and properly ventilating your shop.22'Workbench t June 1997


![Til]tl](https://img.yumpu.com/45878240/1/190x245/tiltl.jpg?quality=85)


