

BooTENDS TnRoITIoNAL SuurTERs STEp TooI Box ... - Wood Tools
BooTENDS TnRoITIoNAL SuurTERs STEp TooI Box ... - Wood Tools
BooTENDS TnRoITIoNAL SuurTERs STEp TooI Box ... - Wood Tools
- No tags were found...

Create successful ePaper yourself
Turn your PDF publications into a flip-book with our unique Google optimized e-Paper software.
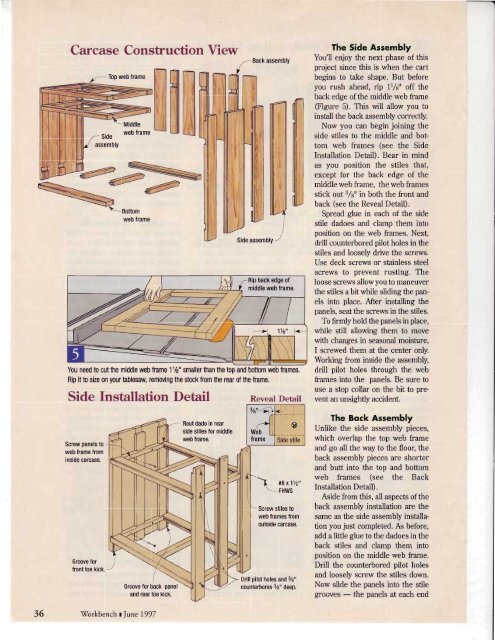
Carcase Conshuction ViewBack assemblyYou need to cut the middle web frame 11/e" smaller than the top and bottom web frames.Rip it to size on your tablesaw, removing the stock from the rear of the frame.Side Installation DetailScrew panels toweb trame trominside carcase.Groove fortrontoe kick.Groove for back paneland rear toe kick.- Rout dado in rearside stiles for middleweb frame.Rip back edge ofmiddle web frame.Reveal Detail\#8x1Y2". FHWS' Screw stiles toweb frames fromoutside carcase.Drill pilot holes and 3/a"counterbores 3/a" deep.The Side AssemblyYou'll enjoy the next phase of thisproject since this is when the cartbegins to take shape. But beforeyou rush ahead, rip ll,/sil off theback edge of the middle web frame(Figure 5). This will allow you toinstall the back assembly correctly.Now you can begin joining theside stiles to the middle and bottomweb frames (see the SideInstallation Detail). Bear in mindas you position the stiles that,except for the back edge of themiddle web frame, the web framesstick out :1,/s" in both the front andback (see the Reveal Detail).Spread glue in each of the sidestile dadoes and clamp them intoposition on the web frames. Next,drill counterbored pilot holes in thestiles and loosely drive the screws.Use deck screws or stainless steelscrews to prevent rusting. Theloose screws allow you to maneuverthe stiles a bit while sliding the panelsinto place. After installing thepanels, seat the screws in the stiles.To firmly hold the panels in place,while still allowing them to movewith changes in seasonal moisfure,I screwed them at the center only.Working from inside the assembly,drill pilot holes through the webframes into the panels. Be sure touse a stop collar on the bit to preventan unsightly accident.The Bock AssemblyUnlike the side assembly pieces,which overlap the top web frameand go all the way to the floor, theback assembly pieces are shorterand butt into the top and bottomweb frames (see the BackInstallation Detail).Aside from this, all aspects of theback assembly installation are thesame as the side assembly installationyou just completed. As before,add a little glue to the dadoes in theback stiles and clamp them intoposition on the middle web frame.Drill the counterbored pilot holesand loosely screw the stiles down.Now slide the panels into the stilegrooves - the panels at each end36Workbench t June 1997


![Til]tl](https://img.yumpu.com/45878240/1/190x245/tiltl.jpg?quality=85)


