

BooTENDS TnRoITIoNAL SuurTERs STEp TooI Box ... - Wood Tools
BooTENDS TnRoITIoNAL SuurTERs STEp TooI Box ... - Wood Tools
BooTENDS TnRoITIoNAL SuurTERs STEp TooI Box ... - Wood Tools
- No tags were found...

You also want an ePaper? Increase the reach of your titles
YUMPU automatically turns print PDFs into web optimized ePapers that Google loves.
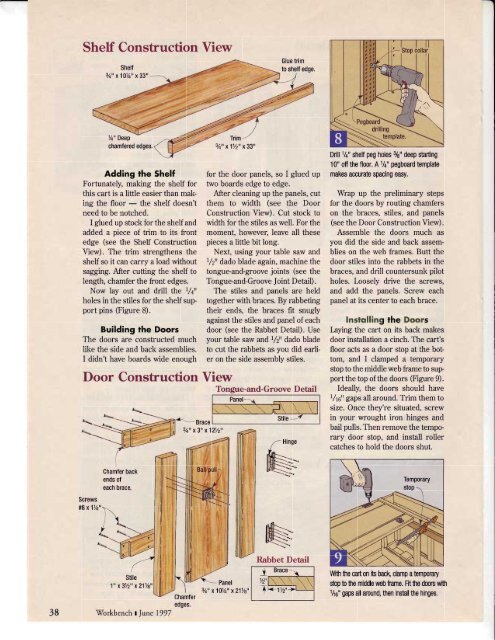
Shelf Conshuction ViewAdding rhe ShelfFortunately, making the shelf forthis cart is a little easier than makingthe floor - the shelf doesn'tneed to be notched.I glued up stock for the shelf andadded a piece of trim to its frontedge (see the Shelf ConstructionView). The trim strengthens theshelf so it can carry a load withoutsagging. After cutting the shelf tolength, chamfer the front edges.Now lay out and drill the 1/+rlholes in the stiles for the shelf suoportpins (Figure 8).Building the DoorsThe doors are constructed muchlike the side and back assemblies.I didn't have boards wide enoughDoor Construction ViewIrim/34" x1/2" x33"for the door panels, so I glued uptwo boards edge to edge.After cleaning up the panels, cutthem to width (see the DoorConstruction View). Cut stock towidth for the stiles as well. For themoment, however, leave all thesepieces a little bit long.Next, using your table saw andr/zt' dado blade again, machine thetongue-and-groove joints (see theTongue-and-Groove Joint Detail).The stiles and panels are heldtogether with braces. By rabbetingtheir ends, the braces fit snuglyagainst the stiles and panel of eachdoor (see the Rabbet Detail). Useyour table saw and 1/zrr dado bladeto cut the rabbets as you did earlieron the side assembly stiles.Tongue-and-Groove DetailPanelStileNDrill 1/c" shelf peg holes 3/6" deep starting10" off the floor, A 1/+" pegboard templatemakes accurate spacing easy.Wrap up the preliminary stepsfor the doors by routing chamferson the braces, stiles, and panels(see the Door Construction View).Assemble the doors much asyou did the side and back assemblieson the web frames. Butt thedoor stiles into the rabbets in thebraces, and drill countersunk pilotholes. I-oosely drive the screws,and add the panels. Screw eachpanel at its center to each brace.Insrolling the DoorsI-aying the cart on its back makesdoor installation a cinch. The cart'sfloor acts as a door stop at the bottom,and I clamped a temporarystop to the middle web frame to support the top of the doors (Figure 9).Ideally, the doors should haverAo" gaps all around. Trim them tosize. Once they're situated, screwin your wrought iron hinges andbail pulls. Then remove the temporarydoor stop, and install rollercatches to hold the doors shut.IY2"I4-rA-'Wfi fie cart on ib bac( clamp a temporarys'top b fie middle web frame. Fit fie doors witrr/ro" gaps all around, hen inshll fie hinges.38\Workbench t lune 1997


![Til]tl](https://img.yumpu.com/45878240/1/190x245/tiltl.jpg?quality=85)


