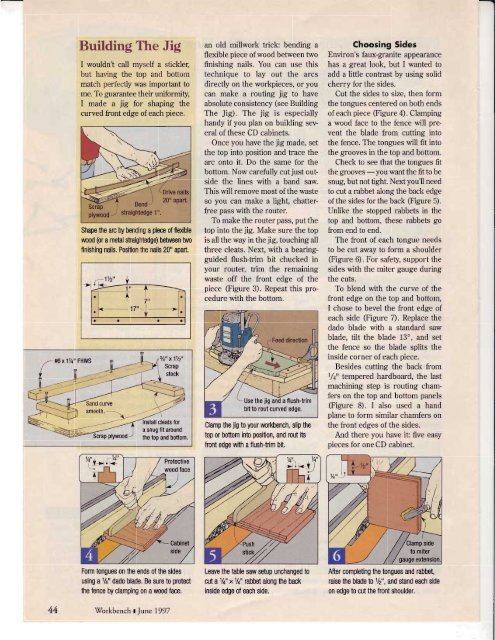
Building The JigI wouldn't call myself a stickler,but having the top and bottommatch perfectly was important tome. Tb guarantee their uniformity,I made a jig for shaping thecurved front edge of each piece.#6 x 17+" FHWSShape the arc by bending a piece of flexiblewood (or a mehl straightedge) between twofinishing nails. Position the nails 20" apart.an old millwork trick: bending aflexible piece of wood between twofinishing nails. You can use thistechnique to lay out the arcsdirectly on the workpieces, or youcan make a routing jig to haveabsolute consistency (see BuildingThe Jig). The jig is especiallyhandy if you plan on building severalofthese CD cabinets.Once you have the jig made, setthe top into position and trace thearc onto it. Do the same for thebottom. Now carefully cut just outsidethe lines with a band saw.This will remove most of the wasteso you can make a light, chatterfreepass with the router.To make the router pass, put thetop into the jig. Make sure the topis all the way in the jig, touching allthree cleats. Next, with a bearingguidedflush-trim bit chucked inyour router, trim the remainingwaste off the front edge of thepiece (Figure 3). Repeathis procedurewith the bottom.Clamp the jig to your workbench, slip thetop or bottom into position, and rout itsfront edge with a flush-trim bit,Choosing SidesEnviron's faux-granite appearancehas a great look, but I wanted toadd a little contrast by using solidcherry for the sides.Cut the sides to size, then formthe tongues centered on both endsof each piece (Figure 4). Clampinga wood face to the fence will preventthe blade from cutting intothe fence. The tongues will fit intothe grooves in the top and bottom.Check to see that the tongues fitthe grooves - you want the fit to besnug, but not tight. Next you'll needto cut a rabbet along the back edgeof the sides for the back (Figure 5).Unlike the stopped rabbets in thetop and bottom, these rabbets gofrom end to end.The front of each tongue needsto be cut away to form a shoulder(Figure 6). For safety, support thesides with the miter gauge duringthe cuts.To blend with the curve of thefront edge on the top and bottom,I chose to bevel the front edge ofeach side (Figure 7). Replace thedado blade with a standard sawblade, tilt the blade 13o, and setthe fence so the blade splits theinside corner of each piece.Besides cutting the back fromI/+rr tempered hardboard, the lastmachining step is routing chamferson the top and bottom panels(Figure 8). I also used a handplane to form similar chamfers onthe front edges ofthe sides.And there you have il five easypieces for one CD cabinet.Form tonguesthe ends of the sidesusing a 1/4" dado blade. Be sure to protectthe fence by clamping on a wood face.Leave the table saw setup unchanged to,,1xtlo" x1la" nabbet along the backinsidedge of each side.After completing the tongues and rabbet,raise the blade to 1/2", and stand each sideon edge to cuthe front shoulder.44W'orkbench t June 1997
Gefting to the FinishNormally, at this stage of the gameI'd be ready to glue everything up,then apply the finish. FinishingEnviron, however, takes some exfracare, so I recommend finishing thepieces for the CD cabinet separately before gluing them together.Like many composite panels,Environ is more porous than mostsolid woods, especially at itsedges. This makes it harder to geta good build up with a top coat.Most common finishes will soak inand leave a low sheen surface.Since I wanted a high gloss finishthat makes the material look likepolished granite, I had to jumpthrough a few hoops (seeFinishing Secrets For Environ).I finished the cherry sides with acoat of cherry oil stain, then severalcoats of General Finishes wipingvarnish. The hardboard back gottwo coats of flat black paint.Finol AssemblyOnce all the finish had thoroughlycured, I checked to see that none ofit had dried on any of the gluingsurfaces, like the tongue-andgroovejoints and the rabbetjoints.For the front edge of the sides to match thecurved top and bottom, rip a 13" bevel withthe blade splitting the inside corner.Finishing Secrets For EnvironThe secret to getting a shiny high mends calling them for the namegloss finish on Environ, according of a dealer near you. I usedto Bob Smith at Phenix Sadoplast on the Environ for theBiocomposites, is a high-solids CD cabinet and the Bookends. Butvarnish. Bob uses a high-solids I frankly don't think I would useacrylic finish that's roll-coated on this product again. I don't thinkand cured with ultraviolet light. that this finish built up much fasterWhile thats fine for a big professionalthan standard finishes to warrantshop, it's not a very its high price plus the hassle ofgood solution for small-time users mixing the catalystlike me and you. For a price, If you're not after a high glossPhenix can supply Environ with look for your projecl you can stickthe acrylic finish already applied to using conventional finishingto the face. Of course, you'll still products. Standard varnish orhave to deal with the edges. But polyurethane will work finethey also suggested a couple on Environ, but you willother solutions.need to apply five or six,-r.coats. Environ is so T:-polyurethane product with 657r porous that it soaks upI experimented with a two partsolids called "Sadoplasl" It's made the first few coats ofby Chemcraft International finish as fast as you can(800) 724-6839. Chemcraft recom-brush them on.Chuck a 45o chamfering bit in youroutertable and chamfer the front edges and bothends of the top and bottom panels.I did pause here, thinking this was you pre-finish the cabinet parts likea little baclcward - usually I'm I did, you'll want to take extra carescouting for excess glue that will when clamping the pieces together.I used scraps of soft cloth underinterfere with my finish.After cleaning up a few spots, I wood clamp pads, and clamped theset about assembling the cabinet. pieces with only light pressure.Yellow (aliphatic resin) glue performsfairly well on Environ, but while the glue dries is easy if youHolding the back in the rabbetsthe manufacturer recommends drive a few brads - screws wouldusing one-part polyurethane adhesivesto get the best results. mount the cabineto a wall.be a better idea if you plan toPolyurethane adhesives form a For now, a pair of these cabinetshard, stable glue line, and they has solved my CD storage problems.But I just got a notice in theexpand as they cure, filling poresin the material. You'll have to allow mail offering me 10 CDs for aa little more clamping time than penny, so I don't think my victorywith yellow glue, though. And, if over clutter will last long. tffiWhatever finish you choose,apply an equal number of coatson all surfaces.Otherwise, warpingmay occur, givingyour cabinet someunwanted curves.


![Til]tl](https://img.yumpu.com/45878240/1/190x245/tiltl.jpg?quality=85)


