

BooTENDS TnRoITIoNAL SuurTERs STEp TooI Box ... - Wood Tools
BooTENDS TnRoITIoNAL SuurTERs STEp TooI Box ... - Wood Tools
BooTENDS TnRoITIoNAL SuurTERs STEp TooI Box ... - Wood Tools
- No tags were found...

You also want an ePaper? Increase the reach of your titles
YUMPU automatically turns print PDFs into web optimized ePapers that Google loves.
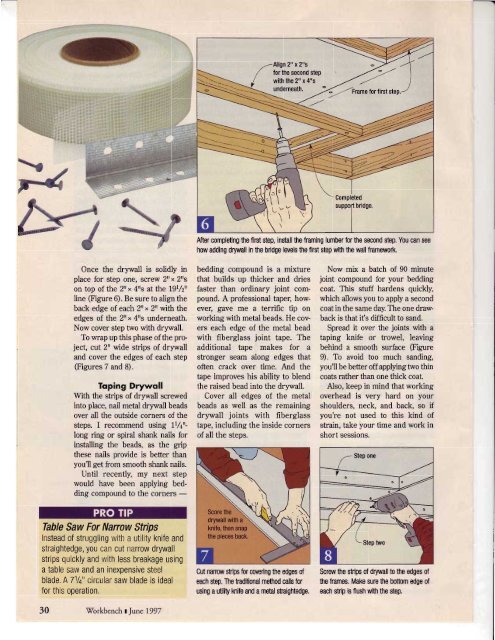
NAlign 2" x 2"sfor the second stepwith the 2" x 4"sunderneath. =>4ryvOnce the drwvall is solidly inplace for step one, screw 2rr x 2rrson top of the 2'r x 4rrs at the !9r/ztlline (Figure 6). Be sure to align theback edge of each 2rr x 2rr with theedges of the 2rr' 4rrs underneath.Now cover step two with drywall.To wrap up this phase of the project,cut 2rr wide strips of drywalland cover the edges of each step(Figures 7 and 8).Toping DrywollWith the strips of drywall screwedinto place, nail metal dryrvall beadsover all the outside corners of thesteps, I recommend using 1t/4ttlongring or spiral shank nails forinstalling the beads, as the gripthese nails provide is better thanyou'll get from smooth shank nails.Until recently, my next stepwould have been applying beddingcompound to the corners -/:;4After completing the first step, install the framing lumber for the second step. You can seehow adding drywall in the bridge levels the first step with the wall framework.bedding compound is a mixturethat builds up thicker and driesfaster than ordinary joint compound.A professional taper, however,gave me a terrific tip onworking with metal beads. He coverseach edge of the metal beadwith fiberglass joint tape. Theadditional tape makes for astronger seam along edges thatoften crack over time. And thetape improves his ability to blendthe raised bead into the drywall.Cover all edges of the metalbeads as well as the remainingdrywall joints with fiberglasstape, including the inside cornersof all the steps.Now mix a batch of 90 minutejoint compound for your beddingcoat. This stuff hardens quickly,which allows you to apply a secondcoat in the same day. The one drawbackis that it's difficult to sand.Spread it over the joints with ataping knife or trowel, leavingbehind a smooth surface (Frgure9). To avoid too much sanding,you'll be better off applying two thincoats rather than one thick coat.Also, keep in mind that workingoverhead is very hard on yourshoulders, neck, and back, so ifyou're not used to this kind ofstrain, take your time and work inshort sessions.Table Saw For Narrow StripsInstead of struggling with a utility knife andstraightedge, you can cut narrow drywallstrips quickly and with less breakage usinga table saw and an inexoensive steelblade. A 71\q" circular saw blade is idealfor this operation.knife, then snapthe piooos bac*Cut nanow strips for covering the edges of Screw the strips of drywall to the edges ofeach step. The traditional method calls for the frames. Make sure the bottom edge ofusing a utility knife and a metal sfaightedge. each strip is flush with the step.30 \Torkbench tlune 1997


![Til]tl](https://img.yumpu.com/45878240/1/190x245/tiltl.jpg?quality=85)


