

BooTENDS TnRoITIoNAL SuurTERs STEp TooI Box ... - Wood Tools
BooTENDS TnRoITIoNAL SuurTERs STEp TooI Box ... - Wood Tools
BooTENDS TnRoITIoNAL SuurTERs STEp TooI Box ... - Wood Tools
- No tags were found...

You also want an ePaper? Increase the reach of your titles
YUMPU automatically turns print PDFs into web optimized ePapers that Google loves.
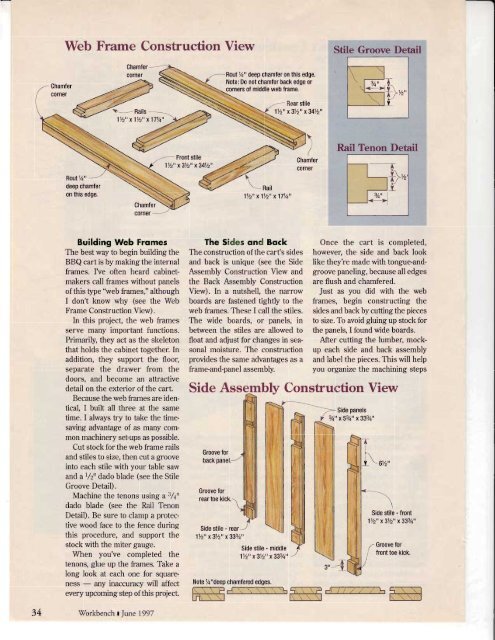
Web Frame Consfruction ViewStile Groove DetailChamferc0rner\- RailslY2" x1Y2" x17Y4"Rout 7+" deep chamfer on this edge.Note: Do not chamfer back edge orcorners of middle web frame.---'--- Rear stile1%" x3lz" x34lz"3A" t- -+1 V \,,,,-Tr"RouI%"deep chamferon this edge./- Frontstile1lz" x3lz" x34Vz"'lVz"x1/2" x17%"Rail Tenon DetailTY \ ,,-v" rY3/r"34Building Web FrqmesThe best way to begin building theBBQ cart is by making the internalframes. I've often heard cabinetmakerscall frames without panelsof this type "web frames," althoughI don't know why (see the WebFrame Construction View).In this project, the web framesserve many important functions.Primarily, they act as the skeletonthat holds the cabinet together. Inaddition, they support the floor,separate the drawer from thedoors, and become an attractivedetail on the exterior of the cart.Because the web frames are identical,I built all three at the sametime. I always try to take the timesavingadvantage of as many commonmachinery set-ups as possible.Cut stock for the web frame railsand stiles to size, then cut a grooveinto each stile with your table sawand ar/2" dado blade (see the StileGroove Detail).Machine the tenons using a 3/a"dado blade (see the Rail TenonDetail). Be sure to clamp a protectivewood face to the fence duringthis procedure, and support thestock with the miter gauge.When you've completed thetenons, glue up the frames. Take along look at each one for squareness- any inaccuracy will affectevery upcoming step of this project.'WorkbenchtJl.;ne 1997The Sides ond BockThe construction of the cart's sidesand back is unique (see the SideAssembly Construction View andthe Back Assembly ConstructionView). In a nutshell. the narrowboards are fastened tightly to theweb frames. These I call the stiles.The wide boards, or panels, inbetween the stiles are allowed tofloat and adjust for changes in seasonalmoisture. The constructionprovides the same advantages as aframe-and-panel assembly.Once the cart is completed,however, the side and back looklike they're made with tongue-andgroovepaneling, because all edgesare flush and chamfered.Just as you did with the webframes, begin constructing thesides and back by cutting the piecesto size. Tb avoid gluing up stock forthe panels, I found wide boards.After cutting the lumber, mockupeach side and back assemblyand label the pieces. This will helpyou organize the machining stepsSide Assemblv Consfruction ViewSide stile - rear1lz" x3lz" x333/q"Side stile - middle1lz" x3lz" x333/t" tNote 7+"deep chamfered edges.N.fl-i-="-\-'.-\\ NllSide Panels, 3/4" xS3/4" x333/4"Side stile - front1lz" x3Vz" x333/q"{177-r'7--7-}.N


![Til]tl](https://img.yumpu.com/45878240/1/190x245/tiltl.jpg?quality=85)


