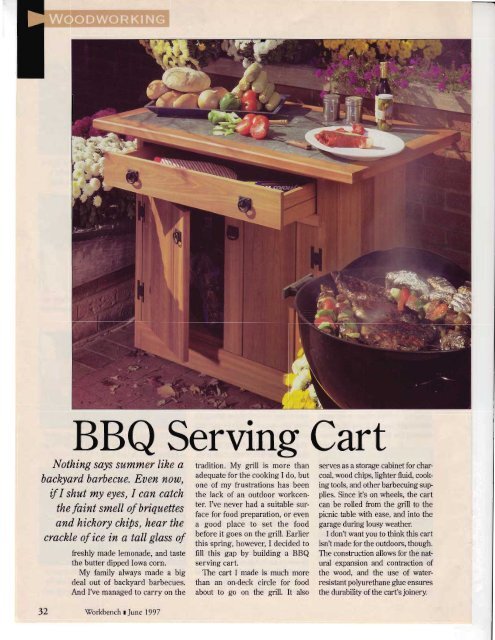
BBa Serving CartNothing sa,ysummer like abackyard barbecue. Euen nou),if I shut my eyes, I can catchthe faint smell of briquettesand hickory chips, hear thecrackle of ice in a tall glass offreshly made lemonade, and tastethe butter dipped Iowa corn.My family always made a bigdeal out of backyard barbecues.And IVe managed to carrY on the32 Workbench tJwe 1997tradition. My grill is more thanadequate for the cooking I do, butone of my frustrations has beenthe lack of an outdoor workcenter.I've never had a suitable surfacefor food preparation, or evena good place to set the foodbefore it goes on the grill. Earlierthis spring, however, I decided tofiIl this gap by buildins a BBQserving cart.The cart I made is much morethan an on-deck circle for foodabout to go on the grill. It alsoserves as a storage cabinet for charcoal,wood chips, lighter fluid, cookingtools, and otherbarbecuing suPplies. Since ifs on wheels, the cartcan be rolled from the grill to thepicnic table with ease, and into thegarage during lousy weather.I don'twantyou to think this cartisn't made for the outdoors, though.The construction allows for the naturalexpansion and contraction ofthe wood, and the use of waterresistantpo$urethane glue ensuresthe durability of the carfs joinery.
BBQ Serving Cart Construction View0VERALL SIZE: 303/e,, , 4gs7r,, x 36,,DrawerFor details, see theDrawer Construction,- View on page 39,Top webframeTile6"x6"Top assemblyBack assemblyFor details, see theFor details, see theTile Top Construction Viewon page 40. --.. Back Assembly ConstructionView on page 35. -.,Side assemblyFor details, see theSide Assembly ConstructionView on page 34.Middleweb frameFront toe kickDoorFor details, see theDoor Construction Viewon page 38.T \Screw#Bx1%"Cedar plugs3/a" dia. x3/a"Note: The wrought iron hardwareused in the BBQ Serving Cart can beordered from Crown City Hardware,1 -800-950-1 047.Hinges.. .......#988-FPulls.... ......#1022-lChoosing MqferiolsThe right glue and constructiontechniques will prolong the cart'slifespan, but selecting the properwood is just as important.During the early planning of thisproject, redwood was my wood ofchoice. After a call to a local lurnberyardfor pricing, I realized I hadbetter come up with a new firstchoice. Sticker shock led me to #2cedar. Although it is not as durableas redwood, Western Red Cedar isnaturally resistant to decay and canbe finished to look a lot like redwood.If left unfinished, the cedarwill age to an attractive grey color.Although #2 cedar contains knots, Ipurchased plenty of it/q,t and 2xlumber so that I could cut aroundthe worst of them. If you are evenmore pennlnvise than I am, you canbuild the cart using treated pine.I'm sure one feature caught youreye right away when you first sawthe BBQ cart: the tile top. Tile willwithstand lots of abuse from theweather while providing an idealsurface for setting food, dishes,and utensils. I also think the tile isattractive. I hope you do too.Contrary to what you maybelieve, laying tile is a rather simpleprocess. The top for my BBQ cartVlhat You'll NeedLumber35 bd. ft. of 34rr thick #2 W. Red Cedar60 bd. ft. of 2rr thick #2 W. Red Cedar4 bd. ft. of |r thick #2 W. Red CedarHardware(2) Roller catches(50)#8 x 11lzrr Flathead deck screws(25)#8 x ll,/arr Flat head deck screws(4) 3rr Casters (2 swiveling/2 non-swiveling)(4) Wrought iron bail pulls(2) Pairs of wrought iron hinges - "H" style(2) 3/4" Aluminum angles - 24tt long(4) Shelf support pins - tTutt shaft(28) Tile squares - 6rr x 6rlis sized to fit 6rr ' 6rr tile with just thecorrect amount ofgap around eachtile for the grout. If you choose tileof a different size, you may have toalter the size of the top slightly.Workbench t June 1997 33


![Til]tl](https://img.yumpu.com/45878240/1/190x245/tiltl.jpg?quality=85)


