

BooTENDS TnRoITIoNAL SuurTERs STEp TooI Box ... - Wood Tools
BooTENDS TnRoITIoNAL SuurTERs STEp TooI Box ... - Wood Tools
BooTENDS TnRoITIoNAL SuurTERs STEp TooI Box ... - Wood Tools
- No tags were found...

Create successful ePaper yourself
Turn your PDF publications into a flip-book with our unique Google optimized e-Paper software.
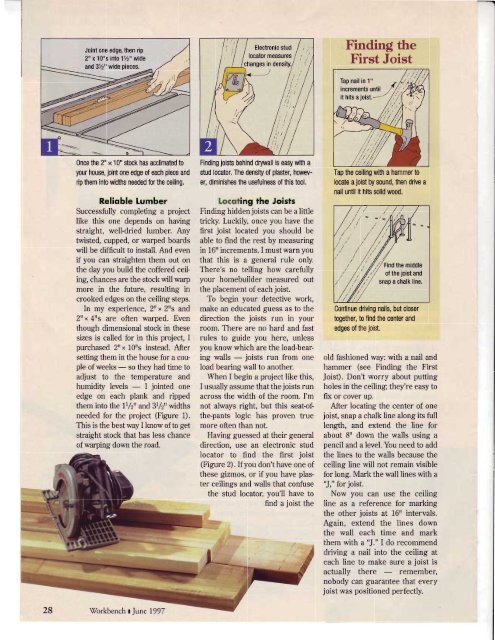
Joint one edge, then rip2" x 10"s into 1/z" wideandSVz" wide pieces.Finding theFirst JoistOnce the 2" x 10" stock has acclimated toyour house, joint one edge of each piece andrip them into widttts needed for the ceiling.Relioble LumberSuccessfully completing a projectlike this one depends on havingstraight, well-dried lumber. Anytwisted, cupped, or warped boardswill be difficult to install. And evenif you can straighten them out onthe day you build the coffered ceiling,chances are the stock will warpmore in the future, resulting incrooked edges on the ceiling steps.In my experience, 2rr 2rrs "and2rr x 4rrs are often warped. Eventhough dimensional stock in thesesizes is called for in this project, Ipurchased 2rr x 10rrs instead. Aftersetting them in the house for a coupleof weeks - so they had time toadjust to the temperature andhumidity levels - I jointed oneedge on each plank and rippedthem into the tr/zn and3\/z" widthsneeded for the project (Figure 1).This is the bestway I know of to getstraight stock that has less chanceof warping down the road.Finding joists behindrywall is easy with astud locator. The density of plaster, however,diminishes the usefulness of this tool.Locoting lhe JoistsFinding hidden joists can be a littletricky. Luckily, once you have thefirst joist located you should beable to find the rest by measuringin 16rr increments. I must warn youthat this is a general rule only.There's no telling how carefullyyour homebuilder measured outthe placement of each joist.To begin your detective work,make an educated guess as to thedirection the joists run in yourroom. There are no hard and fastrules to guide you here, unlessyou know which are the load-bearingwalls - joists run from oneload bearing wall to another.When I begin a project like this,I usually assume that the joists runacross the width of the room. I'mnot always right, but this seat-ofthe-pantslogic has proven truemore often than not.Having guessed at their generaldirection, use an electronic studlocator to find the first joist(Figure 2) . If you don't have one ofthese gizmos, or if you have plasterceilings and walls that confusethe stud locator, you'Il have tofind a ioist theTap the ceiling with a hammer tolocate a joist by sound, then drive anail until it hits solid wood.Continue driving nails, but closertogether,find the center andedges of the joist.old fashioned way: with a nail andhammer (see Finding the FirstJoist). Don't worry about puttingholes in the ceiling; they're easy tofix or cover up.After locating the center of onejoist, snap a chalk line along its fulllength, and extend the line forabout 8rr down the walls using apencil and a level. You need to addthe lines to the walls because theceiling line will not remain visiblefor long. Mark the wall lines with a'J," for joist.Now you can use the ceilingline as a reference for markingthe other joists at 16rr intervals.Again, extend the lines downthe wall each time and markthem with a'J." I do recommenddriving a nail into the ceiling ateach line to make sure a joist isactually there remember,nobody can guarantee that everyjoist was positioned perfectly.\Workbench tJtne 1997


![Til]tl](https://img.yumpu.com/45878240/1/190x245/tiltl.jpg?quality=85)


