Direct Vent Tankless Water Heater - Alpine Home Air Products
Direct Vent Tankless Water Heater - Alpine Home Air Products
Direct Vent Tankless Water Heater - Alpine Home Air Products

You also want an ePaper? Increase the reach of your titles
YUMPU automatically turns print PDFs into web optimized ePapers that Google loves.
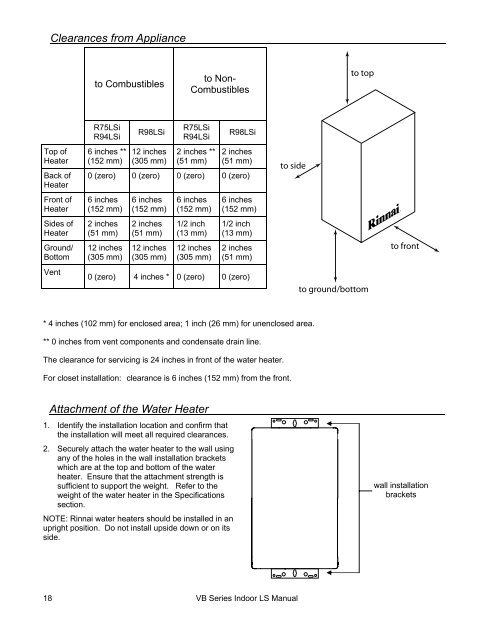
Clearances from Applianceto Combustiblesto Non-Combustiblesto topR75LSiR94LSiR98LSiR75LSiR94LSiR98LSiTop of<strong>Heater</strong>Back of<strong>Heater</strong>6 inches **(152 mm)12 inches(305 mm)2 inches **(51 mm)2 inches(51 mm)0 (zero) 0 (zero) 0 (zero) 0 (zero)to sideFront of<strong>Heater</strong>6 inches(152 mm)6 inches(152 mm)6 inches(152 mm)6 inches(152 mm)Sides of<strong>Heater</strong>Ground/Bottom2 inches(51 mm)12 inches(305 mm)2 inches(51 mm)12 inches(305 mm)1/2 inch(13 mm)12 inches(305 mm)1/2 inch(13 mm)2 inches(51 mm)to front<strong>Vent</strong>0 (zero) 4 inches * 0 (zero) 0 (zero)to ground/bottom* 4 inches (102 mm) for enclosed area; 1 inch (26 mm) for unenclosed area.** 0 inches from vent components and condensate drain line.The clearance for servicing is 24 inches in front of the water heater.For closet installation: clearance is 6 inches (152 mm) from the front.Attachment of the <strong>Water</strong> <strong>Heater</strong>1. Identify the installation location and confirm thatthe installation will meet all required clearances.2. Securely attach the water heater to the wall usingany of the holes in the wall installation bracketswhich are at the top and bottom of the waterheater. Ensure that the attachment strength issufficient to support the weight. Refer to theweight of the water heater in the Specificationssection.NOTE: Rinnai water heaters should be installed in anupright position. Do not install upside down or on itsside.wall installationbrackets18 VB Series Indoor LS Manual

![Owner's Manual (General) [pdf] - Appliance Factory Parts](https://img.yumpu.com/50830858/1/184x260/owners-manual-general-pdf-appliance-factory-parts.jpg?quality=85)