Direct Vent Tankless Water Heater - Alpine Home Air Products
Direct Vent Tankless Water Heater - Alpine Home Air Products
Direct Vent Tankless Water Heater - Alpine Home Air Products

Create successful ePaper yourself
Turn your PDF publications into a flip-book with our unique Google optimized e-Paper software.
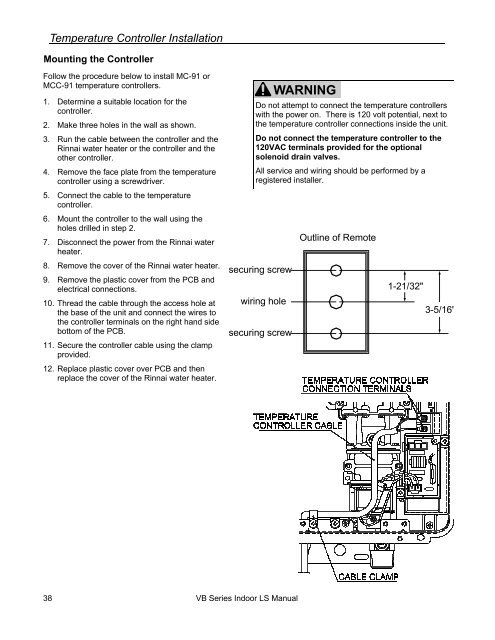
Temperature Controller InstallationMounting the ControllerFollow the procedure below to install MC-91 orMCC-91 temperature controllers.1. Determine a suitable location for thecontroller.2. Make three holes in the wall as shown.3. Run the cable between the controller and theRinnai water heater or the controller and theother controller.4. Remove the face plate from the temperaturecontroller using a screwdriver.5. Connect the cable to the temperaturecontroller.6. Mount the controller to the wall using theholes drilled in step 2.7. Disconnect the power from the Rinnai waterheater.8. Remove the cover of the Rinnai water heater.9. Remove the plastic cover from the PCB andelectrical connections.10. Thread the cable through the access hole atthe base of the unit and connect the wires tothe controller terminals on the right hand sidebottom of the PCB.11. Secure the controller cable using the clampprovided.12. Replace plastic cover over PCB and thenreplace the cover of the Rinnai water heater.WARNINGDo not attempt to connect the temperature controllerswith the power on. There is 120 volt potential, next tothe temperature controller connections inside the unit.Do not connect the temperature controller to the120VAC terminals provided for the optionalsolenoid drain valves.All service and wiring should be performed by aregistered installer.securing screwwiring holesecuring screwOutline of Remote1-21/32"3-5/16"38 VB Series Indoor LS Manual

![Owner's Manual (General) [pdf] - Appliance Factory Parts](https://img.yumpu.com/50830858/1/184x260/owners-manual-general-pdf-appliance-factory-parts.jpg?quality=85)