Kantech IP Link Installation Manual - Tyco Security Products
Kantech IP Link Installation Manual - Tyco Security Products
Kantech IP Link Installation Manual - Tyco Security Products
- No tags were found...

You also want an ePaper? Increase the reach of your titles
YUMPU automatically turns print PDFs into web optimized ePapers that Google loves.
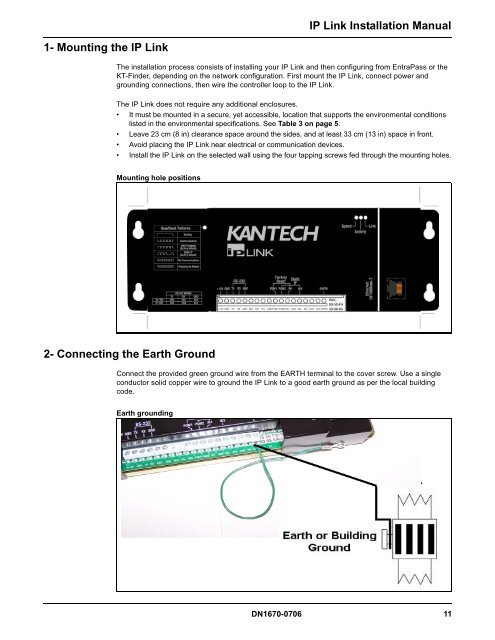
<strong>IP</strong> <strong>Link</strong> <strong>Installation</strong> <strong>Manual</strong>1- Mounting the <strong>IP</strong> <strong>Link</strong>The installation process consists of installing your <strong>IP</strong> <strong>Link</strong> and then configuring from EntraPass or theKT-Finder, depending on the network configuration. First mount the <strong>IP</strong> <strong>Link</strong>, connect power andgrounding connections, then wire the controller loop to the <strong>IP</strong> <strong>Link</strong>.The <strong>IP</strong> <strong>Link</strong> does not require any additional enclosures.• It must be mounted in a secure, yet accessible, location that supports the environmental conditionslisted in the environmental specifications. See Table 3 on page 5.• Leave 23 cm (8 in) clearance space around the sides, and at least 33 cm (13 in) space in front.• Avoid placing the <strong>IP</strong> <strong>Link</strong> near electrical or communication devices.• Install the <strong>IP</strong> <strong>Link</strong> on the selected wall using the four tapping screws fed through the mounting holes.Mounting hole positions2- Connecting the Earth GroundConnect the provided green ground wire from the EARTH terminal to the cover screw. Use a singleconductor solid copper wire to ground the <strong>IP</strong> <strong>Link</strong> to a good earth ground as per the local buildingcode.Earth groundingDN1670-0706 11