Kantech IP Link Installation Manual - Tyco Security Products
Kantech IP Link Installation Manual - Tyco Security Products
Kantech IP Link Installation Manual - Tyco Security Products
- No tags were found...

You also want an ePaper? Increase the reach of your titles
YUMPU automatically turns print PDFs into web optimized ePapers that Google loves.
<strong>Kantech</strong> <strong>IP</strong> <strong>Link</strong>Enhanced Ethernet Device<strong>Installation</strong> <strong>Manual</strong>DN1670-0706Tear-outQuick Setup Sheeton last page!DN1670-0706
Table of ContentsGeneral Information ..........................................................................................2Copyright Info .........................................................................................................2Technical Support ..................................................................................................2Compliance Specifications ...............................................................................2FCC & IC Compliance ............................................................................................2UL 294 Compliance Notice .................................................................................... 2Other UL Compliance .............................................................................................2CE Compliance ......................................................................................................2RoHS ......................................................................................................................2WEEE .....................................................................................................................2Overview ..........................................................................................................3Introduction ............................................................................................................3Cover Description ...................................................................................................4Configurations Options ...........................................................................................5Specifications .........................................................................................................5Ordering Information ........................................................................................6Models Available .................................................................................................... 6<strong>Installation</strong> <strong>Manual</strong>s ...............................................................................................6Site Survey .......................................................................................................6Network Topology ..................................................................................................6Local Area Network (LAN) ...............................................................................6Wide Area Network (WAN) ..............................................................................7LAN Configurations ................................................................................................7Static <strong>IP</strong> Addressing ........................................................................................7Reserved DHCP <strong>IP</strong> Addressing .......................................................................7WAN Configurations ...............................................................................................8Static <strong>IP</strong> Addressing ........................................................................................8Reserved DHCP <strong>IP</strong> Addressing .......................................................................9Pre-<strong>Installation</strong> .................................................................................................9Network Configuration ............................................................................................9Equipment Checklist ..............................................................................................9ESD Precautions ....................................................................................................9Reading Checklist ................................................................................................10Site Checklist .......................................................................................................10Task Lists .......................................................................................................10Mounting the <strong>IP</strong> <strong>Link</strong> ............................................................................................11Connecting the Earth Ground ..............................................................................11Connecting the <strong>IP</strong> <strong>Link</strong> to the Controller Loops ....................................................12Connecting Power ................................................................................................13For KT-300 Controllers only ...........................................................................13For KT-100 and KT-200 Controllers ..............................................................13Powering Up the <strong>IP</strong> <strong>Link</strong> .......................................................................................14Defining the EntraPass Site .................................................................................14Verifying Communication with the <strong>IP</strong> <strong>Link</strong> ............................................................17Configuring the <strong>IP</strong> <strong>Link</strong> in a WAN/Internet ...........................................................18Preparing the WAN for the <strong>IP</strong> <strong>Link</strong> .......................................................................18Configuring the <strong>IP</strong> <strong>Link</strong> at the Remote Site ..........................................................18Confirming <strong>IP</strong> <strong>Link</strong> Communication with the Gateway .........................................20Configuring the <strong>IP</strong> <strong>Link</strong> with the Web Configuration Page .............................21Upgrading the <strong>IP</strong> <strong>Link</strong> Firmware .....................................................................23How to Reset the <strong>IP</strong> <strong>Link</strong> ................................................................................26DN1670-0706 1
General InformationCopyright Info© 2007 <strong>Tyco</strong> Safety <strong>Products</strong>, Canada, Ltd. All specifications were current as of publication date andare subject to change without notice. <strong>Kantech</strong> and the <strong>Kantech</strong> logo are trademarks of <strong>Tyco</strong>International Services AG or its affiliates in the U.S. and/or other countries.TechnicalSupportFor technical assistance with the <strong>IP</strong> <strong>Link</strong> and other <strong>Kantech</strong> products, contact technical support, Mondayto Friday 8:00 AM to 8:00 PM E.S.T. (GMT -5:00)• Toll-Free phone (US & Canada): 1 (888) 222-1560• Phone: +1 (450) 444-2030• Fax: +1 (450) 444-2029• Internet: www.kantech.com• E-mail: kantechsupport@tycoint.comCompliance SpecificationsFCC & ICComplianceThis device complies with Part 15, Class A of the FCC rules. Operation is subject to the following twoconditions: (1) this device may not cause harmful interference, and (2) this device must accept anyinterference received including interference that may cause undesired operation. This class A digitalapparatus meets all requirements of the Canadian Interference Causing Equipment Regulations.UL 294ComplianceNotice• UL Standard for access control system units.• The <strong>IP</strong> <strong>Link</strong> is UL 294 listed for supplementary use with EntraPass, KT-300 Controllers, ioProxProximity readers, and T.Rex request to exit devices.• Each <strong>IP</strong> <strong>Link</strong> enclosure will be installed in a secured and protected location.• Each <strong>IP</strong> <strong>Link</strong> will be equipped with an AC powered LED installed outside the <strong>IP</strong> <strong>Link</strong> and connectedto an inboard relay, and visible at all time to monitor relay status, as per UL 294, section 32.1.5.Other ULComplianceIn order to comply with UL listings, the following has to be respected:• Use of a UL listed 60950 computer• Use only UL listed or recognized cables• Use only UL listed or recognized adaptorsRoHSThe RoHS Directive stands for "the restriction of the use of certain hazardous substances in electricaland electronic equipment". This Directive bans the placing on the EU market of new electrical andelectronic equipment containing more than agreed levels of lead, cadmium, mercury, hexavalentchromium, polybrominated biphenyl (PBB) and polybrominated diphenyl ether (PBDE) flameretardants.WEEEThis Directive is for Waste Electrical and Electronic Equipment and addresses the disposal and theenvironmental handling of these products.2DN1670-0706
<strong>IP</strong> <strong>Link</strong> <strong>Installation</strong> <strong>Manual</strong>OverviewIntroductionThe <strong>Kantech</strong> <strong>IP</strong> <strong>Link</strong> makes it easy and affordable to operate your <strong>Kantech</strong> security system over anetwork. Unlike other similar devices, the <strong>IP</strong> <strong>Link</strong> asynchronously polls the controllers (KT-100, KT-200,KT-300) and communicates with the EntraPass Gateway only when necessary. This significantlyreduces the amount of bandwidth required to operate your security system on the network.The <strong>IP</strong> <strong>Link</strong> is essential in determining what to do with specific events and commands. The <strong>IP</strong> <strong>Link</strong>directs specific events it receives from any controller to the EntraPass Gateway. On the other hand, itsends commands from the EntraPass Gateway to the appropriate controller.The <strong>IP</strong> <strong>Link</strong> is easy to configure. Use the EntraPass workstation, a web browser or an intuitive standaloneapplication called the KT-Finder. The KT-Finder is a small application used to locate an <strong>IP</strong> <strong>Link</strong> ona local area network (LAN).The <strong>IP</strong> <strong>Link</strong> is extremely secure. It uses 128-bit AES encryption to communicate with the Gateway whichprevents any hacking from the Internet and ensures secure communications when used over the Interneton a wide area network (WAN).• Secure communication via 128-bit AES encryption• Minimal bandwidth usage• Supports up to 32 controllers per <strong>IP</strong> <strong>Link</strong>• Compatible with EntraPass Special Edition, Corporate Edition and Global Edition with CorporateGatewayNote: <strong>Kantech</strong> recommends a VC-485 for each site. If there is a loss of communication with one of thecontrollers, the VC-485 will preserve communication with the other controllers.System ArchitectureDN1670-0706 3
Cover DescriptionThe <strong>IP</strong> <strong>Link</strong> has a red status LED called Heartbeat Patterns (with cover) or STAT (without cover). Themain purpose is to indicate if EntraPass is present and if the polling occurs. Table 1 describes thevarious heartbeat patterns that are used. See Table 2 for the description of the other status LEDs.Table 1: Status LED Heartbeat PatternsPulses Description PatternsSteady ON for15 secs<strong>IP</strong> <strong>Link</strong> is booting.1 quick flash/sec. <strong>IP</strong> <strong>Link</strong> is configured and communicating with theGateway.1 long flash/sec. <strong>IP</strong> <strong>Link</strong> is in Factory Default (DHCP) mode3 flashes in 3 secsand OFF for 1 sec.<strong>IP</strong> <strong>Link</strong> is in Forced Static <strong>IP</strong> mode (192.168.1.2)and in Factory Default.4 quick flashes/sec. <strong>IP</strong> <strong>Link</strong> is no longer communicating with theGateway but is configured.5 quick flashes/sec. <strong>IP</strong> <strong>Link</strong> is preparing to reboot.1 long pulse for 2.5secs<strong>IP</strong> <strong>Link</strong> has received a broadcast from the Gatewayor the KT-Finder. After this delay, the <strong>IP</strong> <strong>Link</strong>returns to its previous heartbeat pattern. Useful toverify network communication.4DN1670-0706
<strong>IP</strong> <strong>Link</strong> <strong>Installation</strong> <strong>Manual</strong>Table 2: Network status LEDsSpeedActivity<strong>Link</strong>remains OFF in a 10BaseT network, remains ON in a 100BaseT network.blinks to show network activity, andsteady when there is intense network activity.turns ON when the network is present, turns OFF when there is no network.Configurations OptionsThe <strong>IP</strong> <strong>Link</strong> can be configured through 3 different options:• With EntraPass, when the <strong>IP</strong> <strong>Link</strong> is within the same local area network (LAN)• With the KT-Finder application locally through the LAN or remotely through the Internet or wide areanetwork (WAN).• With a web browser like Internet Explorer locally only (LAN)SpecificationsTable 3: Environmental and Electrical SpecificationsDescriptionOperating TemperatureHumidity LevelDC Power InputInput currentSpecifications0°C to 49°C (32°F to 122°F)0 to 85% non-condensing, indoor use only12 VDC175 mATable 4: <strong>IP</strong> <strong>Link</strong> SpecificationsDescriptionDimensionsWeightPCB dimensionsCommunication PortsCommunication SpeedFlash ROMRAMSpecifications26.7 x 9.5 x 3.12 cm (10.5 x 3.72 x 1.23 in)0.6 kg (1.3 lbs)8.30 x 13.30 cm (3.25 x 5.25 in)RJ-45 Ethernet 10/100Base-T and RS-232Up to 115200 Baud for serial communication2 MB8 MBTable 5: Characteristics with EntraPassDescriptionSpecificationsMaximum number of controllers per <strong>IP</strong> <strong>Link</strong> 32Maximum number of sites per Gateway in EntraPassCorporate Edition and Global Edition256Maximum number of controllers in EntraPass Special Edition 64DN1670-0706 5
Ordering InformationModels Available• KT-<strong>IP</strong>: <strong>IP</strong> <strong>Link</strong> with metallic cover and wall plate.• KT-<strong>IP</strong>-PCB: <strong>IP</strong> <strong>Link</strong> PCB and parts.• KT-<strong>IP</strong>-CAB: Cabinet. Use with KT-<strong>IP</strong>-PCB only.<strong>Installation</strong> <strong>Manual</strong>sSite SurveyAvailable as free downloads in 4 additional languages at www.kantech.com.• DN1671 - French• DN1672 - Spanish• DN1692 - German• DN1693 - ItalianBefore starting the installation of the <strong>IP</strong> <strong>Link</strong>, you have to determine the configuration that bestcorresponds to your network architecture. This information is crucial for the proper operation of the<strong>Kantech</strong> products that you will install.Contact the Network Administrator of the site(s) where you will install the <strong>IP</strong> <strong>Link</strong> so that they canprovide you with all the network information.Gather the network information required to configure the <strong>IP</strong> <strong>Link</strong> and complete the NetworkConfiguration Information Sheet provided at the end of this document.We have divided this manual so that as soon as you determine the pertaining type of architecture andenvironment, you can follow the configuration instructions that correspond to your environment beforeconnecting additional components.Network TopologyTable 6: Bill of MaterialItem Description KT-<strong>IP</strong> KT-<strong>IP</strong>-PCB KT-<strong>IP</strong>-CAB<strong>IP</strong> <strong>Link</strong> with cover and wall plate 1 - -<strong>IP</strong> <strong>Link</strong> PCB only - 1 -Flat cable with RJ-12 male connector, 1.8 m / 6 ft. 1 1 -Ground wire 1 - 1Nylon standoffs - 5 -<strong>Installation</strong> manual DN1670 - English 1 1 -Cabinet - - 1Local Area Network (LAN)A LAN connects network devices over a relatively short distance. A networked office building, school,or home usually contains a single LAN, though sometimes one building will contain a few small LANs,and occasionally a LAN will span a group of nearby buildings.6DN1670-0706
<strong>IP</strong> <strong>Link</strong> <strong>Installation</strong> <strong>Manual</strong>Wide Area Network (WAN)As the term implies, a wide area network spans a large physical distance. A WAN like the Internetspans most of the world. A WAN is a geographically-dispersed collection of LANs. A network devicecalled a router connects LANs to a WAN. In <strong>IP</strong> networking, the router maintains both a LAN addressand a WAN address.In addition, you will notice that there are two constants in LAN and WAN network topologies:• Assigning the <strong>IP</strong> address for communication between the controllers and EntraPass• Managing both types of <strong>IP</strong> addresses, static and dynamicWe recommend that you carefully read the following section in order to correctly select theconfiguration that matches the network architecture where you will install the <strong>IP</strong> <strong>Link</strong>.LAN ConfigurationsThere are two LAN configurations for the <strong>IP</strong> <strong>Link</strong>:Note: <strong>Kantech</strong> recommends the use of a Static or Reserved DHCP <strong>IP</strong> address for the <strong>IP</strong> <strong>Link</strong> and theGateway.Static <strong>IP</strong> AddressingYou will use this type of configuration in an environment where the Network Administrator willdetermine the <strong>IP</strong> address for communication between EntraPass and the <strong>IP</strong> <strong>Link</strong>. We recommendusing the EntraPass application to configure the <strong>IP</strong> <strong>Link</strong>. The other 2 methods, the KT-Finder and theWeb Configuration Page, can be used when the PC has no EntraPass application running.Reserved DHCP <strong>IP</strong> AddressingYou will use this type of configuration in an environment where the customer DHCP server assigns the<strong>IP</strong> address automatically to the <strong>IP</strong> <strong>Link</strong>. Additionally, the <strong>IP</strong> address of the <strong>IP</strong> <strong>Link</strong> will have to remainthe same, which is called Reserved DHCP. We recommend using the EntraPass application toconfigure the <strong>IP</strong> <strong>Link</strong>. The other 2 methods, the KT-Finder and the Web Configuration Page, can beused when the PC has no EntraPass application running.DN1670-0706 7
WAN ConfigurationsWhen sites are distant from each other and protected by the router’s firewall, the public <strong>IP</strong> addressmust be used for communication between EntraPass and the remote <strong>IP</strong> <strong>Link</strong>. The NetworkAdministrator must provide you the Public <strong>IP</strong> addresses (local and remote). The public <strong>IP</strong> address isprovided by the local Internet Service Provider (ISP) which controls the <strong>IP</strong> address.Note: <strong>Kantech</strong> recommends the use of a Static or Reserved DHCP <strong>IP</strong> address for the remote <strong>IP</strong> <strong>Link</strong>and the Gateway since the routers must be configured for port forwarding.There are two WAN configurations for the <strong>IP</strong> <strong>Link</strong>:Static <strong>IP</strong> AddressingYou will use this type of addressing in an environment where the Network Administrator will determinethe <strong>IP</strong> address for communication between EntraPass and the <strong>IP</strong> <strong>Link</strong>. Since the EntraPass applicationis at the host site, you must use the KT-Finder to configure the <strong>IP</strong> <strong>Link</strong>.8DN1670-0706
<strong>IP</strong> <strong>Link</strong> <strong>Installation</strong> <strong>Manual</strong>Reserved DHCP <strong>IP</strong> AddressingYou will use this type of addressing in an environment where the customer DHCP server assigns the<strong>IP</strong> address automatically to the <strong>IP</strong> <strong>Link</strong>. Since the EntraPass application is at the host site, you mustuse the KT-Finder to configure the <strong>IP</strong> <strong>Link</strong>.Pre-<strong>Installation</strong>It is important at this stage, if you have not already done so, to contact the Network Administratorwhere the <strong>IP</strong> <strong>Link</strong> will be installed so that you can complete the Network Configuration InformationSheet. We suggest that you always have the Network Configuration Information Sheet close by, andkeep a copy with your <strong>IP</strong> <strong>Link</strong>.Confirm that all parts are in order, all necessary tools are available, and that the site is properlyprepared.If you are connecting your <strong>IP</strong> <strong>Link</strong> to EntraPass, you must make sure that you are running EntraPassv4.0 or higher.NetworkConfiguration• Network Configuration Information Sheet is fully completedEquipmentChecklist• <strong>IP</strong> <strong>Link</strong>• RS-232 cabling• <strong>Installation</strong> <strong>Manual</strong>• VC-485 (recommended)• Network cable• Network crossover cable for direct connection from PC to <strong>IP</strong> <strong>Link</strong>ESDPrecautionsElectroStatic Discharge (ESD) can damage electrostatic sensitive devices. Use antistatic protection toavoid the risk of equipment damage.DN1670-0706 9
ReadingChecklistWe strongly suggest that you keep the corresponding EntraPass reference manual close at hand:• EntraPass Global Edition Reference <strong>Manual</strong>, DN1316• EntraPass Corporate Edition Reference <strong>Manual</strong>, DN1415• EntraPass Special Edition Reference <strong>Manual</strong>, DN1420• KT-300 <strong>Installation</strong> <strong>Manual</strong>, DN1315• KT-200 <strong>Installation</strong> <strong>Manual</strong>, DN1659• KT-100 <strong>Installation</strong> <strong>Manual</strong>, DN5073Site ChecklistEnsure the following:• The mounting site is ready.• The site has been approved and all wiring complies with UL requirements and other codes asappropriate.• All preliminary site work is completed and the site is clean and free of dust or other contaminants.Task ListsTable 7 lists the tasks for the configuration of the <strong>IP</strong> <strong>Link</strong> in a LANTable 7: Task list for a LAN configurationTaskPage1- Mounting the <strong>IP</strong> <strong>Link</strong> 112- Connecting the Earth Ground 113- Connecting the <strong>IP</strong> <strong>Link</strong> to the Controller Loops 124- Connecting Power 135- Powering Up the <strong>IP</strong> <strong>Link</strong> 136- Defining the EntraPass Site 147- Verifying Communication with the <strong>IP</strong> <strong>Link</strong> 17Table 8 lists the tasks for the configuration of the <strong>IP</strong> <strong>Link</strong> in a WANTable 8: Task list for a WAN configurationTaskPage1- Mounting the <strong>IP</strong> <strong>Link</strong> 112- Connecting the Earth Ground 113- Connecting the <strong>IP</strong> <strong>Link</strong> to the Controller Loops 124- Connecting Power 135- Powering Up the <strong>IP</strong> <strong>Link</strong> 136- Defining the EntraPass Site 148- Configuring the <strong>IP</strong> <strong>Link</strong> in a WAN/Internet 1810DN1670-0706
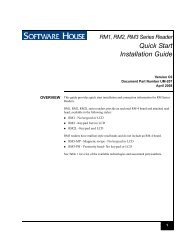
<strong>IP</strong> <strong>Link</strong> <strong>Installation</strong> <strong>Manual</strong>1- Mounting the <strong>IP</strong> <strong>Link</strong>The installation process consists of installing your <strong>IP</strong> <strong>Link</strong> and then configuring from EntraPass or theKT-Finder, depending on the network configuration. First mount the <strong>IP</strong> <strong>Link</strong>, connect power andgrounding connections, then wire the controller loop to the <strong>IP</strong> <strong>Link</strong>.The <strong>IP</strong> <strong>Link</strong> does not require any additional enclosures.• It must be mounted in a secure, yet accessible, location that supports the environmental conditionslisted in the environmental specifications. See Table 3 on page 5.• Leave 23 cm (8 in) clearance space around the sides, and at least 33 cm (13 in) space in front.• Avoid placing the <strong>IP</strong> <strong>Link</strong> near electrical or communication devices.• Install the <strong>IP</strong> <strong>Link</strong> on the selected wall using the four tapping screws fed through the mounting holes.Mounting hole positions2- Connecting the Earth GroundConnect the provided green ground wire from the EARTH terminal to the cover screw. Use a singleconductor solid copper wire to ground the <strong>IP</strong> <strong>Link</strong> to a good earth ground as per the local buildingcode.Earth groundingDN1670-0706 11
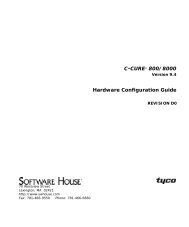
3- Connecting the <strong>IP</strong> <strong>Link</strong> to the Controller LoopsThe <strong>IP</strong> <strong>Link</strong> can connect to all <strong>Kantech</strong> controllers such as the KT-100, KT-200 and the KT-300. TheKT-100 only uses RS-485, the KT-200 and KT-300 accept both.• See Table 9 and Figure 1 for RS-232 connection to a VC-485 with RJ12 connector• See Table 9 and Figure 2 for RS-232 connection to a KT-300 with RJ12 connector• See Figure 3 for RS-232 connection to a KT-200Note: Always use the same controller model within the same site or loop.Table 9: RS-232 Wiring to <strong>IP</strong> <strong>Link</strong>RJ12 connector on TX RX GNDVC-485 GRN RED BLKKT-300 RED GRN BLKFigure 1: RS-232 connection with RJ12 to VC-485 (KT-100, KT-200 and KT-300)Figure 2: RS-232 connection with RJ12 to KT-300 #1 (only with KT-300)12DN1670-0706
3- Connecting the <strong>IP</strong> <strong>Link</strong> to the Controller Loops (continued)Figure 3: RS-232 connection to KT-200 #1<strong>IP</strong> <strong>Link</strong> <strong>Installation</strong> <strong>Manual</strong>4- Connecting PowerFor KT-300 Controllers only• Use the 12V DC from the 12V AUX terminals.For KT-100 and KT-200 Controllers• You will need a separate 12V DC power supply with battery backup for the <strong>IP</strong> <strong>Link</strong>.DN1670-0706 13
5- Powering Up the <strong>IP</strong> <strong>Link</strong>1. Power up the <strong>IP</strong> <strong>Link</strong>.2. Make sure the <strong>IP</strong> <strong>Link</strong> is in Factory Default (DHCP) mode before starting the configuration. SeeTable 1 on page 4 for the heartbeat patterns per state.3. Connect the network cable.6- Defining the EntraPass SiteBefore you startThese items must be completed and verified:• The detachable Network Configuration Information Sheet is fully completed.• You are running EntraPass version 4.0 or higher.Note: If you are running EntraPass Corporate Edition or EntraPass Global Edition; the following systemcomponents should have been installed and configured:- an EntraPass Workstation,- an EntraPass Corporate Gateway.The <strong>IP</strong> <strong>Link</strong> communicates locally with EntraPass through a10/100 Base-T ethernet connection.1. From the Devices menu, go to Site, or click on Devices > Site.2. Click on New, located in the top left corner of the Site/Loop screen, to create a new site.3. Enter the site name for both languages.4. Under the General tab, select Enhanced Ethernet (<strong>IP</strong> <strong>Link</strong>) from the Connection type menu.5. Enter the Number of controllers.Note: The maximum number of controllers per <strong>IP</strong> <strong>Link</strong> is 32.6. Complete the other settings as required.7. Click on the <strong>IP</strong> <strong>Link</strong> <strong>IP</strong> Configuration tab.8. Look on the <strong>IP</strong> <strong>Link</strong> for the MAC address sticker next to the terminal strip and complete the MACaddress of the <strong>IP</strong> <strong>Link</strong>.Note: The 1st 6 digits are already displayed and can’t be modified: 00:50:F9:00:00:00.14DN1670-0706
<strong>IP</strong> <strong>Link</strong> <strong>Installation</strong> <strong>Manual</strong>6- Defining the EntraPass Site (continued)9. Make sure the Online option is checked.10.Enter the required information as specified in the Network Configuration Information Sheet.• For a Static <strong>IP</strong> address, click Use the following <strong>IP</strong> address and enter the information.• For a Reserved DHCP <strong>IP</strong> address, click Obtain an <strong>IP</strong> address automatically.Example when obtaining an <strong>IP</strong> address automatically11. Enter the <strong>IP</strong> address or the Domain name of the EntraPass Special Edition / Corporate Gateway.12.Enter the Port number used by the <strong>IP</strong> <strong>Link</strong> (port 18810 by default). If more than one <strong>IP</strong> <strong>Link</strong> residesat the same <strong>IP</strong> address (WAN/Internet applications) then it will required the use of a unique portnumber per <strong>IP</strong> <strong>Link</strong>. See Procedure 8 on page 18.13.Click on the <strong>IP</strong> <strong>Link</strong> Automated Connection tab.14.Make sure the Broadcast configuration option is checked.Note: Leave the Enable KT-Finder diagnostic option checked, to be able to view andtroubleshoot the <strong>IP</strong> <strong>Link</strong> configuration with the KT-Finder.15.Enter the Public <strong>IP</strong> address or the Domain name of the remote DHCP server / outbound router asper the Network Configuration Information Sheet.DN1670-0706 15
6- Defining the EntraPass Site (continued)16.Click on the <strong>IP</strong> <strong>Link</strong> Parameters tab.17.Verify the Encryption key. A random key is generated automatically.18.Select the Controller’s loop baud rate.Note: The maximum baud rate for the KT-200 controller is 19200.16DN1670-0706
<strong>IP</strong> <strong>Link</strong> <strong>Installation</strong> <strong>Manual</strong>6- Defining the EntraPass Site (continued)19.The settings in the Delays section refer to the communication with the Gateway. In order to displaythe connection status of the <strong>IP</strong> <strong>Link</strong> with EntraPass and to avoid large amount of traffic, the <strong>IP</strong> <strong>Link</strong>sends a heartbeat to EntraPass at a pre-configured interval (60 seconds for example). If EntraPassis not answering after this amount of time, the <strong>IP</strong> <strong>Link</strong> will retry several times and then stop the pollingif no answer is received.• Heartbeat frequency (mm:ss): The time range value is from 1:00 to 59:59. This is the heartbeatfrequency from the <strong>IP</strong> <strong>Link</strong> to the Gateway.• Fails-soft delay on Gateway communication failure (mm:ss): The maximum time range valuewill follow the selection from the Heartbeat Frequency. This is the time that the <strong>IP</strong> <strong>Link</strong> will taketo verify if there is a communication failure with the Gateway before it operates in stand-alonemode.• Retry count: The range value is 1 to 15. This is the number of times that the <strong>IP</strong> <strong>Link</strong> will retry toconfirm communication failure with the Gateway.• Maximum wait on send command (s:cc): The time range value is from 1:00 to 9:99. This is themaximum time allowed for the <strong>IP</strong> <strong>Link</strong> to acknowledge a command sent from the EntraPassworkstation.20.Click on the floppy icon to save. Click on Close.7- Verifying Communication with the <strong>IP</strong> <strong>Link</strong>If the <strong>IP</strong> <strong>Link</strong> is within thethen go tolocal DHCP server (LAN) Step 21.remote DHCP server (WAN) Procedure 8 on page 18.21.Verify the communication status between the new <strong>IP</strong> <strong>Link</strong> and the Gateway. From the EntraPassworkstation Operation menu, select Site.22.Select the Gateway from the Gateway List.Note: For the EntraPass Special Edition application, there is no Gateway List selection.The Communication status must read as follows: <strong>IP</strong> <strong>Link</strong> communication OK.DN1670-0706 17
8- Configuring the <strong>IP</strong> <strong>Link</strong> in a WAN/InternetPreparing the WAN for the <strong>IP</strong> <strong>Link</strong>When using the <strong>IP</strong> <strong>Link</strong> in a WAN configuration behind a router/firewall, it is necessary to forwardport(s) for both the local (Gateway) and the remote (<strong>IP</strong> <strong>Link</strong>) sites. Typically, this will be performed bythe Network Administrator.Ports used at the local site (Gateway)1. Forward ports 18001 and 18801 to the <strong>IP</strong> address of the Gateway.Table 10: Gateway PortsPurpose Port ProtocolFirmware upgrade 18001 UDPCommunication with <strong>IP</strong> <strong>Link</strong> 18801 UDPPorts used at the remote site (<strong>IP</strong> <strong>Link</strong>)2. Forward ports 18803 and 18810 to the <strong>IP</strong> address of the <strong>IP</strong> <strong>Link</strong>.Table 11: <strong>IP</strong> <strong>Link</strong> PortsPurpose Port ProtocolBroadcast and KT-Finder 18803 UDPCommunication with the Gateway 18810 (Note 1) UDPWeb Configuration Page 80 (Note 2)Note 1: If you are using more than one <strong>IP</strong> <strong>Link</strong> at the same remote site, it is necessary to use aunique port number for each <strong>IP</strong> <strong>Link</strong>. This information is used in Procedure 5, Step 12.Note 2: This port is used to configure the <strong>IP</strong> <strong>Link</strong> with a Web Browser and should not be forwarded.This will restrict its use to the LAN only.Configuring the <strong>IP</strong> <strong>Link</strong> at the Remote SiteThe KT-Finder is an application used to configure the <strong>IP</strong> <strong>Link</strong> over the local area network (LAN) or thewide area network (WAN).Important: The KT-Finder application is on the EntraPass CD-ROM and is also available as afree download from http://www.kantech.com. It doesn’t require any installation.1. Quit all EntraPass applications.2. Make sure the <strong>IP</strong> <strong>Link</strong> is in Factory Default (DHCP) mode. See Table 1 on page 4.3. Start the KT-Finder.Note: If you try to run the KT-Finder while running EntraPass, you will get an error message similarto this.18DN1670-0706
8- Configuring the <strong>IP</strong> <strong>Link</strong> in a WAN/Internet (continued)4. Select <strong>IP</strong> <strong>Link</strong> from the Device menu.5. Enter the MAC address of the <strong>IP</strong> <strong>Link</strong> then click on Connect.<strong>IP</strong> <strong>Link</strong> <strong>Installation</strong> <strong>Manual</strong>6. When the <strong>IP</strong> <strong>Link</strong> is found, the configuration page will be displayed.DN1670-0706 19
8- Configuring the <strong>IP</strong> <strong>Link</strong> in a WAN/Internet (continued)7. Verify your Network Configuration Information Sheet:• Enter the Public <strong>IP</strong> address or the Domain name of the EntraPass Special Edition /Corporate Gateway. This information must be the same as entered in Procedure 5 Step 11.• Select Obtain an <strong>IP</strong> address automatically or Use the following <strong>IP</strong> address but it must be thesame as entered in Procedure 5 Step 10.8. Change the Port number, if required.Note: The port number should only be changed when you have more than one <strong>IP</strong> <strong>Link</strong> at the sameremote site.9. Click OK.10.Repeat the procedure for each <strong>IP</strong> <strong>Link</strong> at this site.Confirming <strong>IP</strong> <strong>Link</strong> Communication with the GatewayThe <strong>IP</strong> <strong>Link</strong> should begin communicating with the Gateway within a few minutes. To confirm that theyare communicating, please verify the following:11. That the <strong>IP</strong> <strong>Link</strong> heartbeat pattern LED is flashing 1 quick flash/sec. as per Table 1 on page 4.12.Verify communication between the new <strong>IP</strong> <strong>Link</strong> and the Gateway. From the EntraPass workstationOperation menu, select Site and then select the Gateway from the Gateway List.Note: For the EntraPass Special Edition application, there is no Gateway List selection.The Communication status must read as follows: <strong>IP</strong> <strong>Link</strong> communication OK.20DN1670-0706
<strong>IP</strong> <strong>Link</strong> <strong>Installation</strong> <strong>Manual</strong>Configuring the <strong>IP</strong> <strong>Link</strong> with the Web Configuration PageThis procedure is practical if you want to configure the <strong>IP</strong> <strong>Link</strong>(s) in advance before going on site.Note: The Web Configuration Page is available only while the <strong>IP</strong> <strong>Link</strong> is in Factory Default.Before you start • The detachable Network Configuration Information Sheet is fully completed.• Determine your connection to the <strong>IP</strong> <strong>Link</strong> and choose the appropriate network cable that you need.See below for an example with each type of network cable.1. Make sure the <strong>IP</strong> <strong>Link</strong> is in Forced Static <strong>IP</strong> and Factory Default before starting the configuration.Verify the heartbeat patterns to determine the status. See Table 1 on page 4 for details.2. At your computer, change your network connection settings as follows.DN1670-0706 21
Configuring the <strong>IP</strong> <strong>Link</strong> with the Web Configuration Page (continued)3. Start your web browser and enter the following <strong>IP</strong>: 192.168.1.2 and press Enter.4. Remove the wire between PGM2 and IN2 on the <strong>IP</strong> <strong>Link</strong>.5. Enter the <strong>IP</strong> addresses as per the Network Configuration Information Sheet and click onSave configuration to <strong>IP</strong> <strong>Link</strong>.6. When you will go to the site with the configured <strong>IP</strong> <strong>Link</strong>, you will have to enter the same details intothe EntraPass workstation.22DN1670-0706
<strong>IP</strong> <strong>Link</strong> <strong>Installation</strong> <strong>Manual</strong>Upgrading the <strong>IP</strong> <strong>Link</strong> FirmwareWarning:You will loose communication with all your controllers for up to 5 minutes duringthis upgrade. This must be planned accordingly.1. Verify the communication status between the <strong>IP</strong> <strong>Link</strong> and the Gateway. From the EntraPassworkstation Operation menu, select Site.2. Select the Gateway from the Gateway List.Note: For the EntraPass Special Edition application, there is no Gateway List selection.The Communication status must read as follows: <strong>IP</strong> <strong>Link</strong> communication OK.3. Confirm the firmware version before proceeding. Right click on the site name to view the contextualmenu.4. Select State to view the firmware version.DN1670-0706 23
Upgrading the <strong>IP</strong> <strong>Link</strong> Firmware (continued)5. Click Close.6. From the Options menu, select System Parameters.7. From the Firmware section, click on the <strong>IP</strong> <strong>Link</strong> tab.8. Make sure the Enable TFTP <strong>IP</strong> <strong>Link</strong> updater option is checked.9. Click on the 3 dots to locate the firmware file.10.Select the firmware file and click OK.11. Click OK to close the System Parameters dialog.12.From the Operation menu, select Site.13.Select the Gateway from the Gateway List.Note: For the EntraPass Special Edition application, there is no Gateway List selection.14.Click on the site that corresponds to the <strong>IP</strong> <strong>Link</strong> to highlight it.15.Click on the reload firmware button.16.A confirmation will display.24DN1670-0706
<strong>IP</strong> <strong>Link</strong> <strong>Installation</strong> <strong>Manual</strong>Upgrading the <strong>IP</strong> <strong>Link</strong> Firmware (continued)17.Click Yes.18.The <strong>IP</strong> <strong>Link</strong> will reset and restart with the new firmware.Warning: That process could take up to 5 minutes.The communication status in the Operation > Site will say <strong>IP</strong> <strong>Link</strong> Communication Failed then backto <strong>IP</strong> <strong>Link</strong> Communication OK.19.Right click on the site name to view the contextual menu.20.Select State to view the new firmware version.21.Two very important status messages must be listed as well:• <strong>IP</strong> <strong>Link</strong> communication OK for <strong>IP</strong> <strong>Link</strong> communication status with the Gateway.• Site communication OK for controllers communication, through the <strong>IP</strong> <strong>Link</strong>, with the Gateway.22.Click Close.DN1670-0706 25
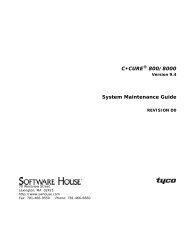
How to Reset the <strong>IP</strong> <strong>Link</strong>For maintenance or configuration purposes, the <strong>IP</strong> <strong>Link</strong> can be reset. Two types of resets can beperformed: Factory Default (DHCP) and Forced Static <strong>IP</strong>.Table 12: Reset optionsResetsFactory Default(DHCP)Forced Static <strong>IP</strong>(192.168.1.2) andFactory DefaultInstructionsWARNING: This reset will clear all <strong>IP</strong> <strong>Link</strong> configuration including the<strong>IP</strong> address.1. Disconnect DC power.2. Connect a wire between the PGM1 and IN1 pins.There should be no wire between PGM2 and IN2.3. Connect power.4. Wait 60 secs. The Heartbeat Patterns or STAT LED should besteady red, then blink very quickly.5. Remove the wire between PGM1 and IN1.6. See Table 1 on page 4 for the heartbeat patterns:1 long flash per sec.7. The <strong>IP</strong> <strong>Link</strong> will now be in DHCP mode and will attempt to obtainan <strong>IP</strong> address automatically from the DHCP server.WARNING: This reset will clear all <strong>IP</strong> <strong>Link</strong> configuration andtemporarily assign 192.168.1.2 as an <strong>IP</strong> address so that the <strong>IP</strong> <strong>Link</strong>may be configured using a Web Browser or the KT-Finder.1. Disconnect DC power.2. Connect a wire between the PGM1 and IN1 pins.3. Connect a wire between the PGM2 and IN2 pins.4. Connect DC power.5. Wait 60 secs. The Heartbeat Patterns or STAT LED should besteady red, then blink very quickly.6. Remove only the wire between PGM1 and IN1.7. See Table 1 on page 4 for the heartbeat patterns:3 flashes in 3 secs and OFF for 1 sec.8. The <strong>IP</strong> <strong>Link</strong> will now be accessible at <strong>IP</strong> address 192.168.1.2.9. Configure the <strong>IP</strong> <strong>Link</strong> using either the KT-Finder or the WebConfiguration Page.10.Remove the wire between PGM2 and IN2.11. Remove DC power from the <strong>IP</strong> <strong>Link</strong> for 5 sec. and reconnect DCpower.Figure 4: Terminal positions for resets26DN1670-0706
<strong>Kantech</strong> <strong>IP</strong> <strong>Link</strong> Quick Setup Sheet1. From EntraPass v4.0 and higher, go to Devices > Site. Select an existing Gateway andSite or create a new site.2. Enter the Number of controllers.3. Choose Enhanced Ethernet <strong>IP</strong> <strong>Link</strong> as connection type. Move to the <strong>IP</strong> <strong>Link</strong> <strong>IP</strong>Configuration tab.4. Enter the <strong>IP</strong> <strong>Link</strong>.MAC address.5. Enter the <strong>IP</strong> <strong>Link</strong> <strong>IP</strong> address.6. Enter the <strong>IP</strong> address (or Domain name) of the PC on which EntraPass Special Edition/Corporate Gateway is installed. Move to the <strong>IP</strong> <strong>Link</strong> Automated Connection tab.7. The parameters you will define in this section depends on the type of installation youhave:• If the <strong>IP</strong> <strong>Link</strong> is installed on the same subnet (LAN) as the PC defined in Step 6,select Local <strong>IP</strong> address• If the <strong>IP</strong> <strong>Link</strong> is installed on a different subnet (WAN), enter the <strong>IP</strong> <strong>Link</strong> Public <strong>IP</strong>address (or Domain name). Typically, this is the router address/name.8. Click on the floppy icon to save your configuration.9. Close window.10.Go to Operations > Site, select the Gateway.11. Verify the <strong>IP</strong> <strong>Link</strong> Communication status.DN1670-0706
<strong>Kantech</strong> <strong>IP</strong> <strong>Link</strong> Enhanced Ethernet DeviceNetwork Configuration Information SheetPlease complete one sheet per <strong>IP</strong> <strong>Link</strong>Company Name:Site Name:<strong>IP</strong> <strong>Link</strong> ConfigurationMAC Address: 00:50:F9: ____:____:____<strong>IP</strong> Address Type: __ Static __ DHCP (Reserved DHCP for WAN/Internet use)<strong>IP</strong> Address:Subnet Mask:Router (Gateway) <strong>IP</strong> Address:<strong>IP</strong> <strong>Link</strong> WAN/Internet ParametersDomain name (if used):DNS Server <strong>IP</strong> Address (if using a Domain Name for EntraPass):Public <strong>IP</strong> Address:Communications Port (18810 by default):Port Forwarding Completed on Router: ___18803 (UDP) ___18810/Custom (UDP)EntraPass Special Edition / Corporate Gateway PC Configuration<strong>IP</strong> Address Type: ___ Static ___ Reserved DHCP<strong>IP</strong> Address:EntraPass WAN/Internet ParametersDomain name (if used):Public <strong>IP</strong> Address:Port Forwarding Completed on Router: ___18001 (UDP) ___18801 (UDP)DN1670-0706