TotalPac®2 Dry - FIREFLEX SYSTEMS
TotalPac®2 Dry - FIREFLEX SYSTEMS
TotalPac®2 Dry - FIREFLEX SYSTEMS

You also want an ePaper? Increase the reach of your titles
YUMPU automatically turns print PDFs into web optimized ePapers that Google loves.
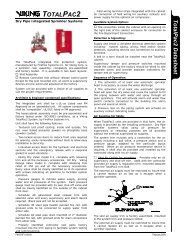
TOTALPAC2 Page 3 of 14TOTALPAC2 Integrated Fire Protection SystemMechanical Section - <strong>Dry</strong> Pipe System.14 Verify that the intermediate chamber of the dry valve isfree of water. No water should flow from the drip check(B7) when the plunger is pushed ..15 If equipped with a Viking Accelerator and External AntifloodDevice: When pressure in the accelerator airpressure gauge equals the system set pressure, OPENand secure the ½" (15mm) anti-flood isolation valve..16 Slowly open the water supply main control valve (D1)..17 When flow is developed from the main drain (D3),CLOSE the main drain valve..18 Fully open the water supply main control valve (D1)..19 Secure all valves in their normal operating position..20 Notify Authorities Having Jurisdiction and those in theaffected area that the system is in service.1.3 Placing the System In Service Regular <strong>Dry</strong> Pipe system: (refer to Fig.2) When the <strong>Dry</strong>Pipe System is ready to be placed in service, verify that allequipment is adequately heated and protected to preventfreezing and physical damage.Caution ! The dry valve clapper must be latched openduring performance of the hydrostatic test. Do notperform a 200 psi (1 379 kPa) hydrostatic system test withthe dry valve clapper in the closed (set) position.Never exceed 60 PSI (414 kPa) pressure in the systempiping with the dry valve clapper closed.Do not expose the Viking Accelerator to the hydrostatictest. For warnings and considerations regardinghydrostatic testing of the Viking Accelerator and othersystem components, refer to technical Data for theequipment used..1 Verify that the water supply main water supply controlvalve (D1) is closed..2 Open the main drain valve (D3) (located on the inlet ofthe dry valve) (A1)..3 Drain all water from the dry pipe system. If the systemhas operated, or if water has entered the system, openall auxiliary drains and the system main drain valve (D3).Allow enough time to completely drain the system..4 If equipped with a Viking Accelerator and external Antiflooddevice:.a Close the ½" (15mm) anti-flood isolation valve..b Observe the air pressure gauge on top of theAccelerator. The gauge must read zero before theaccelerator will automatically reset. It may benecessary to loosen, remove, and re-install (useappropriate wrench) the air gauge to vent trapped airpressure from the upper chamber of the Accelerator..5 Pressurize the dry pipe system as per table 1 above andMAKE SURE NOT TO EXCEED 60PSI (414 kPa). Donot perform pressure test on the trim. Correct all leaksbefore leaving this test. OPEN Main Drain Valve (D3).Completely flush the <strong>Dry</strong> Pipe System. Verify that thedry valve intermediate chamber is free from water. Nowater should flow from the drip check (B7) when theplunger is pushed..6 Connect the 120/220 VAC power feed for the optionalAir compressor on a separate breaker at the electricaldistribution panel. (see TBB at FIELD WIRINGDIAGRAM)..7 Install the cover back on the junction box.Note: Do not use this circuit breaker for any otherparallel application. Provide the circuit breaker with asafety lock if necessary to avoid any accidental closure.If equipped with a Viking Accelerator and externalAnti-flood device: when the pressure shown on theAccelerator pressure gauge equals the system setpressure shown on the <strong>Dry</strong> Pipe System air pressuregauge (E3), OPEN and secure the ½" (15mm) Antifloodisolation valve..8 Slowly OPEN the main water supply controlvalve (D1)..9 When flow is developed from the main drain, CLOSEthe main drain valve (D3)..10 Fully OPEN the water supply main control valve (D1)..11 Secure all valves on their normal operating position..12 Notify Authorities Having Jurisdiction and those in theaffected area that the system is in service. HP ® <strong>Dry</strong> Pipe System:.1 Verify that the system has been properly drained.Flow Test Valve (B6) should be open. Verify that theEmergency Release (B10) handle is closed. Primingvalve (B1) should be closed. Once sprinkler piping isdrained, close system main drain valve (D3)..2 Restore pneumatic pressure to the system piping.Maintain as required to the Anti-Flood Device..3 Open Priming valve (B1). Water pressure should bepresent on Priming Water Gauge (B11)..4 Open Flow test Valve (B6)..5 Partially open Main Water Supply Control Valve (D1)..6 When full flow develops from Flow test Valve (B6),close the Flow test Valve..7 Fully open and secure Main Water Supply ControlValve (D1)..8 Verify that the Alarm Test Valve (B5) is close and thatall other valves are in their normal operating position..9 Depress the plunger of the Drip Check (B7). No watershould flow from the Drip Check when the plunger ispushed.FM-086G-0-26C