- Page 1 and 2:
Foxit PhantomPDFUser Manual1
- Page 3 and 4:
Foxit PhantomPDF 5.5User ManualFOXI
- Page 5 and 6:
Foxit PhantomPDF 5.5User Manualimpr
- Page 7 and 8:
Foxit PhantomPDF 5.5User Manualwith
- Page 9 and 10:
Foxit PhantomPDF 5.5User Manualprov
- Page 11 and 12:
Foxit PhantomPDF 5.5User ManualDupl
- Page 13 and 14:
Foxit PhantomPDF 5.5User ManualChap
- Page 15 and 16:
Foxit PhantomPDF 5.5User ManualChap
- Page 17 and 18:
Foxit PhantomPDF 5.5User Manual•
- Page 19 and 20:
Foxit PhantomPDF 5.5User ManualAny
- Page 21 and 22:
Layer PanelA. A checkmark indicates
- Page 23 and 24:
Foxit PhantomPDF 5.5User ManualIn
- Page 25 and 26:
Foxit PhantomPDF 5.5User ManualFoxi
- Page 27 and 28:
Foxit PhantomPDF 5.5User ManualRead
- Page 29 and 30:
Foxit PhantomPDF 5.5User Manual•
- Page 31 and 32:
Foxit PhantomPDF 5.5User Manual•
- Page 33 and 34:
Foxit PhantomPDF 5.5User ManualInit
- Page 35 and 36:
Foxit PhantomPDF 5.5User ManualFont
- Page 37 and 38:
Foxit PhantomPDF 5.5User ManualBook
- Page 39 and 40:
Foxit PhantomPDF 5.5User Manualicon
- Page 41 and 42:
Foxit PhantomPDF 5.5User ManualResi
- Page 43 and 44:
Showing or hiding rulers• To show
- Page 45 and 46:
Foxit PhantomPDF 5.5User Manual1 in
- Page 47 and 48:
Chapter 3 - Creating PDFsFoxit Phan
- Page 49 and 50:
Foxit PhantomPDF 5.5User Manual•
- Page 51 and 52:
Foxit PhantomPDF 5.5User ManualTip:
- Page 53 and 54:
Foxit PhantomPDF 5.5User ManualReso
- Page 55 and 56:
2. Click “OK” to exit.3. A reco
- Page 57 and 58:
Foxit PhantomPDF 5.5User Manual3. Y
- Page 59 and 60:
Foxit PhantomPDF 5.5User ManualChap
- Page 61 and 62:
Foxit PhantomPDF 5.5User Manual To
- Page 63 and 64:
Foxit PhantomPDF 5.5User Manual1. O
- Page 65 and 66:
Foxit PhantomPDF 5.5User ManualChap
- Page 67 and 68:
3. Click OK to activate it.Foxit Ph
- Page 69 and 70:
Foxit PhantomPDF 5.5User Manual3. C
- Page 71 and 72:
Foxit PhantomPDF 5.5User ManualRemo
- Page 73 and 74:
Foxit PhantomPDF 5.5User ManualWork
- Page 75 and 76:
ookmark, and choose Paste under Sel
- Page 77 and 78:
Foxit PhantomPDF 5.5User ManualSoli
- Page 79 and 80:
Foxit PhantomPDF 5.5User ManualYou
- Page 81 and 82:
Foxit PhantomPDF 5.5User ManualRigh
- Page 83 and 84:
Foxit PhantomPDF 5.5User ManualImag
- Page 85 and 86:
Selecting multiple imagesFoxit Phan
- Page 87 and 88:
Foxit PhantomPDF 5.5User ManualABA.
- Page 89 and 90:
Foxit PhantomPDF 5.5User ManualReme
- Page 91 and 92:
Foxit PhantomPDF 5.5User Manual•
- Page 93 and 94:
Foxit PhantomPDF 5.5User Manual•
- Page 95 and 96:
Foxit PhantomPDF 5.5User ManualEdit
- Page 97 and 98:
3. In path object properties dialog
- Page 99 and 100:
Foxit PhantomPDF 5.5User ManualReda
- Page 101 and 102:
Chapter 7 - CommentsFoxit PhantomPD
- Page 103 and 104:
Foxit PhantomPDF 5.5User ManualUsin
- Page 105 and 106:
Foxit PhantomPDF 5.5User ManualDele
- Page 107 and 108:
Foxit PhantomPDF 5.5User ManualB. M
- Page 109 and 110:
Delete or Choose Delete from the Op
- Page 111 and 112: Changing the appearance of Typewrit
- Page 113 and 114: Setting a statusFoxit PhantomPDF 5.
- Page 115 and 116: Foxit PhantomPDF 5.5User ManualImpo
- Page 117 and 118: Chapter 8 - Stamping PDFsFoxit Phan
- Page 119 and 120: Foxit PhantomPDF 5.5User Manual5. Y
- Page 121 and 122: Foxit PhantomPDF 5.5User Manual•
- Page 123 and 124: Foxit PhantomPDF 5.5User ManualFill
- Page 125 and 126: or print a copy of the completed fo
- Page 127 and 128: A PDF FormFoxit PhantomPDF 5.5User
- Page 129 and 130: Creating multiple copies of a push
- Page 131 and 132: Foxit PhantomPDF 5.5User ManualNote
- Page 133 and 134: Foxit PhantomPDF 5.5User ManualChoo
- Page 135 and 136: Foxit PhantomPDF 5.5User ManualA. I
- Page 137 and 138: Foxit PhantomPDF 5.5User Manual•
- Page 139 and 140: Foxit PhantomPDF 5.5User ManualNote
- Page 141 and 142: Foxit PhantomPDF 5.5User ManualB. C
- Page 143 and 144: Foxit PhantomPDF 5.5User Manual•
- Page 145 and 146: Foxit PhantomPDF 5.5User ManualNote
- Page 147 and 148: Foxit PhantomPDF 5.5User ManualTo a
- Page 149 and 150: Chapter 10 - SecurityFoxit PhantomP
- Page 151 and 152: Foxit PhantomPDF 5.5User ManualA. E
- Page 153 and 154: Foxit PhantomPDF 5.5User ManualTo r
- Page 155 and 156: Foxit PhantomPDF 5.5User Manualperm
- Page 157 and 158: Foxit PhantomPDF 5.5User ManualAllo
- Page 159 and 160: Foxit PhantomPDF 5.5User ManualCont
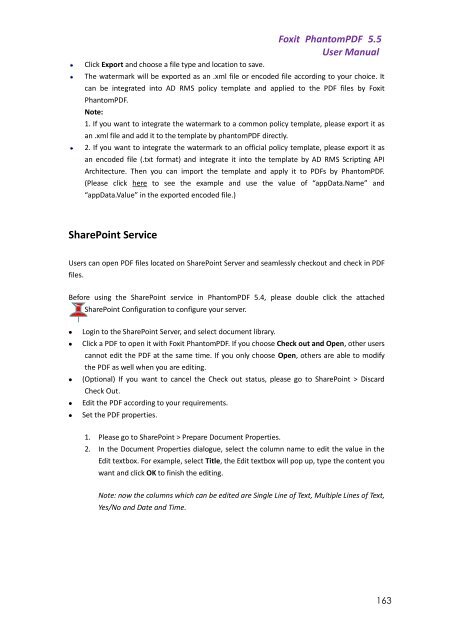
- Page 161: Foxit PhantomPDF 5.5User Manual2. A
- Page 165 and 166: Foxit PhantomPDF 5.5User ManualChap
- Page 167 and 168: Foxit PhantomPDF 5.5User ManualDiff
- Page 169 and 170: depends on options you select.Foxit
- Page 171 and 172: Foxit PhantomPDF 5.5User ManualCert
- Page 173 and 174: Certificate if you trust it.4. The
- Page 175 and 176: Foxit PhantomPDF 5.5User Manual•
- Page 177 and 178: Foxit PhantomPDFUser ManualChapter
- Page 179 and 180: Foxit PhantomPDF 5.5User ManualPrin
- Page 181 and 182: Chapter 13 - AppendicesFoxit Phanto
- Page 183 and 184: StrikeOutUnderlineSquigglyReplaceAd
- Page 185: Contact UsFoxit PhantomPDF 5.5User


