968 Spectrophotometer Operation Manual ***discontinued ... - X-Rite
968 Spectrophotometer Operation Manual ***discontinued ... - X-Rite
968 Spectrophotometer Operation Manual ***discontinued ... - X-Rite

You also want an ePaper? Increase the reach of your titles
YUMPU automatically turns print PDFs into web optimized ePapers that Google loves.
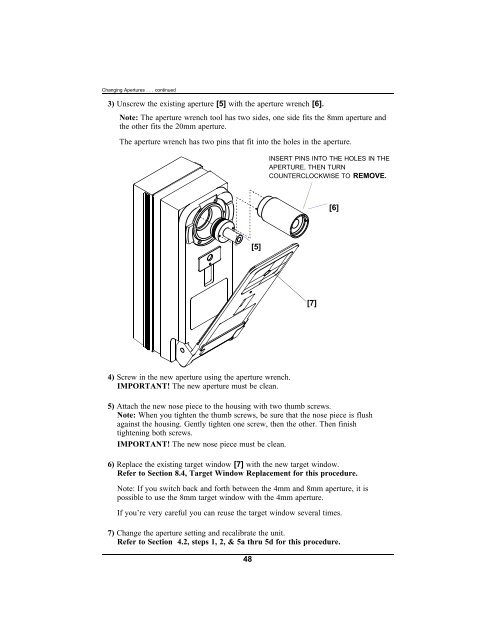
Changing Apertures . . . continued3) Unscrew the existing aperture [5] with the aperture wrench [6].Note: The aperture wrench tool has two sides, one side fits the 8mm aperture andthe other fits the 20mm aperture.The aperture wrench has two pins that fit into the holes in the aperture.INSERT PINS INTO THE HOLES IN THEAPERTURE, THEN TURNCOUNTERCLOCKWISE TO REMOVE.[6][5][7]4) Screw in the new aperture using the aperture wrench.IMPORTANT! The new aperture must be clean.5) Attach the new nose piece to the housing with two thumb screws.Note: When you tighten the thumb screws, be sure that the nose piece is flushagainst the housing. Gently tighten one screw, then the other. Then finishtightening both screws.IMPORTANT! The new nose piece must be clean.6) Replace the existing target window [7] with the new target window.Refer to Section 8.4, Target Window Replacement for this procedure.Note: If you switch back and forth between the 4mm and 8mm aperture, it ispossible to use the 8mm target window with the 4mm aperture.If you’re very careful you can reuse the target window several times.7) Change the aperture setting and recalibrate the unit.Refer to Section 4.2, steps 1, 2, & 5a thru 5d for this procedure.48