S5600 Installation Instructions - Efco
S5600 Installation Instructions - Efco
S5600 Installation Instructions - Efco

Create successful ePaper yourself
Turn your PDF publications into a flip-book with our unique Google optimized e-Paper software.
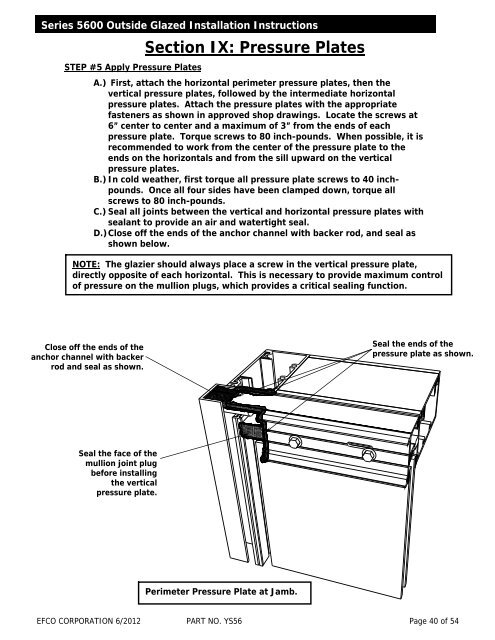
Series 5600 Outside Glazed <strong>Installation</strong> <strong>Instructions</strong>Section IX: Pressure PlatesSTEP #5 Apply Pressure PlatesA.) First, attach the horizontal perimeter pressure plates, then thevertical pressure plates, followed by the intermediate horizontalpressure plates. Attach the pressure plates with the appropriatefasteners as shown in approved shop drawings. Locate the screws at6” center to center and a maximum of 3” from the ends of eachpressure plate. Torque screws to 80 inch-pounds. When possible, it isrecommended to work from the center of the pressure plate to theends on the horizontals and from the sill upward on the verticalpressure plates.B.) In cold weather, first torque all pressure plate screws to 40 inchpounds.Once all four sides have been clamped down, torque allscrews to 80 inch-pounds.C.) Seal all joints between the vertical and horizontal pressure plates withsealant to provide an air and watertight seal.D.) Close off the ends of the anchor channel with backer rod, and seal asshown below.NOTE: The glazier should always place a screw in the vertical pressure plate,directly opposite of each horizontal. This is necessary to provide maximum controlof pressure on the mullion plugs, which provides a critical sealing function.Close off the ends of theanchor channel with backerrod and seal as shown.Seal the ends of thepressure plate as shown.Seal the face of themullion joint plugbefore installingthe verticalpressure plate.Perimeter Pressure Plate at Jamb.EFCO CORPORATION 6/2012 PART NO. YS56 Page 40 of 54