SERVICE MANUAL for MODEL AirV Rooftop Air Conditioning Systems
SERVICE MANUAL for MODEL AirV Rooftop Air Conditioning Systems
SERVICE MANUAL for MODEL AirV Rooftop Air Conditioning Systems
- No tags were found...

You also want an ePaper? Increase the reach of your titles
YUMPU automatically turns print PDFs into web optimized ePapers that Google loves.
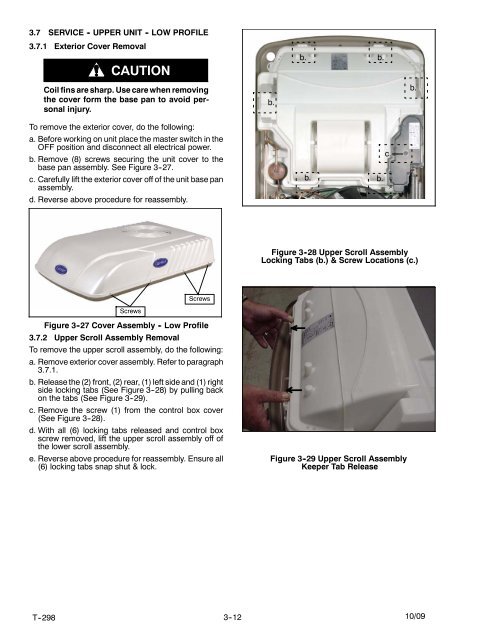
3.7 <strong>SERVICE</strong> - UPPER UNIT - LOW PROFILE3.7.1 Exterior Cover RemovalCAUTIONb. b.Coil fins are sharp. Use care when removingthe cover <strong>for</strong>m the base pan to avoid personalinjury.b.b.To remove the exterior cover, do the following:a. Be<strong>for</strong>e working on unit place the master switch in theOFF position and disconnect all electrical power.b. Remove (8) screws securing the unit cover to thebase pan assembly. See Figure 3--27.c. Carefully lift the exterior cover off of the unit base panassembly.d. Reverse above procedure <strong>for</strong> reassembly.b. b.c.Figure 3 -28 Upper Scroll AssemblyLocking Tabs (b.) & Screw Locations (c.)ScrewsScrewsFigure 3 -27 Cover Assembly - Low Profile3.7.2 Upper Scroll Assembly RemovalTo remove the upper scroll assembly, do the following:a. Remove exterior cover assembly. Refer to paragraph3.7.1.b. Release the (2) front, (2) rear, (1) left side and (1) rightside locking tabs (See Figure 3--28) by pulling backon the tabs (See Figure 3--29).c. Remove the screw (1) from the control box cover(See Figure 3--28).d. With all (6) locking tabs released and control boxscrew removed, lift the upper scroll assembly off ofthe lower scroll assembly.e. Reverse above procedure <strong>for</strong> reassembly. Ensure all(6) locking tabs snap shut & lock.Figure 3 -29 Upper Scroll AssemblyKeeper Tab ReleaseT--298 3--12 10/09