SERVICE MANUAL for MODEL AirV Rooftop Air Conditioning Systems
SERVICE MANUAL for MODEL AirV Rooftop Air Conditioning Systems
SERVICE MANUAL for MODEL AirV Rooftop Air Conditioning Systems
- No tags were found...

You also want an ePaper? Increase the reach of your titles
YUMPU automatically turns print PDFs into web optimized ePapers that Google loves.
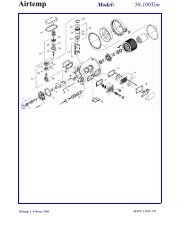
NOTEWhen reassembling the blower wheel on tothe motor shaft ensure that the blowerwheel is flush with the end of the motorshaft (SeeFigure 3--37).h. Reverse above procedure <strong>for</strong> reassembly.NOTEWhen placing the evaporator motor/blowerassembly back into the lower scroll assemblycradle, make sure that the assembly isseated securely in the cradle.(See Figure 3--36).3.7.6 Compressor ReplacementPer<strong>for</strong>m the procedures outlined in Section 3.6.2There are 4 bolts with the Low Profile Compressor.The system charge <strong>for</strong> the Low Profile unit is 16.9 OZ.3.7.7 Capacitor RemovalTo remove the capacitor, do the following:Wheel Flush With Motor ShaftFigure 3 -37 Evaporator Blower Wheel(Flush With End Of Motor Shaft)a. Per<strong>for</strong>m steps a., b. & c. as outlined in Section 3.7.5.b. Per<strong>for</strong>m steps outlined in Sections 3.6.8 & 3.6.9.c. The Low Profile Capacitor is removed from the controlbox assembly by pushing on the capacitor fromunder the control box assembly (See Figure 3--36).Upper Scroll AssemblyControl Box AssemblyCapacitorTerminal BlockFigure 3 -38 Control Box Assembly With Capacitor3.7.8 Remote Control (Fahrenheit to Celsius)All Remote Control Assemblies in the United States arepre--set to display in Fahrenheit degrees (seeFigure 3--39). To change from a Fahrenheit display to aCelsius display do the following:CAUTIONThe change from Fahrenheit to Celsius willbe permanent. It cannot be changed back toFahrenheit.10/093--15T--298