

QUILTsocial | Issue 07
I'm so excited to share this issue with you, within it there are treasures of quilting know-how that will help you improve your quilting skills. One of my challenges is sewing Y seams, and who doesn't struggle with these at first? Follow the instructions and you'll be well on your way to achieving perfect results. Other essential skills you'll want to hone are achieving perfect points every time using easy foundation piecing, 2 ways to machine quilt a binding, improving your 5 quilt label essentials and the 7 critical questions to ask yourself before quilting your quilt. Plus...expand your creativity using Northcott ColorWorks Concepts fabric, using bright and colorful patterns that engage your quilting senses! Enjoy the patterns in this issue, and Happy Quilting!
I'm so excited to share this issue with you, within it there are treasures of quilting know-how that will help you improve your quilting skills. One of my challenges is sewing Y seams, and who doesn't struggle with these at first? Follow the instructions and you'll be well on your way to achieving perfect results. Other essential skills you'll want to hone are achieving perfect points every time using easy foundation piecing, 2 ways to machine quilt a binding, improving your 5 quilt label essentials and the 7 critical questions to ask yourself before quilting your quilt. Plus...expand your creativity using Northcott ColorWorks Concepts fabric, using bright and colorful patterns that engage your quilting senses! Enjoy the patterns in this issue, and Happy Quilting!

Create successful ePaper yourself
Turn your PDF publications into a flip-book with our unique Google optimized e-Paper software.
skill level easy<br />
finished measurements<br />
top edge to bottom edge 26½” [67cm]<br />
skirt width 50” [127cm]<br />
materials<br />
fabric<br />
• 32” [80cm] Fabric 1 (floral)<br />
• 39” [100cm] Fabric 2 (solid)<br />
• 1yd package or 1yd x 20” Sulky Soft n Sheer extra<br />
required notions<br />
• Sew Easy 10⁰ Wedge Ruler<br />
• quilting ruler 6” x 24”<br />
• 45mm rotary cutter<br />
other<br />
• Kai Scissors 4½”<br />
• Heirloom Glass Head Pins<br />
• 4 spools Gütermann Serger thread<br />
• 30 wt Sulky Cotton Blendables thread<br />
• Topstitch needle size 90/14<br />
• Clever Clips<br />
• Clover Double sided basting tape<br />
• Heirloom Air-erasable marker<br />
• Heirloom Stop Fray<br />
Cutting<br />
Fabric 1<br />
Bib: 2 – 12” x 11” (1 lining and 1 bib front)<br />
Wedges: 2 – 17” x 14”<br />
Binding: 2 – 2½” x 22”<br />
Fabric 2<br />
Ruffle: 2 – 3½”x 40”<br />
Waistband/Ties: 2 – 4½” x 40”<br />
Neck Ties: 2 – 3½” x 40”<br />
Wedges: 2 – 17” x 12”<br />
Soft n Sheer Extra<br />
Bib: 12” x 11”<br />
Waistband: 2¼” x 20”<br />
Serger set up<br />
4–Thread Overlock Stitch<br />
Neck Ties<br />
1. Cut one neck tie strip 20” long. For each tie,<br />
place right sides together, serge the length and<br />
across one end.<br />
2. Put a dab of Fray Stop on the threads at the corners.<br />
3. Turn right-side out. Press and set aside<br />
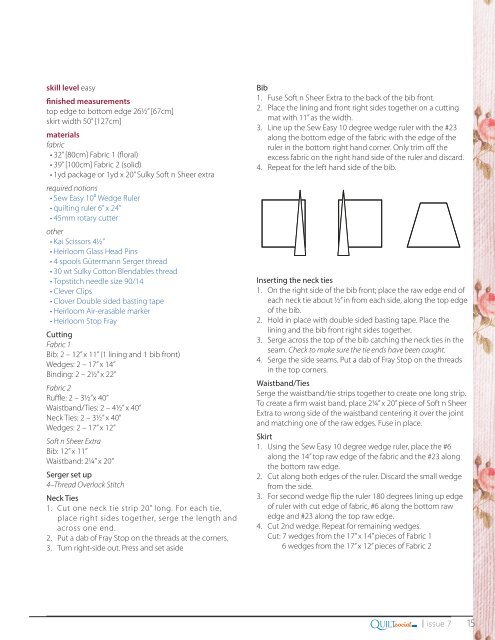
Bib<br />
1. Fuse Soft n Sheer Extra to the back of the bib front.<br />
2. Place the lining and front right sides together on a cutting<br />
mat with 11” as the width.<br />
3. Line up the Sew Easy 10 degree wedge ruler with the #23<br />
along the bottom edge of the fabric with the edge of the<br />
ruler in the bottom right hand corner. Only trim off the<br />
excess fabric on the right hand side of the ruler and discard.<br />
4. Repeat for the left hand side of the bib.<br />
Inserting the neck ties<br />
1. On the right side of the bib front; place the raw edge end of<br />
each neck tie about ½” in from each side, along the top edge<br />
of the bib.<br />
2. Hold in place with double sided basting tape. Place the<br />
lining and the bib front right sides together.<br />
3. Serge across the top of the bib catching the neck ties in the<br />
seam. Check to make sure the tie ends have been caught.<br />
4. Serge the side seams. Put a dab of Fray Stop on the threads<br />
in the top corners.<br />
Waistband/Ties<br />
Serge the waistband/tie strips together to create one long strip.<br />
To create a firm waist band, place 2¼” x 20” piece of Soft n Sheer<br />
Extra to wrong side of the waistband centering it over the joint<br />
and matching one of the raw edges. Fuse in place.<br />
Skirt<br />
1. Using the Sew Easy 10 degree wedge ruler, place the #6<br />
along the 14” top raw edge of the fabric and the #23 along<br />
the bottom raw edge.<br />
2. Cut along both edges of the ruler. Discard the small wedge<br />
from the side.<br />
3. For second wedge flip the ruler 180 degrees lining up edge<br />
of ruler with cut edge of fabric, #6 along the bottom raw<br />
edge and #23 along the top raw edge.<br />
4. Cut 2nd wedge. Repeat for remaining wedges.<br />
Cut: 7 wedges from the 17” x 14” pieces of Fabric 1<br />
6 wedges from the 17” x 12” pieces of Fabric 2<br />
Q<br />
.com<br />
UILTsocial<br />
| issue 7<br />
15


