

QUILTsocial | Issue 07
I'm so excited to share this issue with you, within it there are treasures of quilting know-how that will help you improve your quilting skills. One of my challenges is sewing Y seams, and who doesn't struggle with these at first? Follow the instructions and you'll be well on your way to achieving perfect results. Other essential skills you'll want to hone are achieving perfect points every time using easy foundation piecing, 2 ways to machine quilt a binding, improving your 5 quilt label essentials and the 7 critical questions to ask yourself before quilting your quilt. Plus...expand your creativity using Northcott ColorWorks Concepts fabric, using bright and colorful patterns that engage your quilting senses! Enjoy the patterns in this issue, and Happy Quilting!
I'm so excited to share this issue with you, within it there are treasures of quilting know-how that will help you improve your quilting skills. One of my challenges is sewing Y seams, and who doesn't struggle with these at first? Follow the instructions and you'll be well on your way to achieving perfect results. Other essential skills you'll want to hone are achieving perfect points every time using easy foundation piecing, 2 ways to machine quilt a binding, improving your 5 quilt label essentials and the 7 critical questions to ask yourself before quilting your quilt. Plus...expand your creativity using Northcott ColorWorks Concepts fabric, using bright and colorful patterns that engage your quilting senses! Enjoy the patterns in this issue, and Happy Quilting!

Create successful ePaper yourself
Turn your PDF publications into a flip-book with our unique Google optimized e-Paper software.
The biggest beef I have about binding<br />
is that most people stitch their binding<br />
to the quilt top with a quarter inch seam.<br />
If you use 2½" binding strips, this means<br />
you're going to have "empty" binding<br />
that feels limp and thin or your binding<br />
will not be even on the front and the<br />
back.<br />
You can see in the picture below, I use<br />
the edge of that opening in the Straight<br />
Stitch Foot as my guide for the seam<br />
allowance. This ends up giving me about<br />
a ³∕₈" seam allowance and when I pull<br />
that binding to the back of the quilt and<br />
hand stitch it in place, that binding is<br />
completely full of quilt and feels nice<br />
and firm.<br />
Don't tell anyone I told you this, but I<br />
always check out the binding to see how<br />
it was sewn on! Again – there's nothing<br />
wrong if you use a ¼" seam, but find a<br />
quilt that is done in both styles and then<br />
ask yourself – which one do you like the<br />
best? Then you decide if you want to do<br />
this for your quilts.<br />
Sewing the binding to the front of the quilt using<br />
the Dual Feed Foot<br />
There are also guides on the Changeable<br />
Straight Stitch Foot that help me know<br />
where to stop at the corner. Very handy if<br />
you need it!<br />
I used the Interchangeable Dual<br />
Feed Foot but this time, I used the<br />
Changeable Zigzag Foot. I didn't<br />
find a difference in using either of the<br />
interchangeable feet for this first part.<br />
You can see in the picture, that I'm<br />
using the edge of that opening in the<br />
Changeable Zigzag Foot as the guide for<br />
the seam.<br />
Sewing the binding to the BACK of the quilt<br />
Let's talk about thread color!<br />
Reluctantly, I had to learn how to sew<br />
bindings this way because at work we<br />
often have very tight deadlines to get<br />
quilts ready and there's no time for hand<br />
stitching. Since that first quilt, I've done<br />
several more (including one of mine-<br />
ACK!). I'm still perfecting this technique<br />
but I'll share with you what I have<br />
discovered so far.<br />
Thread color is extremely important.<br />
When initially sewing the binding the<br />
first time, I find it helpful to use a bobbin<br />
thread that matches the color of the<br />
quilt top. It doesn't matter what color<br />
you use on top.<br />
When I sew the binding on the front of<br />
the quilt, I use invisible thread on the top<br />
and use thread that matches the binding<br />
in the bobbin.<br />
In this case, I use my size 80/12 needle<br />
that I use for piecing. That needle has to<br />
go through a lot of layers and the smaller<br />
needle may end up breaking or bending.<br />
While I've seen people use a lot of<br />
different decorative stitches for this step,<br />
I like to use a blanket stitch (D:3) which<br />
is found in the D Menu – Quilt Stitches<br />
on the Sapphire 960Q.<br />
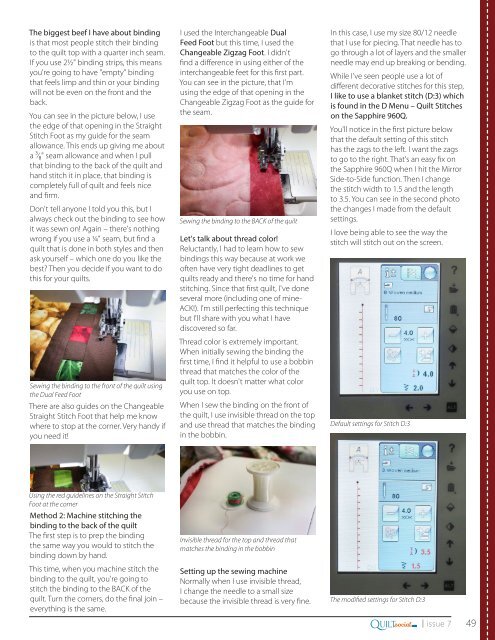
You'll notice in the first picture below<br />
that the default setting of this stitch<br />
has the zags to the left. I want the zags<br />
to go to the right. That's an easy fix on<br />
the Sapphire 960Q when I hit the Mirror<br />
Side-to-Side function. Then I change<br />
the stitch width to 1.5 and the length<br />
to 3.5. You can see in the second photo<br />
the changes I made from the default<br />
settings.<br />
I love being able to see the way the<br />
stitch will stitch out on the screen.<br />
Default settings for Stitch D:3<br />
Using the red guidelines on the Straight Stitch<br />
Foot at the corner<br />
Method 2: Machine stitching the<br />
binding to the back of the quilt<br />
The first step is to prep the binding<br />
the same way you would to stitch the<br />
binding down by hand.<br />
This time, when you machine stitch the<br />
binding to the quilt, you're going to<br />
stitch the binding to the BACK of the<br />
quilt. Turn the corners, do the final join –<br />
everything is the same.<br />
Invisible thread for the top and thread that<br />
matches the binding in the bobbin<br />
Setting up the sewing machine<br />
Normally when I use invisible thread,<br />
I change the needle to a small size<br />
because the invisible thread is very fine.<br />
The modified settings for Stitch D:3<br />
Q<br />
.com<br />
UILTsocial<br />
| issue 7 49


