

QUILTsocial | Issue 07
I'm so excited to share this issue with you, within it there are treasures of quilting know-how that will help you improve your quilting skills. One of my challenges is sewing Y seams, and who doesn't struggle with these at first? Follow the instructions and you'll be well on your way to achieving perfect results. Other essential skills you'll want to hone are achieving perfect points every time using easy foundation piecing, 2 ways to machine quilt a binding, improving your 5 quilt label essentials and the 7 critical questions to ask yourself before quilting your quilt. Plus...expand your creativity using Northcott ColorWorks Concepts fabric, using bright and colorful patterns that engage your quilting senses! Enjoy the patterns in this issue, and Happy Quilting!
I'm so excited to share this issue with you, within it there are treasures of quilting know-how that will help you improve your quilting skills. One of my challenges is sewing Y seams, and who doesn't struggle with these at first? Follow the instructions and you'll be well on your way to achieving perfect results. Other essential skills you'll want to hone are achieving perfect points every time using easy foundation piecing, 2 ways to machine quilt a binding, improving your 5 quilt label essentials and the 7 critical questions to ask yourself before quilting your quilt. Plus...expand your creativity using Northcott ColorWorks Concepts fabric, using bright and colorful patterns that engage your quilting senses! Enjoy the patterns in this issue, and Happy Quilting!

You also want an ePaper? Increase the reach of your titles
YUMPU automatically turns print PDFs into web optimized ePapers that Google loves.
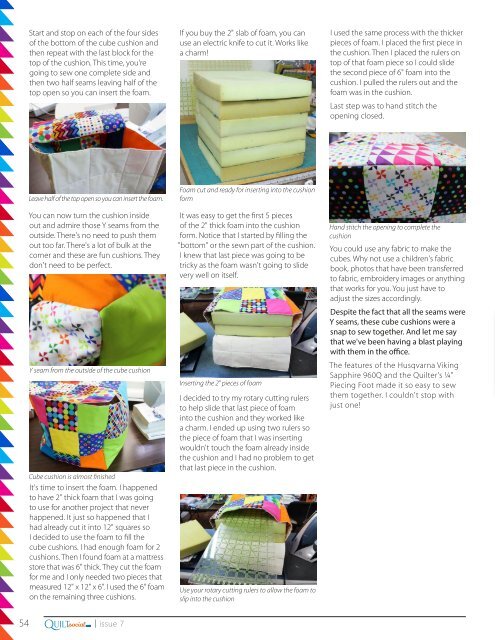
Start and stop on each of the four sides<br />
of the bottom of the cube cushion and<br />
then repeat with the last block for the<br />
top of the cushion. This time, you're<br />
going to sew one complete side and<br />
then two half seams leaving half of the<br />
top open so you can insert the foam.<br />
If you buy the 2" slab of foam, you can<br />
use an electric knife to cut it. Works like<br />
a charm!<br />
I used the same process with the thicker<br />
pieces of foam. I placed the first piece in<br />
the cushion. Then I placed the rulers on<br />
top of that foam piece so I could slide<br />
the second piece of 6" foam into the<br />
cushion. I pulled the rulers out and the<br />
foam was in the cushion.<br />
Last step was to hand stitch the<br />
opening closed.<br />
Leave half of the top open so you can insert the foam.<br />
You can now turn the cushion inside<br />
out and admire those Y seams from the<br />
outside. There's no need to push them<br />
out too far. There's a lot of bulk at the<br />
corner and these are fun cushions. They<br />
don't need to be perfect.<br />
Y seam from the outside of the cube cushion<br />
Cube cushion is almost finished<br />
It's time to insert the foam. I happened<br />
to have 2" thick foam that I was going<br />
to use for another project that never<br />
happened. It just so happened that I<br />
had already cut it into 12" squares so<br />
I decided to use the foam to fill the<br />
cube cushions. I had enough foam for 2<br />
cushions. Then I found foam at a mattress<br />
store that was 6" thick. They cut the foam<br />
for me and I only needed two pieces that<br />
measured 12" x 12" x 6". I used the 6" foam<br />
on the remaining three cushions.<br />
Foam cut and ready for inserting into the cushion<br />
form<br />
It was easy to get the first 5 pieces<br />
of the 2" thick foam into the cushion<br />
form. Notice that I started by filling the<br />
"bottom" or the sewn part of the cushion.<br />
I knew that last piece was going to be<br />
tricky as the foam wasn't going to slide<br />
very well on itself.<br />
Inserting the 2" pieces of foam<br />
I decided to try my rotary cutting rulers<br />
to help slide that last piece of foam<br />
into the cushion and they worked like<br />
a charm. I ended up using two rulers so<br />
the piece of foam that I was inserting<br />
wouldn't touch the foam already inside<br />
the cushion and I had no problem to get<br />
that last piece in the cushion.<br />
Use your rotary cutting rulers to allow the foam to<br />
slip into the cushion<br />
Hand stitch the opening to complete the<br />
cushion<br />
You could use any fabric to make the<br />
cubes. Why not use a children's fabric<br />
book, photos that have been transferred<br />
to fabric, embroidery images or anything<br />
that works for you. You just have to<br />
adjust the sizes accordingly.<br />
Despite the fact that all the seams were<br />
Y seams, these cube cushions were a<br />
snap to sew together. And let me say<br />
that we've been having a blast playing<br />
with them in the office.<br />
The features of the Husqvarna Viking<br />
Sapphire 960Q and the Quilter's ¼"<br />
Piecing Foot made it so easy to sew<br />
them together. I couldn't stop with<br />
just one!<br />
Q<br />
54 .com | issue 7<br />
UILTsocial


