

QUILTsocial | Issue 07
I'm so excited to share this issue with you, within it there are treasures of quilting know-how that will help you improve your quilting skills. One of my challenges is sewing Y seams, and who doesn't struggle with these at first? Follow the instructions and you'll be well on your way to achieving perfect results. Other essential skills you'll want to hone are achieving perfect points every time using easy foundation piecing, 2 ways to machine quilt a binding, improving your 5 quilt label essentials and the 7 critical questions to ask yourself before quilting your quilt. Plus...expand your creativity using Northcott ColorWorks Concepts fabric, using bright and colorful patterns that engage your quilting senses! Enjoy the patterns in this issue, and Happy Quilting!
I'm so excited to share this issue with you, within it there are treasures of quilting know-how that will help you improve your quilting skills. One of my challenges is sewing Y seams, and who doesn't struggle with these at first? Follow the instructions and you'll be well on your way to achieving perfect results. Other essential skills you'll want to hone are achieving perfect points every time using easy foundation piecing, 2 ways to machine quilt a binding, improving your 5 quilt label essentials and the 7 critical questions to ask yourself before quilting your quilt. Plus...expand your creativity using Northcott ColorWorks Concepts fabric, using bright and colorful patterns that engage your quilting senses! Enjoy the patterns in this issue, and Happy Quilting!

Create successful ePaper yourself
Turn your PDF publications into a flip-book with our unique Google optimized e-Paper software.
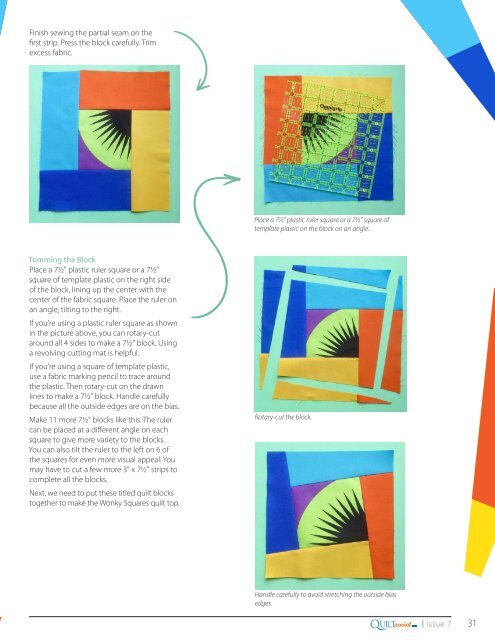
Finish sewing the partial seam on the<br />
first strip. Press the block carefully. Trim<br />
excess fabric.<br />
Place a 7½" plastic ruler square or a 7½" square of<br />
template plastic on the block on an angle.<br />
Trimming the Block<br />
Place a 7½" plastic ruler square or a 7½"<br />
square of template plastic on the right side<br />
of the block, lining up the center with the<br />
center of the fabric square. Place the ruler on<br />
an angle, tilting to the right.<br />
If you're using a plastic ruler square as shown<br />
in the picture above, you can rotary-cut<br />
around all 4 sides to make a 7½" block. Using<br />
a revolving cutting mat is helpful.<br />
If you're using a square of template plastic,<br />
use a fabric marking pencil to trace around<br />
the plastic. Then rotary-cut on the drawn<br />
lines to make a 7½" block. Handle carefully<br />
because all the outside edges are on the bias.<br />
Make 11 more 7½" blocks like this. The ruler<br />
can be placed at a different angle on each<br />
square to give more variety to the blocks.<br />
You can also tilt the ruler to the left on 6 of<br />
the squares for even more visual appeal. You<br />
may have to cut a few more 3" x 7½" strips to<br />
complete all the blocks.<br />
Next, we need to put these titled quilt blocks<br />
together to make the Wonky Squares quilt top.<br />
Rotary-cut the block.<br />
Handle carefully to avoid stretching the outside bias<br />
edges.<br />
Q<br />
.com<br />
UILTsocial<br />
| issue 7 31


