

QUILTsocial | Issue 07
I'm so excited to share this issue with you, within it there are treasures of quilting know-how that will help you improve your quilting skills. One of my challenges is sewing Y seams, and who doesn't struggle with these at first? Follow the instructions and you'll be well on your way to achieving perfect results. Other essential skills you'll want to hone are achieving perfect points every time using easy foundation piecing, 2 ways to machine quilt a binding, improving your 5 quilt label essentials and the 7 critical questions to ask yourself before quilting your quilt. Plus...expand your creativity using Northcott ColorWorks Concepts fabric, using bright and colorful patterns that engage your quilting senses! Enjoy the patterns in this issue, and Happy Quilting!
I'm so excited to share this issue with you, within it there are treasures of quilting know-how that will help you improve your quilting skills. One of my challenges is sewing Y seams, and who doesn't struggle with these at first? Follow the instructions and you'll be well on your way to achieving perfect results. Other essential skills you'll want to hone are achieving perfect points every time using easy foundation piecing, 2 ways to machine quilt a binding, improving your 5 quilt label essentials and the 7 critical questions to ask yourself before quilting your quilt. Plus...expand your creativity using Northcott ColorWorks Concepts fabric, using bright and colorful patterns that engage your quilting senses! Enjoy the patterns in this issue, and Happy Quilting!

You also want an ePaper? Increase the reach of your titles
YUMPU automatically turns print PDFs into web optimized ePapers that Google loves.
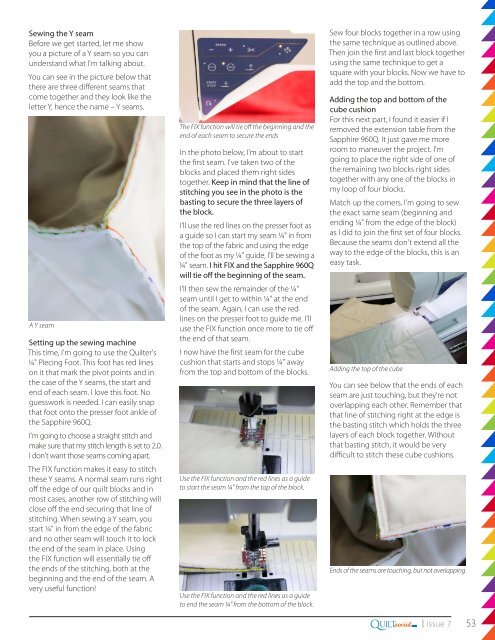
Sewing the Y seam<br />
Before we get started, let me show<br />
you a picture of a Y seam so you can<br />
understand what I'm talking about.<br />
You can see in the picture below that<br />
there are three different seams that<br />
come together and they look like the<br />
letter Y, hence the name – Y seams.<br />
A Y seam<br />
Setting up the sewing machine<br />
This time, I'm going to use the Quilter's<br />
¼" Piecing Foot. This foot has red lines<br />
on it that mark the pivot points and in<br />
the case of the Y seams, the start and<br />
end of each seam. I love this foot. No<br />
guesswork is needed. I can easily snap<br />
that foot onto the presser foot ankle of<br />
the Sapphire 960Q.<br />
I'm going to choose a straight stitch and<br />
make sure that my stitch length is set to 2.0.<br />
I don't want those seams coming apart.<br />
The FIX function makes it easy to stitch<br />
these Y seams. A normal seam runs right<br />
off the edge of our quilt blocks and in<br />
most cases, another row of stitching will<br />
close off the end securing that line of<br />
stitching. When sewing a Y seam, you<br />
start ¼" in from the edge of the fabric<br />
and no other seam will touch it to lock<br />
the end of the seam in place. Using<br />
the FIX function will essentially tie off<br />
the ends of the stitching, both at the<br />
beginning and the end of the seam. A<br />
very useful function!<br />
The FIX function will tie off the beginning and the<br />
end of each seam to secure the ends<br />
In the photo below, I'm about to start<br />
the first seam. I've taken two of the<br />
blocks and placed them right sides<br />
together. Keep in mind that the line of<br />
stitching you see in the photo is the<br />
basting to secure the three layers of<br />
the block.<br />
I'll use the red lines on the presser foot as<br />
a guide so I can start my seam ¼" in from<br />
the top of the fabric and using the edge<br />
of the foot as my ¼" guide, I'll be sewing a<br />
¼" seam. I hit FIX and the Sapphire 960Q<br />
will tie off the beginning of the seam.<br />
I'll then sew the remainder of the ¼"<br />
seam until I get to within ¼" at the end<br />
of the seam. Again, I can use the red<br />
lines on the presser foot to guide me. I'll<br />
use the FIX function once more to tie off<br />
the end of that seam.<br />
I now have the first seam for the cube<br />
cushion that starts and stops ¼" away<br />
from the top and bottom of the blocks.<br />
Use the FIX function and the red lines as a guide<br />
to start the seam ¼" from the top of the block.<br />
Use the FIX function and the red lines as a guide<br />
to end the seam ¼" from the bottom of the block.<br />
Sew four blocks together in a row using<br />
the same technique as outlined above.<br />
Then join the first and last block together<br />
using the same technique to get a<br />
square with your blocks. Now we have to<br />
add the top and the bottom.<br />
Adding the top and bottom of the<br />
cube cushion<br />
For this next part, I found it easier if I<br />
removed the extension table from the<br />
Sapphire 960Q. It just gave me more<br />
room to maneuver the project. I'm<br />
going to place the right side of one of<br />
the remaining two blocks right sides<br />
together with any one of the blocks in<br />
my loop of four blocks.<br />
Match up the corners. I'm going to sew<br />
the exact same seam (beginning and<br />
ending ¼" from the edge of the block)<br />
as I did to join the first set of four blocks.<br />
Because the seams don't extend all the<br />
way to the edge of the blocks, this is an<br />
easy task.<br />
Adding the top of the cube<br />
You can see below that the ends of each<br />
seam are just touching, but they're not<br />
overlapping each other. Remember that<br />
that line of stitching right at the edge is<br />
the basting stitch which holds the three<br />
layers of each block together. Without<br />
that basting stitch, it would be very<br />
difficult to stitch these cube cushions.<br />
Ends of the seams are touching, but not overlapping<br />
Q<br />
.com<br />
UILTsocial<br />
| issue 7 53


