

QUILTsocial | Issue 07
I'm so excited to share this issue with you, within it there are treasures of quilting know-how that will help you improve your quilting skills. One of my challenges is sewing Y seams, and who doesn't struggle with these at first? Follow the instructions and you'll be well on your way to achieving perfect results. Other essential skills you'll want to hone are achieving perfect points every time using easy foundation piecing, 2 ways to machine quilt a binding, improving your 5 quilt label essentials and the 7 critical questions to ask yourself before quilting your quilt. Plus...expand your creativity using Northcott ColorWorks Concepts fabric, using bright and colorful patterns that engage your quilting senses! Enjoy the patterns in this issue, and Happy Quilting!
I'm so excited to share this issue with you, within it there are treasures of quilting know-how that will help you improve your quilting skills. One of my challenges is sewing Y seams, and who doesn't struggle with these at first? Follow the instructions and you'll be well on your way to achieving perfect results. Other essential skills you'll want to hone are achieving perfect points every time using easy foundation piecing, 2 ways to machine quilt a binding, improving your 5 quilt label essentials and the 7 critical questions to ask yourself before quilting your quilt. Plus...expand your creativity using Northcott ColorWorks Concepts fabric, using bright and colorful patterns that engage your quilting senses! Enjoy the patterns in this issue, and Happy Quilting!

Create successful ePaper yourself
Turn your PDF publications into a flip-book with our unique Google optimized e-Paper software.
Piece 3 in position<br />
Foundation piecing complete with perfect points<br />
Piece squared up<br />
Removing the paper<br />
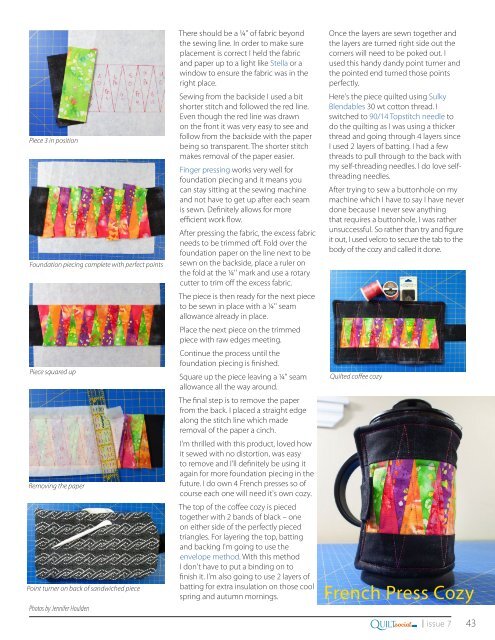
Point turner on back of sandwiched piece<br />
Photos by Jennifer Houlden<br />
There should be a ¼" of fabric beyond<br />
the sewing line. In order to make sure<br />
placement is correct I held the fabric<br />
and paper up to a light like Stella or a<br />
window to ensure the fabric was in the<br />
right place.<br />
Sewing from the backside I used a bit<br />
shorter stitch and followed the red line.<br />
Even though the red line was drawn<br />
on the front it was very easy to see and<br />
follow from the backside with the paper<br />
being so transparent. The shorter stitch<br />
makes removal of the paper easier.<br />
Finger pressing works very well for<br />
foundation piecing and it means you<br />
can stay sitting at the sewing machine<br />
and not have to get up after each seam<br />
is sewn. Definitely allows for more<br />
efficient work flow.<br />
After pressing the fabric, the excess fabric<br />
needs to be trimmed off. Fold over the<br />
foundation paper on the line next to be<br />
sewn on the backside, place a ruler on<br />
the fold at the ¼'' mark and use a rotary<br />
cutter to trim off the excess fabric.<br />
The piece is then ready for the next piece<br />
to be sewn in place with a ¼'' seam<br />
allowance already in place.<br />
Place the next piece on the trimmed<br />
piece with raw edges meeting.<br />
Continue the process until the<br />
foundation piecing is finished.<br />
Square up the piece leaving a ¼" seam<br />
allowance all the way around.<br />
The final step is to remove the paper<br />
from the back. I placed a straight edge<br />
along the stitch line which made<br />
removal of the paper a cinch.<br />
I'm thrilled with this product, loved how<br />
it sewed with no distortion, was easy<br />
to remove and I'll definitely be using it<br />
again for more foundation piecing in the<br />
future. I do own 4 French presses so of<br />
course each one will need it's own cozy.<br />
The top of the coffee cozy is pieced<br />
together with 2 bands of black – one<br />
on either side of the perfectly pieced<br />
triangles. For layering the top, batting<br />
and backing I'm going to use the<br />
envelope method. With this method<br />
I don't have to put a binding on to<br />
finish it. I'm also going to use 2 layers of<br />
batting for extra insulation on those cool<br />
spring and autumn mornings.<br />
Once the layers are sewn together and<br />
the layers are turned right side out the<br />
corners will need to be poked out. I<br />
used this handy dandy point turner and<br />
the pointed end turned those points<br />
perfectly.<br />
Here's the piece quilted using Sulky<br />
Blendables 30 wt cotton thread. I<br />
switched to 90/14 Topstitch needle to<br />
do the quilting as I was using a thicker<br />
thread and going through 4 layers since<br />
I used 2 layers of batting. I had a few<br />
threads to pull through to the back with<br />
my self-threading needles. I do love selfthreading<br />
needles.<br />
After trying to sew a buttonhole on my<br />
machine which I have to say I have never<br />
done because I never sew anything<br />
that requires a buttonhole, I was rather<br />
unsuccessful. So rather than try and figure<br />
it out, I used velcro to secure the tab to the<br />
body of the cozy and called it done.<br />
Quilted coffee cozy<br />
French Press Cozy<br />
Q<br />
.com<br />
UILTsocial<br />
| issue 7 43


