ABS READER II USER GUIDE - OTC
ABS READER II USER GUIDE - OTC
ABS READER II USER GUIDE - OTC

Create successful ePaper yourself
Turn your PDF publications into a flip-book with our unique Google optimized e-Paper software.
42<br />
<strong>ABS</strong> Reader <strong>II</strong> User Guide<br />
Read Codes / Clear Codes (Flash Codes)<br />
Read Codes / Clear Codes (Flash<br />
Codes)<br />
If a vehicle requires that you read diagnostic trouble<br />
codes by visually viewing them as “flash codes,” the<br />
Read Codes and Clear Codes menu options appear<br />
directly on the Diagnostic Menu screen (instead of the<br />
Diagnostic Codes option).<br />
For this type of vehicle, you identify the vehicle’s flash<br />
code numbers and manually enter the numbers into the<br />
<strong>ABS</strong> Reader <strong>II</strong> tool to see their descriptions. The Read<br />
Codes function provides instructions for how to physically<br />
view the flash codes and lets you enter the code<br />
numbers to see their descriptions. The Clear Codes<br />
function provides instructions for how to manually clear<br />
flash codes from the vehicle.<br />
Note: Flash codes are DTCs that you identify by: 1) grounding<br />
a pin on the vehicle’s check connector to trigger a specific<br />
indictor light to blink, and 2) viewing and counting the number<br />
of times the indicator light blinks.<br />
This section includes the following procedures:<br />
• Read Codes (Flash Codes) (below)<br />
• Clear Codes (Flash Codes) on page 43<br />
Read Codes (Flash Codes)<br />
When the Read Codes option appears on the Diagnostic<br />
Menu screen, use the option to: 1) view instructions for<br />
how to physically view flash codes from the vehicle, and<br />
2) to enter the flash code numbers into the <strong>ABS</strong> Reader<br />
<strong>II</strong> tool to see their descriptions.<br />
To read flash codes, follow these steps:<br />
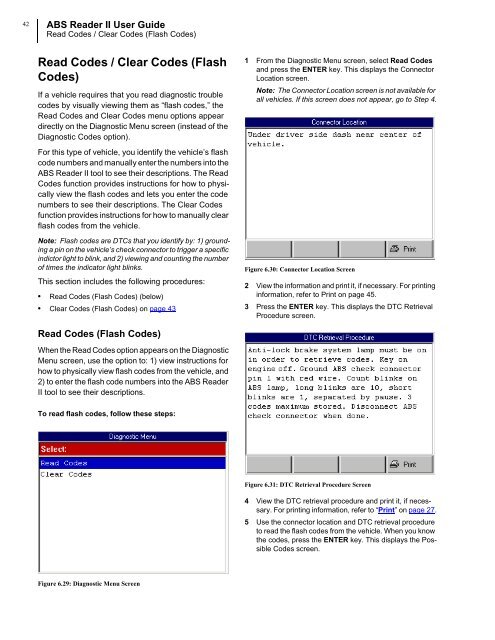
Figure 6.29: Diagnostic Menu Screen<br />
1 From the Diagnostic Menu screen, select Read Codes<br />
and press the ENTER key. This displays the Connector<br />
Location screen.<br />
Note: The Connector Location screen is not available for<br />
all vehicles. If this screen does not appear, go to Step 4.<br />
Figure 6.30: Connector Location Screen<br />
2 View the information and print it, if necessary. For printing<br />
information, refer to Print on page 45.<br />
3 Press the ENTER key. This displays the DTC Retrieval<br />
Procedure screen.<br />
Figure 6.31: DTC Retrieval Procedure Screen<br />
4 View the DTC retrieval procedure and print it, if necessary.<br />
For printing information, refer to “Print” on page 27.<br />
5 Use the connector location and DTC retrieval procedure<br />
to read the flash codes from the vehicle. When you know<br />
the codes, press the ENTER key. This displays the Possible<br />
Codes screen.