AW #131.pdf - Karatunov.net
AW #131.pdf - Karatunov.net
AW #131.pdf - Karatunov.net

Create successful ePaper yourself
Turn your PDF publications into a flip-book with our unique Google optimized e-Paper software.
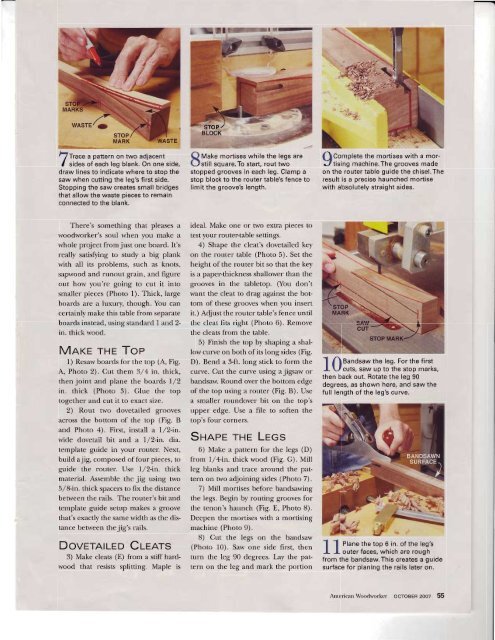
F/Tra"e a pattern on two adjacent<br />
J sides of each leg blank. On one side,<br />
draw lines to indicate where to stop the<br />
saw when cutting the leg's first side.<br />
Stopping the saw creates small bridges<br />
that allow the waste pieces to remain<br />
connected to the blank.<br />
There's something that pleases a<br />
woodworker's soul when you make a<br />
whole project from just one board. It's<br />
really satisffing to study a big plank<br />
with all its problems, such as knots,<br />
sapwood and runout grain, and figure<br />
out how you're going to cut it into<br />
smaller pieces (Photo 1). Thick, large<br />
boards are a luxury though. You can<br />
certainly make this table from separate<br />
boards instead, using standard 1 and 2-<br />
in. thick wood.<br />
Marr rHE ToP<br />
1) Resaw boards for the top (A, Fig.<br />
A, Photo 2). Cut them 3/4 in. thick,<br />
then joint and plane the boards l,/2<br />
in. thick (Photo 3). Glue the top<br />
together and cut it to exact size.<br />
2) Rout two dovetailed grooves<br />
across the bottom of the top (Fig. B<br />
and Photo 4). First, install a l/2-in.<br />
wide dovetail bit and a 1/2-in. dia.<br />
template guide in your router. Next,<br />
build ajig, composed of four pieces, to<br />
guide the router. Use 1,/2-in. thick<br />
material. Assemble the jig using two<br />
5 / 8-in. thick spacers to fix the distance<br />
between the rails. The router's bit and<br />
template guide setup makes a groove<br />
that's exactly the same width as the dis-<br />
tance between the jig's rails.<br />
DoverarLED Cleans<br />
3) Make cleas (E) fiom a stiff hard-<br />
wood that resists splitting. Maple is<br />
Q tuate mortises while the legs are<br />
(Jstill square.To start, rout tvvo<br />
stopped grooves in each leg. Clamp a<br />
stoo block to the router table's fence to<br />
limit the groove's length.<br />
ideal. Make one or two extra pieces to<br />
test your router-table settings.<br />
4) Shape the cleat's dovetailed key<br />
on the router table (Photo 5). Set the<br />
height ofthe router bit so that the key<br />
is a paper-thickness shallower than the<br />
grooves in the tabletop. €ou don't<br />
want the cleat to drag against the bot-<br />
tom of these grooves when you insert<br />
it.) Adjust the router table's fence until<br />
the cleat fits right (Photo 6). Remove<br />
the cleats from the table.<br />
5) Finish the top by shaping a shallow<br />
curve on both of its long sides (Fig.<br />
D). Bend a 3-ft. long stick to form the<br />
curve. Cut the curve using ajigsaw or<br />
bandsaw. Round over the bottom edge<br />
of the top using a router (Fig. B). Use<br />
a smaller roundover bit on the top's<br />
upper edge. Use a file to soften the<br />
top's four corners.<br />
SHnpe rHE LEGS<br />
6) Make a pattern for the legs (D)<br />
from 1/4in. thickwood (Fig. G). Mill<br />
leg blanks and trace around the pat-<br />
tern on two adjoining sides (Photo 7).<br />
7) Mill mortises before bandsawing<br />
the legs. Begin by routing grooves for<br />
the tenon's haunch (Fig. E, Photo 8).<br />
Deepen the mortises with a mortising<br />
machine (Photo 9).<br />
8) Cut the legs on the bandsaw<br />
(Photo 10). Saw one side first, then<br />
turn the leg 90 degrees. Lay the pat-<br />
tern on the leg and mark the portion<br />
flComplete the mortises with a mor-<br />
Jtising machine.The grooves made<br />
on the router table guide the chisel.The<br />
result is a orecise haunched mortise<br />
with absolutely straight sides.<br />
-l<br />
fleanOsaw<br />
the leg. For the first<br />
I \,f cuts, saw up to the stop marks,<br />
then back out. Rotate the leg 90<br />
degrees, as shown here, and saw the<br />
full length of the leg's curve.<br />
-l -l<br />
etane the top 6 in. of the leg's<br />
I I outer faces, which are rough<br />
from the bandsaw.This creates a guide<br />
surface for planing the rails later on.<br />
American Woodworker ocToBER zooz 55