AW #131.pdf - Karatunov.net
AW #131.pdf - Karatunov.net
AW #131.pdf - Karatunov.net

Create successful ePaper yourself
Turn your PDF publications into a flip-book with our unique Google optimized e-Paper software.
T<br />
O<br />
o<br />
c<br />
I<br />
E<br />
z<br />
E<br />
I<br />
z<br />
tr<br />
E<br />
ts<br />
l<br />
J<br />
E<br />
d<br />
@<br />
a<br />
P<br />
E<br />
Po<br />
U<br />
Second, figure out the height at<br />
which you're comfortable grinding.<br />
Many woodworkers prefer elevating a<br />
grinder so its tool rests are about elbow-<br />
high. This height will vary between Gin.<br />
and 8-in. grinders (we used an 8-in.<br />
grinder for our station). Use this meas-<br />
urement to determine the height of the<br />
shelf above the cabi<strong>net</strong>.<br />
Burlo rHE CABTNET<br />
Use basic plylvood-construction<br />
techniques to build the base cabi<strong>net</strong><br />
and drawers. The cabi<strong>net</strong> is very simi-<br />
Iar to our Tool Chest in <strong>AW</strong>#96,<br />
October 2002, page 60. You'll find<br />
complete step-by-step instructions and<br />
many how-to photos in that article. You<br />
can also view or download this story at<br />
our web site. www.americanwoodworker.com,/toolcabi<strong>net</strong>.<br />
See Fig. C for the<br />
location of the dadoes and rabbets in<br />
the cabi<strong>net</strong>'s sides and Fig. B for drawer<br />
details.<br />
Marcr rHE ToP<br />
To ensure a flat top, use MDF for the<br />
substrate (Bl, Fig. A). Edgeband it with<br />
solid birch (B2 and B3), mitered at the<br />
front corners. Use an 80-grit sanding<br />
block, a plane, or a router and flushtrim<br />
bit to level the edging (Photo 1) .<br />
Apply the laminate (B4). Use a<br />
chamfer bit to trim the laminate and<br />
create the finished edge in one step<br />
(Photo 2).<br />
Rout two grooves for the T:track (B5<br />
and Fig. D). Seal the grooves with slow<br />
curing epoxy to keep water from soaking<br />
into the MDF. \4/hile the epoxy is<br />
still tacky, apply a second, thicker coat<br />
and glue in the T:track (Photo 3). Drill<br />
two holes in the top for registration<br />
pins. These keep the rubber mat from<br />
sliding back and forth. Attach the top<br />
to the cabi<strong>net</strong>. Position it flush with<br />
the back and offset on the right side,<br />
to allow for the pocket.<br />
Aon rHE PocKET<br />
The pocket fastens to both the top<br />
and the cabi<strong>net</strong>. Cut two pieces of aluminum<br />
angle (D2). Drill and counter-<br />
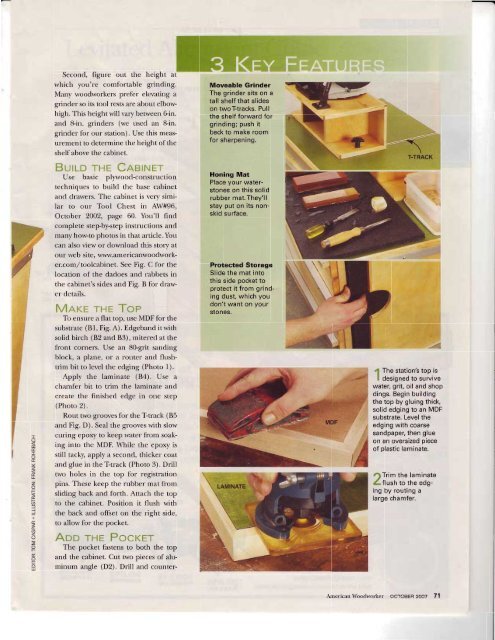
Moveable Grinder<br />
The grinder sits on a<br />
tall shelf that slides<br />
on twoT-tracks, Pull<br />
the shelf forward for<br />
grinding; push it<br />
back to make room<br />
for sharpening.<br />
Honing Mat<br />
Place your waterstones<br />
on this solid<br />
rubber mat.They'll<br />
stay put on its nonskid<br />
surface.<br />
Protected Storage<br />
Slide the mat into<br />
this side pocket to<br />
protect it from grinding<br />
dust, which you<br />
don't want on your<br />
stones.<br />
4 The station's top is<br />
I designed to survive<br />
water, grit, oil and shop<br />
dings. Begin building<br />
the top by gluing thick,<br />
solid edging to an MDF<br />
substrate. Level the<br />
edging with coarse<br />
sandpaper, then glue<br />
on an oversized piece<br />
of plastic laminate.<br />
/)Trim the laminate<br />
Zflush to the edging<br />
by routing a<br />
large chamfer.<br />
American Woodworker ocToBER zooz 71