AW #131.pdf - Karatunov.net
AW #131.pdf - Karatunov.net
AW #131.pdf - Karatunov.net

Create successful ePaper yourself
Turn your PDF publications into a flip-book with our unique Google optimized e-Paper software.
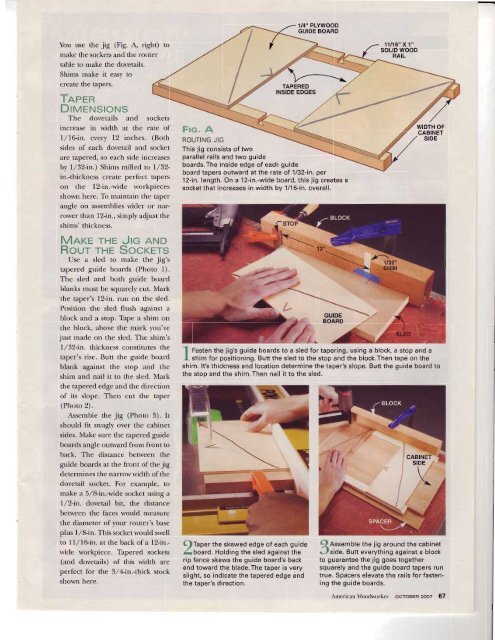
You use the jig (Fig. A, right) to<br />
make the sockets and the router<br />
table to make the dovetails.<br />
Shims make it easy to<br />
create the tapers.<br />
TnpEn<br />
DrvEtrtstoNS<br />
The dovetails and<br />
sides of each dovetail and<br />
sockets<br />
increase in width at the rate of<br />
l/lGin. every 12 inches. (Both<br />
socket<br />
are tapered, so each side increases<br />
by I/32-in.) Shims milled to I/32-<br />
in.-thickness create perfect uPers<br />
on the l2-in.-wide workpieces<br />
shown here. To maintain the taper<br />
angle on assemblies wider or nar-<br />
rower than 12-in., simply adjust the<br />
shims' thickness.<br />
Mnrce rHE Jtc AND<br />
Rour rHE SocKETS<br />
Use a sled to make the jig's<br />
tapered guide boards (Photo 1).<br />
The sled and both guide board<br />
blanks must be squarely cut. Mark<br />
the taper's l2-in. run on the sled.<br />
Position the sled flush against a<br />
block and a stop. Thpe a shim on<br />
the block, above the mark you've<br />
just made on the sled. The shim's<br />
l/32-in. thickness constitutes the<br />
taper's rise. Butt the guide board<br />
blank against the stop and the<br />
shim and nail it to the sled. Mark<br />
the tapered edge and the direction<br />
of is slope. Then cut the taper<br />
(Photo 2).<br />
Assemble the jig (Photo 3). It<br />
should fit snugly over the cabi<strong>net</strong><br />
sides. Make sure the tapered guide<br />
boards angle outward from front to<br />
back. The distance between the<br />
guide boards at the front of the jig<br />
determines the narrow width of the<br />
dovetail socket. For example, to<br />
make a 5,28-in.-wide socket using a<br />
l,/2-in. dovetail bit, the distance<br />
between the faces would measure<br />
the diameter of your router's base<br />
plus 1,/8-in. This socketwould swell<br />
to 11,/1Gin. at the back of a 12-in.-<br />
wide workpiece. Tapered sockets<br />
(and dovetails) of this width are<br />
perfect for the 3,/4in.-thick stock<br />
shown here.<br />
Frc. ,A<br />
ROUTING JIG<br />
This jig consists of two<br />
parallel rails and two guide<br />
boards.The inside edge of each guide<br />
board tapers outward at the rate of 1/32-in' per<br />
12-in. length. On a 12-in.-wide board, this jig creates a<br />
socket that increases in width by 1/16-in' overall'<br />
I Fasten the jig's guide boards to a sled for tapering, using a block, a stop and a<br />
I shim for positioning. Buttthe sled to the stop and the block.Then tape on the<br />
shim. lt's thickness and location determine the taper's slope. Butt the guide board to<br />
the stoo and the shim.Then nail it to the sled'<br />
C)taper the skewed edge of each guide<br />
lboard. Holding the sled against the<br />
rip fence skews the guide board's back<br />
end toward the blade.The taper is very<br />
slight, so indicate the tapered edge and<br />
the taoer's direction.<br />
QAssemble the jig around the cabi<strong>net</strong><br />
Jside. Butt everything against a block<br />
to guarantee the jig goes together<br />
squarely and the guide board tapers run<br />
true. Spacers elevate the rails for fastening<br />
the guide boards.<br />
American Woodworker ocToBER zoot 67