AW #131.pdf - Karatunov.net
AW #131.pdf - Karatunov.net
AW #131.pdf - Karatunov.net

Create successful ePaper yourself
Turn your PDF publications into a flip-book with our unique Google optimized e-Paper software.
Pnrp rne LnvlNATtoNS<br />
10. Cut the riser block to length. Find the center of<br />
the bottom of the riser block and drill a 5,/lGin' hole'<br />
1/2-in. deep to fit over the index pin on the lower<br />
form. Tiace the shape of the riser using the pattern in<br />
*re kit and cut the shape using your bandsaw. Sand<br />
with a drum sander (Photo 4).<br />
11.Tiim the wood laminations to 32-in. Then, cook<br />
the riser and wood laminations in the heat box for<br />
about 30 minutes to chase off any surface moisture<br />
that might interfere with the epoxy set.<br />
12. Cutboth bottom pieces of Bo-Tufffiberglass to<br />
32-in. and the top piece to 64in. ADremel cut-offdisc<br />
works great on the Bo-Tuff, but a pair of metal cutting<br />
shears will do. Wear gloves when handling the Bo-<br />
Tuff. Fiberglass slivers are a real drag.<br />
13. The Bo-Tuff has a smooth and a rough side.<br />
The smooth side is the finished surface while the<br />
rough side gets the epoxy. Apply heat-resistant mask-<br />
ing tape to the smooth side of the Bo-Tuff. The mask-<br />
ing tape keeps epoxy off the surface and avoids<br />
unnecessary cleaning and sanding<br />
14. It's imperative to have everything (including a<br />
helper) ready before applyrng epoxy to the bow lam-<br />
inations. I like to set the form between blocks<br />
clamped to a pair of sawhorses. This provides clear-<br />
ance around the entire form so I can wrap filament<br />
tape around the form and pull the laminations down<br />
tight to the form. Test the pressure hose fittings for<br />
leaks in a pail of waterjust as you would with a bicycle<br />
inner tube. Also, rub a thin layer of paste wax onto<br />
the plastic laminate and both sides of the metal pres<br />
sure strip (Fig. B) to keep oozing epoxy from sticking<br />
to their surfaces.<br />
15. Roll out an ample length of plastic wrap over<br />
the lower form onto the plastic laminate to further<br />
protect it from epoxy squeeze out.<br />
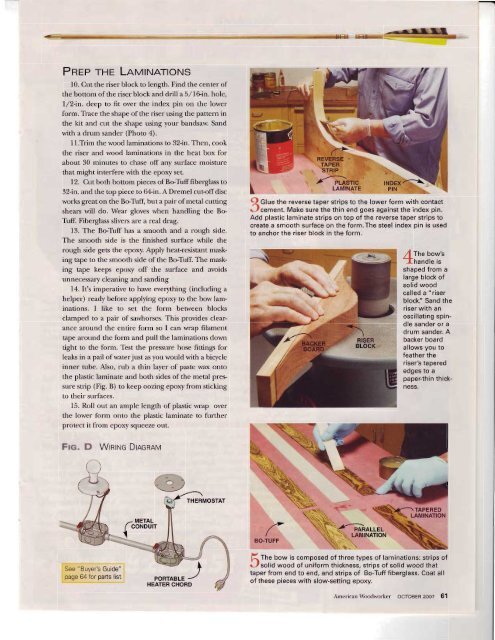
Frc. D Wtntruc DtRcnRvt<br />
Q Ctr" the reverse taper strips to the lower form with contact<br />
Jcement. Make sure the thin end goes against the index pin'<br />
Add plastic laminate strips on top of the reverse taper strips to<br />
create a smooth surface on the form.The steel index pin is used<br />
to anchor the riser block in the form.<br />
7,1 tne oow's<br />
Ihandle is<br />
shaped from a<br />
large block of<br />
solid wood<br />
called a "riser<br />
blocki' Sand the<br />
riser with an<br />
oscillating spindle<br />
sander or a<br />
drum sander. A<br />
backer board<br />
allows you to<br />
feather the<br />
riser's tapered<br />
edges to a<br />
paper-thin thickness.<br />
(fn" bow is composed of three types of laminations: strips of<br />
r-f solid wood of uniform thickness, strips of solid wood that<br />
taper from end to end, and strips of Bo-Tuff fiberglass. Coat all<br />
of these pieces with slow-setting epoxy.<br />
AmericanWoodworker ocToBERzooz 61