AW #131.pdf - Karatunov.net
AW #131.pdf - Karatunov.net
AW #131.pdf - Karatunov.net

Create successful ePaper yourself
Turn your PDF publications into a flip-book with our unique Google optimized e-Paper software.
(l<br />
F-q*<br />
*ii#<br />
lti;r"1..t;;"'.,,.*<br />
'<br />
64 Arnerican rr4roodrvorker ocToBER 2oo7<br />
:. ffid.f,1,{ *- **n*"*Mffii.ffi!grq*;ii;*h'<br />
i!<br />
1Y^<br />
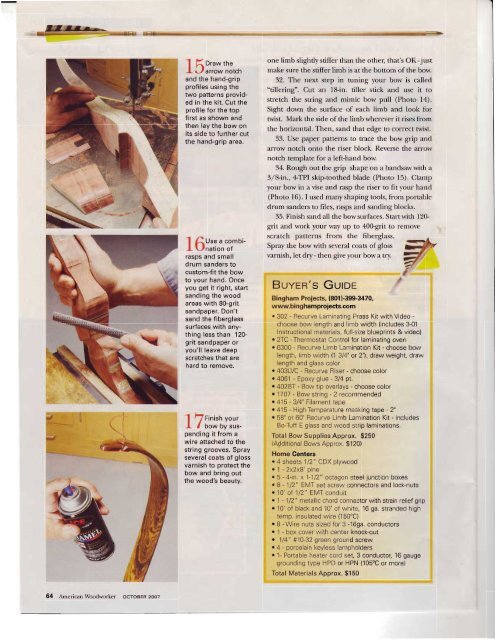
I k\uraw tne<br />
I r-.f arrow notch<br />
and the hand-grip<br />
profiles using the<br />
two patterns provided<br />
in the kit. cut the<br />
profile for the top<br />
first as shown and<br />
then lay the bow on<br />
its side to further cut<br />
the hand-grip<br />
area.<br />
I fiuse a combi-<br />
I \-fnation of<br />
rasps and small<br />
drum sanders to<br />
custom-fit the bow<br />
to your hand. Once<br />
you get it right, start<br />
sanding the wood<br />
areas with 80-grit<br />
sandpaper. Don't<br />
sand the fiberglass<br />
surfaces with anything<br />
less than 120grit<br />
sandpaper or<br />
you'll leave deep<br />
scratches that are<br />
hard to remove.<br />
I ]rinisr' yort<br />
I / uow by suspending<br />
it from a<br />
wire attached to the<br />
string grooves. Spray<br />
several coats of gloss<br />
varnish to protect the<br />
bow and bring out<br />
the wood's beauty.<br />
one lirnb slightly stiffer rhan the other, that's OK-.just<br />
make sure the stiffer limb is at the bottom of the bow.<br />
32. The ltext step in tunine your bow is called<br />
"tillering". Cut an 18-in. tiller stick and use ir ro<br />
stretch the string and mirnic bow pull (Photo 14).<br />
Sight down the surface of each limb and look for<br />
nvist. Mark the side of the limb wherever it rises fiom<br />
tl-re horizontal. Then, sand that edge to correct twist.<br />
33. Use paper patterns to trace tl're bow srip and<br />
arrow notch oltto the riser block. Revcrse the arrow<br />
notch template for a left-hand borv.<br />
34. Rough out the grip shape on a bandsaw with a<br />
3/8-in., 4-TPI skip-toothed blacle (Photo 15). Clamp<br />
your bow in a vise and rasp the riser- to fit your- hzrncl<br />
(Pl.roto l6). I usecl rnany shaping rools, f)orn por-table<br />
drum sanders to files, r-asps and sanding blocks.<br />
35. Finish sand all the bow surfaces. Start rvith I 2(l<br />
grit and rvork your way up to 400-grit t() rclllo\.('<br />
scr-atch patterns fl-onr the fiberelass.<br />
Spray the bow with sevcral coaLs ol gloss<br />
varnish, let clry - then give your borv a tra.<br />
BuYER's Guror<br />
f<br />
t<br />
Bingham Projects, (801 )-399-3470,<br />
www. bi n g ha m projects.com<br />
. 302 - Recurve Laminating Press Kit with Video -<br />
choose bow length and limb width (includes 3-01<br />
Instructional materials, f ull-size blueprints & video)<br />
o 2TC -Thermostat Control for laminating oven<br />
. 6300 - Recurve Limb Lamination Kit - choose bow<br />
length, limb width (1 314" or 2"), draw weight, draw<br />
length and glass color<br />
r 403LVC - Recurve Riser - choose color<br />
o 406'1 - Epoxy glue - 314 pt<br />
. 4028f - Bow tip overlavs - choose color<br />
c 1707 - Bow string - 2 recommended<br />
o 415 - 314" Filament taoe<br />
o 415 - High Temperature masking tape - 2"<br />
. 58" or 60" Recurve Limb Lamination Kit - includes<br />
Bo-Tuff E glass and wood strip laminations.<br />
Total Bow Supplies Approx. $250<br />
(Additional Bows Approx. $120)<br />
Home Genters<br />
. 4 sheets 112" CDX plywood<br />
.1-2x2x8'pine<br />
o 5 - 4-in. x 1-112" octagon steel junction boxes<br />
.8 - 112" EMT set screw connectors and lock-nuts<br />
. l0' of 112" EMT conduit<br />
. 1 - 112" metallic chord connector with strain relief grip<br />
. '10'of<br />
black and '10'of white, 16 ga. stranded high<br />
temp. insulated wire (1bo'C)<br />
o B - Wire nuts sized for 3 -169a. conductors<br />
. 1 - box cover with center knock-out<br />
. 114" #10-32 green ground screw<br />
. 4 - porcelain keyless lampholders<br />
. 1- Portable heater cord<br />
'16<br />
set, 3 conductor, gauge<br />
grounding type HPD or HPN ('105"C or more)<br />
Total Materials Approx. $150