AW #131.pdf - Karatunov.net
AW #131.pdf - Karatunov.net
AW #131.pdf - Karatunov.net

Create successful ePaper yourself
Turn your PDF publications into a flip-book with our unique Google optimized e-Paper software.
-l<br />
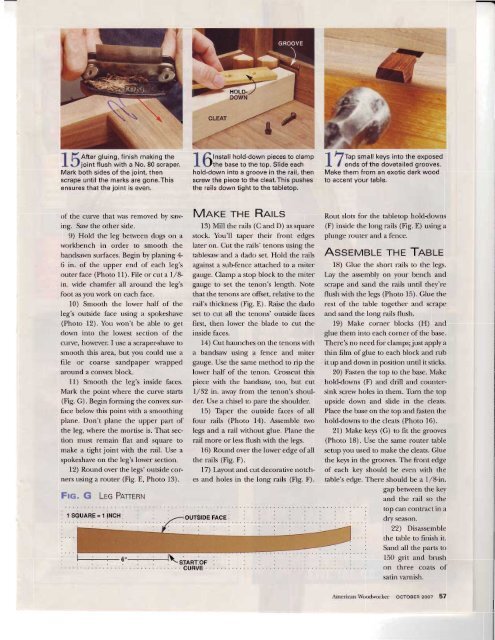
(Atter gluing, finish making the<br />
I r., joint flush with a No. 80 scraper.<br />
Mark both sides of the joint, then<br />
scrape until the marks are gone.This<br />
ensures that the joint is even.<br />
of the curve that was removed by saw-<br />
ing. Saw the other side.<br />
9) Hold the leg between dogs on a<br />
workbench in order to smooth the<br />
bandsawn surfaces. Begin by planing 4<br />
6 in. of the upper end of each leg's<br />
outer face (Photo 1 1) . File or cut a I /8in.<br />
wide chamfer all around the leg's<br />
foot as you work on each face.<br />
10) Smooth the lower half of the<br />
leg's outside face using a spokeshave<br />
(Photo 12). You won't be able to get<br />
down into the lowest section of the<br />
curve, however. I use a scraper-shave to<br />
smooth this area, but you could use a<br />
file or coarse sandpaper wrapped<br />
around a convex block.<br />
11) Smooth the leg's inside faces.<br />
Mark the point where the curve starts<br />
(Fig. G). Begin forming the convex sur-<br />
face below this point with a smoothing<br />
plane. Don't plane the upper part of<br />
the leg, where the mortise is. That sec-<br />
tion must remain flat and square to<br />
make a tight joint with the rail. Use a<br />
spokeshave on the leg's lower section.<br />
12) Round over the legs'outside cor-<br />
ners using a router (Fig. E, Photo 13).<br />
Fre. G Lrc PnrmnN<br />
-t<br />
fitnstatt<br />
hold-down pieces to clamp<br />
I \-tthe base to the too. Slide each<br />
hold-down into a groove in the rail, then<br />
screw the piece to the cleat.This pushes<br />
the rails down tight to the tabletop.<br />
Mnre rHE RAILS<br />
13) Mill the rails (C and D) as square<br />
stock. You'll taper their front edges<br />
later on. Cut the rails' tenons using the<br />
tablesaw and a dado set. Hold the rails<br />
against a sutrfence attached to a miter<br />
gauge. Clamp a stop block to the miter<br />
gauge to set the tenon's length. Note<br />
that the tenons are offset, relative to the<br />
rail's thickness (Fig. E). Raise the dado<br />
set to cut all the tenons' outside faces<br />
first. then lower the blade to cut the<br />
inside faces.<br />
14) Cut haunches on the tenons with<br />
a bandsaw using a fence and miter<br />
gauge. Use the same method to rip the<br />
lower half of the tenon. Crosscut this<br />
piece with the bandsaw, too, but cut<br />
l/32 in. away from the tenon's shoul-<br />
der. Use a chisel to pare the shoulder.<br />
15) Thper the outside faces of all<br />
four rails (Photo 14). Assemble two<br />
legs and a rail without glue. Plane the<br />
rail more or less flush with the legs.<br />
16) Round over the lower edge ofall<br />
the rails (Fig. F).<br />
l7) Layout and cut decorative notch-<br />
es and holes in the long rails (Fig. F).<br />
1 nnp small keys into the exposed<br />
I J ends of the dovetailed grooves.<br />
Make them from an exotic dark wood<br />
to accent your table.<br />
Rout slots for the tabletop holddowns<br />
(F) inside the long rails (Fig. E) using a<br />
plunge router and a fence.<br />
AssrMeLE THE TAeLe<br />
18) Glue the short rails to the legs.<br />
Lay the assembly on your bench and<br />
scrape and sand the rails until they're<br />
flush with the legs (Photo 15). Glue the<br />
rest of the table together and scrape<br />
and sand the long rails flush.<br />
19) Make corner blocks (H) and<br />
glue them into each corner of the base.<br />
There's no need for clamps;just apply a<br />
thin film of glue to each block and rub<br />
it up and down in position until it sticks.<br />
20) Fasten the top to the base. Make<br />
holddowns (F) and drill and counter-<br />
sink screw holes in them. Turn the top<br />
upside down and slide in the cleats.<br />
Place the base on the top and fasten the<br />
holddowns to the cleats (Photo 16).<br />
21) Make keys (G) to fit the grooves<br />
(Photo 18). Use the same router table<br />
setup you used to make the cleats. Glue<br />
the keys in the grooves. The front edge<br />
of each key should be even with the<br />
table's edge. There should be a 1,/&in.<br />
gap between the key<br />
and the rail so the<br />
top can contract in a<br />
dry season.<br />
22) Disassemble<br />
the table to finish it.<br />
Sand all the parts to<br />
150 grit and brush<br />
on three coats of<br />
satin varnish.<br />
American Woodworker octoeen zooz 57