AW #131.pdf - Karatunov.net
AW #131.pdf - Karatunov.net
AW #131.pdf - Karatunov.net

Create successful ePaper yourself
Turn your PDF publications into a flip-book with our unique Google optimized e-Paper software.
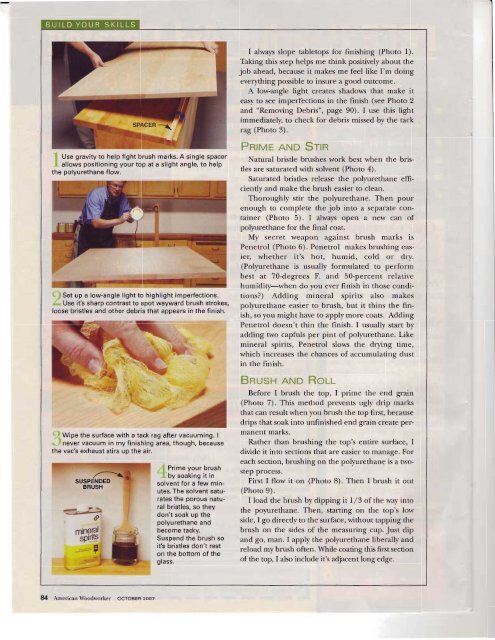
t Use gravity to help fight brush marks. A single spacer<br />
allows positioning your top at a slight angle, to help<br />
the polyurethane flow.<br />
I<br />
itSet up a low-angle light to highlight imperfections.<br />
, Use it's sharp contrast to spot wayward brush strokes,<br />
loose bristles and other debris that appears in the finish.<br />
Wipe the surface with a tack rag after vacuuming. I<br />
never vacuum in my finishing area, though, because<br />
the vac's exhaust stirs up the air.<br />
'Iffi#j<br />
84 American Woodworker ocroBER 2oo7<br />
I Prime your brush<br />
Ii by soaking it in<br />
solvent for a few minutes.The<br />
solvent saturates<br />
the porous natural<br />
bristles, so they<br />
don't soak up the<br />
polyurethane and<br />
become tacky.<br />
Suspend the brush so<br />
it's bristles don't rest<br />
on the bottom of the<br />
glass.<br />
I always slope tabletops for finishing (Photo l).<br />
Thking this step helps me think positively about the<br />
job ahead, because<br />
it makes me feel like I'm doing<br />
everything possible to insure a good outcome.<br />
A low-angle light creates shadows that make it<br />
easy to see imperfections in the finish (see Photo 2<br />
and "Removing Debris", page 90). I use this light<br />
immediately, to check for debris missed by the tack<br />
rag (Photo 3).<br />
Pnlvr AND Sln<br />
Natural bristle brushes work best when the bris-<br />
tles are saturated with solvent (Photo 4).<br />
Saturated bristles release the polyurethane effi-<br />
ciently and make the brush easier to clean.<br />
Thoroughly stir rhe polyurethane. Then pour<br />
enough to complete the job into a separate con-<br />
tainer (Photo 5). I always open a new can of<br />
polyurethane for the final coat.<br />
My secret weapon against brush marks is<br />
Pe<strong>net</strong>rol (Photo 6). Pe<strong>net</strong>rol makes brushing eas-<br />
ier, whether it's hot, humid, cold or dry.<br />
(Polyurethane is usually formulated to perform<br />
best at 70-degrees F. and 50-percent relative<br />
humidity-when do you ever finish in those condi-<br />
tions?) Adding mineral spirits also makes<br />
polyurethane easier to brush, but it thins the fin-<br />
ish, so you might have to apply more coats. Adding<br />
Pe<strong>net</strong>rol doesn't thin the finish. I usually start by<br />
adding two capfuls per pint of polyurethane. Like<br />
mineral spirits, Pe<strong>net</strong>rol slows the drying time,<br />
which increases the chances of accumulating dust<br />
in the finish.<br />
Bnusu AND Roll<br />
Before I brush rhe top, I prime the end grain<br />
(Photo 7) . This method prevenrs ugly drip marks<br />
that can result when you brush the top first, because<br />
drips that soak into unfinished end grain create permanent<br />
marks.<br />
Rather than brushing the top's entire surface, I<br />
divide it into sections that are easier to manage. For<br />
each section, brushing on the polyurethane is a twostep<br />
process.<br />
First I flow it on (Photo 8). Then I brush it out<br />
(Photo 9).<br />
I load the brush by dipping it 7/Z of the way into<br />
the poy'urethane. Then, starting on the top's low<br />
side, I go directly to the surface, wirhout tapping the<br />
brush on the sides of the measuring cup. Just dip<br />
and go, man. I apply the poly'urethane liberally and<br />
reload my brush often. While coating this first secrion<br />
of the top, I also include it's adjacent long edge.