AW #131.pdf - Karatunov.net
AW #131.pdf - Karatunov.net
AW #131.pdf - Karatunov.net

You also want an ePaper? Increase the reach of your titles
YUMPU automatically turns print PDFs into web optimized ePapers that Google loves.
About the only mistake you can make during this<br />
step is being too stingy with the poly'urethane.<br />
Covering the surface quickly and uniformly is most<br />
important. Brushing direction doesn't matter, except<br />
at the ends. There I brush parallel to *re edges, to<br />
apply the polyurethane evenly and minimize drips.<br />
After using the low-angle light to make sure the<br />
section is completely covered, I level the<br />
poly'urethane with end-to-end strokes. The brush<br />
wicks up excess finish during this process, so before<br />
each stroke, I unload the brush by gently pressing it<br />
inside the measuring cup's rim. I use an especially<br />
light touch at the beginning of each stroke, to avoid<br />
leaving a pool of varnish.<br />
I don't brush out the last couple inches of the sec-<br />
tion, because I'll be brushing back into this portion<br />
later. \A/hen the raking light shows that all the brush<br />
marks run with the grain, I switch to a dry foam brush<br />
to clean the adjacent long edge (Photo 10). Most bris-<br />
tle brushes deposit too much polyurethane for this<br />
job, creating as many drips and sags as they remove.<br />
I move to the other side of the table to brush the<br />
next section, so I'm not leaning over the wet finish<br />
(Photo 11). I cut back into the wet polyr,rrethane as<br />
soon as possible. The longer it sets up, the more<br />
likely it is to show brush marks. I check my work in<br />
the raking light before moving on to the last section,<br />
and then again when that section-including its<br />
adjacent long edge-is completed.<br />
\Arhen the top looks good in raking light, I com-<br />
plete the job by cleaning the ends with the roller<br />
and dry foam brush (Photo 12). Then I walk away.<br />
Experience has taught me to leave tiny imperfec-<br />
tions. They look bad when the varnish is wet, but<br />
they virtually disappear when the varnish is dry.<br />
4.'rh -q .F -r.-.+.<br />
q__<br />
--.*"*p -\&,,,<br />
Removing Debris<br />
Inevitably, dust, hair, bristles or bugs will lodge in<br />
the wet finish. I use the edge of the brush to lift<br />
them off the surface as soon as I see them-it's too<br />
late if the poly has started to set up. After removing<br />
the offender, I brush lightly end-to-end to eliminate<br />
pock marks left by the process.<br />
86 American \{oodworker ocroBER 2oo7<br />
*o<br />
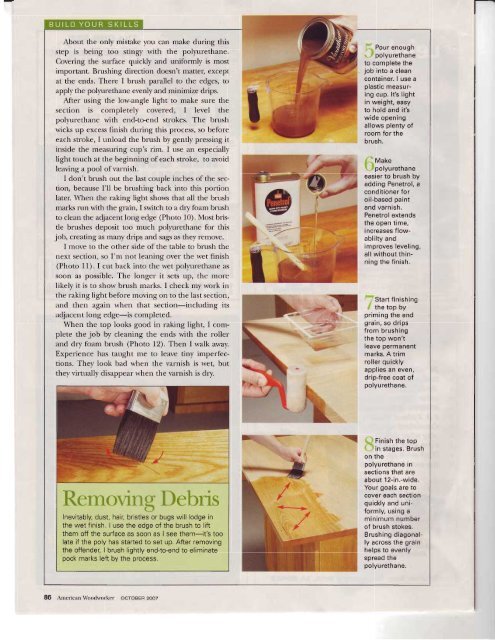
Pour enough<br />
, .r pslyurethane<br />
to complete the<br />
job into a clean<br />
container. I use a<br />
plastic measuring<br />
cup. lt's light<br />
in weight, easy<br />
to hold and it's<br />
wide opening<br />
allows plenty of<br />
room for the<br />
brush.<br />
.<br />
4<br />
Make<br />
'i rpolyurethane<br />
easier to brush by<br />
adding Pe<strong>net</strong>rol. a<br />
conditioner for<br />
oil-based paint<br />
and varnish.<br />
Pe<strong>net</strong>rol extends<br />
the open time,<br />
increases flowablilty<br />
and<br />
improves leveling,<br />
all without thinning<br />
the finish.<br />
Start finishing<br />
the top by<br />
priming the end<br />
grain. so drips<br />
from brushing<br />
the top won't<br />
leave permanent<br />
marks. A trim<br />
roller quickly<br />
applies an even,<br />
drip-free coat of<br />
polyu retha ne.<br />
t( Finish the top<br />
\. nin stages. Brush<br />
on the<br />
polyurethane in<br />
sections that are<br />
about 12-in.-wide.<br />
Your goals are to<br />
cover each section<br />
quickly and uniformly,<br />
using a<br />
minimum number<br />
of brush stokes.<br />
Brushing diagonally<br />
across the grain<br />
helps to evenly<br />
spread the<br />
polyu rethane.