Dental Asia January/February 2019
For more than two decades, Dental Asia is the premium journal in linking dental innovators and manufacturers to its rightful audience. We devote ourselves in showcasing the latest dental technology and share evidence-based clinical philosophies to serve as an educational platform to dental professionals. Our combined portfolio of print and digital media also allows us to reach a wider market and secure our position as the leading dental media in the Asia Pacific region while facilitating global interactions among our readers.
For more than two decades, Dental Asia is the premium journal in linking dental innovators
and manufacturers to its rightful audience. We devote ourselves in showcasing the latest dental technology and share evidence-based clinical philosophies to serve as an educational platform to dental professionals. Our combined portfolio of print and digital media also allows us to reach a wider market and secure our position as the leading dental media in the Asia Pacific region while facilitating global interactions among our readers.

You also want an ePaper? Increase the reach of your titles
YUMPU automatically turns print PDFs into web optimized ePapers that Google loves.
Behind the Scenes<br />
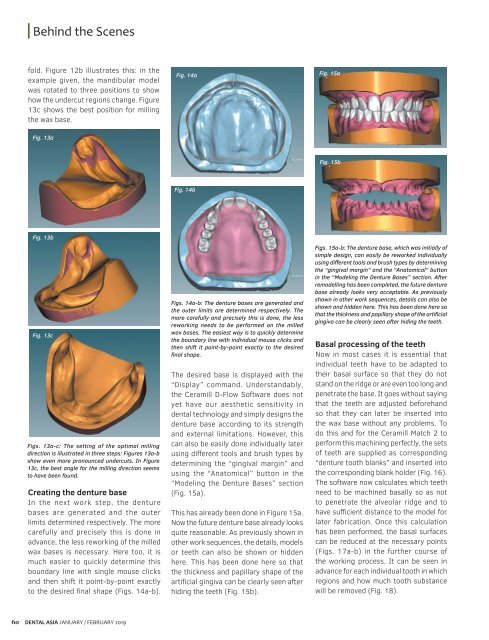
fold. Figure 12b illustrates this: in the<br />
example given, the mandibular model<br />
was rotated to three positions to show<br />
how the undercut regions change. Figure<br />
13c shows the best position for milling<br />
the wax base.<br />
Fig. 14a<br />
Fig. 15a<br />
Fig. 13a<br />
Fig. 15b<br />
Fig. 14b<br />
Fig. 13b<br />
Fig. 13c<br />
Figs. 13a-c: The setting of the optimal milling<br />
direction is illustrated in three steps: Figures 13a-b<br />
show even more pronounced undercuts. In Figure<br />
13c, the best angle for the milling direction seems<br />
to have been found.<br />
Creating the denture base<br />
In the next work step, the denture<br />
bases are generated and the outer<br />
limits determined respectively. The more<br />
carefully and precisely this is done in<br />
advance, the less reworking of the milled<br />
wax bases is necessary. Here too, it is<br />
much easier to quickly determine this<br />
boundary line with single mouse clicks<br />
and then shift it point-by-point exactly<br />
to the desired final shape (Figs. 14a-b).<br />
Figs. 14a-b: The denture bases are generated and<br />
the outer limits are determined respectively. The<br />
more carefully and precisely this is done, the less<br />
reworking needs to be performed on the milled<br />
wax bases. The easiest way is to quickly determine<br />
the boundary line with individual mouse clicks and<br />
then shift it point-by-point exactly to the desired<br />
final shape.<br />
The desired base is displayed with the<br />
“Display” command. Understandably,<br />
the Ceramill D-Flow Software does not<br />
yet have our aesthetic sensitivity in<br />
dental technology and simply designs the<br />
denture base according to its strength<br />
and external limitations. However, this<br />
can also be easily done individually later<br />
using different tools and brush types by<br />
determining the “gingival margin” and<br />
using the “Anatomical” button in the<br />
“Modeling the Denture Bases” section<br />
(Fig. 15a).<br />
This has already been done in Figure 15a.<br />
Now the future denture base already looks<br />
quite reasonable. As previously shown in<br />
other work sequences, the details, models<br />
or teeth can also be shown or hidden<br />
here. This has been done here so that<br />
the thickness and papillary shape of the<br />
artificial gingiva can be clearly seen after<br />
hiding the teeth (Fig. 15b).<br />
Figs. 15a-b: The denture base, which was initially of<br />
simple design, can easily be reworked individually<br />
using different tools and brush types by determining<br />
the “gingival margin” and the “Anatomical” button<br />
in the “Modeling the Denture Bases” section. After<br />
remodelling has been completed, the future denture<br />
base already looks very acceptable. As previously<br />
shown in other work sequences, details can also be<br />
shown and hidden here. This has been done here so<br />
that the thickness and papillary shape of the artificial<br />
gingiva can be clearly seen after hiding the teeth.<br />
Basal processing of the teeth<br />
Now in most cases it is essential that<br />
individual teeth have to be adapted to<br />
their basal surface so that they do not<br />
stand on the ridge or are even too long and<br />
penetrate the base. It goes without saying<br />
that the teeth are adjusted beforehand<br />
so that they can later be inserted into<br />
the wax base without any problems. To<br />
do this and for the Ceramill Match 2 to<br />
perform this machining perfectly, the sets<br />
of teeth are supplied as corresponding<br />
“denture tooth blanks” and inserted into<br />
the corresponding blank holder (Fig. 16).<br />
The software now calculates which teeth<br />
need to be machined basally so as not<br />
to penetrate the alveolar ridge and to<br />
have sufficient distance to the model for<br />
later fabrication. Once this calculation<br />
has been performed, the basal surfaces<br />
can be reduced at the necessary points<br />
(Figs. 17a-b) in the further course of<br />
the working process. It can be seen in<br />
advance for each individual tooth in which<br />
regions and how much tooth substance<br />
will be removed (Fig. 18).<br />
60<br />
DENTAL ASIA JANUARY / FEBRUARY <strong>2019</strong>