DNS-320 User Manual - D-Link
DNS-320 User Manual - D-Link
DNS-320 User Manual - D-Link

You also want an ePaper? Increase the reach of your titles
YUMPU automatically turns print PDFs into web optimized ePapers that Google loves.
D-<strong>Link</strong> ShareCenter Pulse <strong>User</strong> <strong>Manual</strong><br />
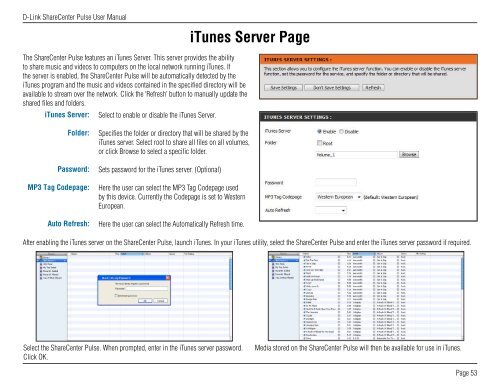
The ShareCenter Pulse features an iTunes Server. This server provides the ability<br />
to share music and videos to computers on the local network running iTunes. If<br />
the server is enabled, the ShareCenter Pulse will be automatically detected by the<br />
iTunes program and the music and videos contained in the specified directory will be<br />
available to stream over the network. Click the ‘Refresh’ button to manually update the<br />
shared files and folders.<br />
iTunes Server:<br />
Folder:<br />
Password:<br />
MP3 Tag Codepage:<br />
Auto Refresh:<br />
Select to enable or disable the iTunes Server.<br />
iTunes Server Page<br />
Specifies the folder or directory that will be shared by the<br />
iTunes server. Select root to share all files on all volumes,<br />
or click Browse to select a specific folder.<br />
Sets password for the iTunes server. (Optional)<br />
Here the user can select the MP3 Tag Codepage used<br />
by this device. Currently the Codepage is set to Western<br />
European.<br />
Here the user can select the Automatically Refresh time.<br />
After enabling the iTunes server on the ShareCenter Pulse, launch iTunes. In your iTunes utility, select the ShareCenter Pulse and enter the iTunes server password if required.<br />
Select the ShareCenter Pulse. When prompted, enter in the iTunes server password.<br />
Click OK.<br />
Media stored on the ShareCenter Pulse will then be available for use in iTunes.<br />
Page 53