DNS-320 User Manual - D-Link
DNS-320 User Manual - D-Link
DNS-320 User Manual - D-Link

You also want an ePaper? Increase the reach of your titles
YUMPU automatically turns print PDFs into web optimized ePapers that Google loves.
D-<strong>Link</strong> ShareCenter Pulse <strong>User</strong> <strong>Manual</strong><br />
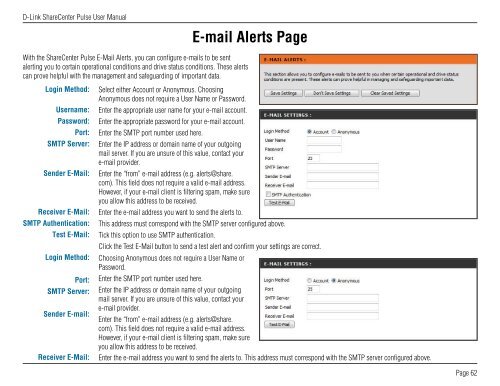
With the ShareCenter Pulse E-Mail Alerts, you can configure e-mails to be sent<br />
alerting you to certain operational conditions and drive status conditions. These alerts<br />
can prove helpful with the management and safeguarding of important data.<br />
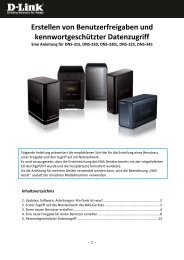
Login Method:<br />
<strong>User</strong>name:<br />
Password:<br />
Port:<br />
SMTP Server:<br />
Sender E-Mail:<br />
Receiver E-Mail:<br />
SMTP Authentication:<br />
Test E-Mail:<br />
Login Method:<br />
Port:<br />
SMTP Server:<br />
Sender E-mail:<br />
Receiver E-Mail:<br />
Select either Account or Anonymous. Choosing<br />
Anonymous does not require a <strong>User</strong> Name or Password.<br />
Enter the appropriate user name for your e-mail account.<br />
Enter the appropriate password for your e-mail account.<br />
Enter the SMTP port number used here.<br />
Enter the IP address or domain name of your outgoing<br />
mail server. If you are unsure of this value, contact your<br />
e-mail provider.<br />
E-mail Alerts Page<br />
Enter the “from” e-mail address (e.g. alerts@share.<br />
com). This field does not require a valid e-mail address.<br />
However, if your e-mail client is filtering spam, make sure<br />
you allow this address to be received.<br />
Enter the e-mail address you want to send the alerts to.<br />
This address must correspond with the SMTP server configured above.<br />
Tick this option to use SMTP authentication.<br />
Click the Test E-Mail button to send a test alert and confirm your settings are correct.<br />
Choosing Anonymous does not require a <strong>User</strong> Name or<br />
Password.<br />
Enter the SMTP port number used here.<br />
Enter the IP address or domain name of your outgoing<br />
mail server. If you are unsure of this value, contact your<br />
e-mail provider.<br />
Enter the “from” e-mail address (e.g. alerts@share.<br />
com). This field does not require a valid e-mail address.<br />
However, if your e-mail client is filtering spam, make sure<br />
you allow this address to be received.<br />
Enter the e-mail address you want to send the alerts to. This address must correspond with the SMTP server configured above.<br />
Page 62