Power Vented Gas Models FPSH/FPCR/FPST with ... - Geisel
Power Vented Gas Models FPSH/FPCR/FPST with ... - Geisel
Power Vented Gas Models FPSH/FPCR/FPST with ... - Geisel

Create successful ePaper yourself
Turn your PDF publications into a flip-book with our unique Google optimized e-Paper software.
APPLICATORS<br />
Select a suitable pure bristle type paint brush. Use a proper width<br />
brush or roller to apply the primer and cement (see chart below).<br />
Speedy application of cement is important due to its fast drying<br />
characteristics. IMPORTANT NOTE: A dauber type applicator<br />
should only be used on pipe sizes 2" and below. For larger<br />
diameter pipe, a brush or roller must be used.<br />
RECOMMENDED BRUSH* SIZE FOR PRIMER<br />
AND CEMENT APPLICATIONS<br />
Nominal Pipe SizeBrush Width<br />
(IPS) (INS.)<br />
2 1-1/2<br />
3 1-1/2 - 2-1/2<br />
*USE ONLY NATURAL BRISTLE<br />
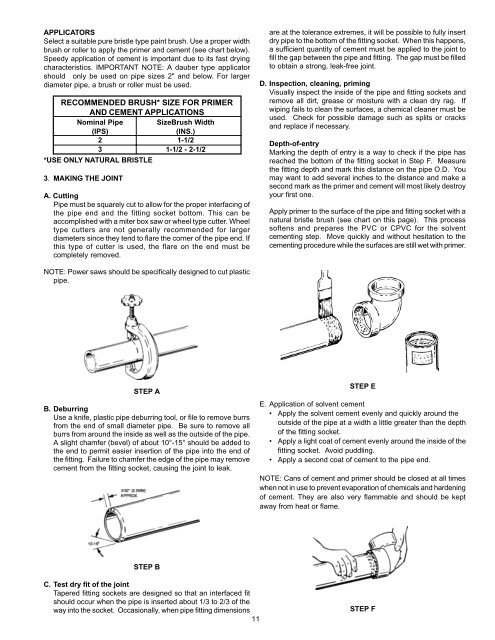
3. MAKING THE JOINT<br />
A. Cutting<br />
Pipe must be squarely cut to allow for the proper interfacing of<br />
the pipe end and the fitting socket bottom. This can be<br />
accomplished <strong>with</strong> a miter box saw or wheel type cutter. Wheel<br />
type cutters are not generally recommended for larger<br />
diameters since they tend to flare the corner of the pipe end. If<br />
this type of cutter is used, the flare on the end must be<br />
completely removed.<br />
NOTE: <strong>Power</strong> saws should be specifically designed to cut plastic<br />
pipe.<br />
STEP A<br />
B. Deburring<br />
Use a knife, plastic pipe deburring tool, or file to remove burrs<br />
from the end of small diameter pipe. Be sure to remove all<br />
burrs from around the inside as well as the outside of the pipe.<br />
A slight chamfer (bevel) of about 10°-15° should be added to<br />
the end to permit easier insertion of the pipe into the end of<br />
the fitting. Failure to chamfer the edge of the pipe may remove<br />
cement from the fitting socket, causing the joint to leak.<br />
STEP B<br />
C. Test dry fit of the joint<br />
Tapered fitting sockets are designed so that an interfaced fit<br />
should occur when the pipe is inserted about 1/3 to 2/3 of the<br />
way into the socket. Occasionally, when pipe fitting dimensions<br />
11<br />
are at the tolerance extremes, it will be possible to fully insert<br />
dry pipe to the bottom of the fitting socket. When this happens,<br />
a sufficient quantity of cement must be applied to the joint to<br />
fill the gap between the pipe and fitting. The gap must be filled<br />
to obtain a strong, leak-free joint.<br />
D. Inspection, cleaning, priming<br />
Visually inspect the inside of the pipe and fitting sockets and<br />
remove all dirt, grease or moisture <strong>with</strong> a clean dry rag. If<br />
wiping fails to clean the surfaces, a chemical cleaner must be<br />
used. Check for possible damage such as splits or cracks<br />
and replace if necessary.<br />
Depth-of-entry<br />
Marking the depth of entry is a way to check if the pipe has<br />
reached the bottom of the fitting socket in Step F. Measure<br />
the fitting depth and mark this distance on the pipe O.D. You<br />
may want to add several inches to the distance and make a<br />
second mark as the primer and cement will most likely destroy<br />
your first one.<br />
Apply primer to the surface of the pipe and fitting socket <strong>with</strong> a<br />
natural bristle brush (see chart on this page). This process<br />
softens and prepares the PVC or CPVC for the solvent<br />
cementing step. Move quickly and <strong>with</strong>out hesitation to the<br />
cementing procedure while the surfaces are still wet <strong>with</strong> primer.<br />
STEP E<br />
E. Application of solvent cement<br />
Apply the solvent cement evenly and quickly around the<br />
outside of the pipe at a width a little greater than the depth<br />
of the fitting socket.<br />
Apply a light coat of cement evenly around the inside of the<br />
fitting socket. Avoid puddling.<br />
Apply a second coat of cement to the pipe end.<br />
NOTE: Cans of cement and primer should be closed at all times<br />
when not in use to prevent evaporation of chemicals and hardening<br />
of cement. They are also very flammable and should be kept<br />
away from heat or flame.<br />
STEP F