Installer manual - nibe.com
Installer manual - nibe.com
Installer manual - nibe.com

Create successful ePaper yourself
Turn your PDF publications into a flip-book with our unique Google optimized e-Paper software.
32<br />
heating and approximately two to three increments for<br />
the radiator system.<br />
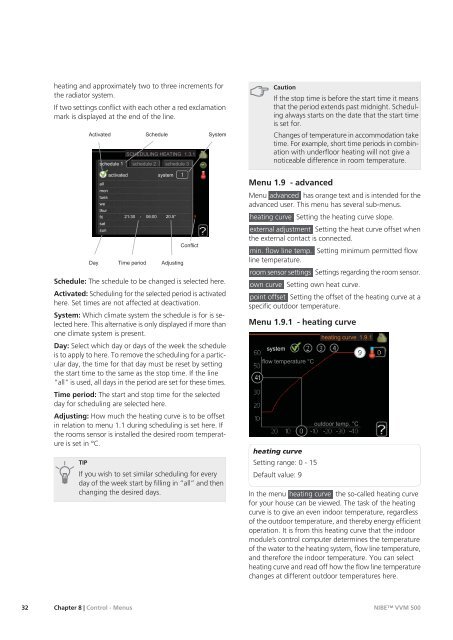
If two settings conflict with each other a red exclamation<br />
mark is displayed at the end of the line.<br />
��������� �������� ������<br />
���<br />
�������� �<br />
���<br />
���<br />
����<br />
��<br />
����<br />
���<br />
���<br />
���<br />
���������<br />
���������� ������� �����<br />
�������� �<br />
�������� �<br />
������<br />
����� � ����� �����<br />
���� ������ ���������<br />
��������<br />
Schedule: The schedule to be changed is selected here.<br />
Activated: Scheduling for the selected period is activated<br />
here. Set times are not affected at deactivation.<br />
System: Which climate system the schedule is for is selected<br />
here. This alternative is only displayed if more than<br />
one climate system is present.<br />
Day: Select which day or days of the week the schedule<br />
is to apply to here. To remove the scheduling for a particular<br />
day, the time for that day must be reset by setting<br />
the start time to the same as the stop time. If the line<br />
"all" is used, all days in the period are set for these times.<br />
Time period: The start and stop time for the selected<br />
day for scheduling are selected here.<br />
Adjusting: How much the heating curve is to be offset<br />
in relation to menu 1.1 during scheduling is set here. If<br />
the rooms sensor is installed the desired room temperature<br />
is set in °C.<br />
TIP<br />
If you wish to set similar scheduling for every<br />
day of the week start by filling in “all” and then<br />
changing the desired days.<br />
Chapter 8 | Control - Menus<br />
Caution<br />
If the stop time is before the start time it means<br />
that the period extends past midnight. Scheduling<br />
always starts on the date that the start time<br />
is set for.<br />
Changes of temperature in ac<strong>com</strong>modation take<br />
time. For example, short time periods in <strong>com</strong>bination<br />
with underfloor heating will not give a<br />
noticeable difference in room temperature.<br />
Menu 1.9 - advanced<br />
Menu advanced has orange text and is intended for the<br />
advanced user. This menu has several sub-menus.<br />
heating curve Setting the heating curve slope.<br />
external adjustment Setting the heat curve offset when<br />
the external contact is connected.<br />
min. flow line temp. Setting minimum permitted flow<br />
line temperature.<br />
room sensor settings Settings regarding the room sensor.<br />
own curve Setting own heat curve.<br />
point offset Setting the offset of the heating curve at a<br />
specific outdoor temperature.<br />
Menu 1.9.1 - heating curve<br />
������<br />
���� ����������� ��<br />
heating curve<br />
Setting range: 0 - 15<br />
Default value: 9<br />
������� ����� �����<br />
������� ����� ��<br />
In the menu heating curve the so-called heating curve<br />
for your house can be viewed. The task of the heating<br />
curve is to give an even indoor temperature, regardless<br />
of the outdoor temperature, and thereby energy efficient<br />
operation. It is from this heating curve that the indoor<br />
module’s control <strong>com</strong>puter determines the temperature<br />
of the water to the heating system, flow line temperature,<br />
and therefore the indoor temperature. You can select<br />
heating curve and read off how the flow line temperature<br />
changes at different outdoor temperatures here.<br />
NIBE VVM 500