SKF Timing Belt Kits - SKF.com
SKF Timing Belt Kits - SKF.com
SKF Timing Belt Kits - SKF.com

You also want an ePaper? Increase the reach of your titles
YUMPU automatically turns print PDFs into web optimized ePapers that Google loves.
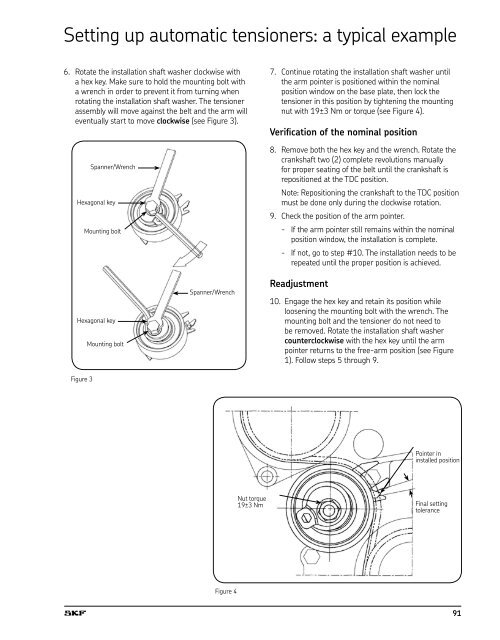
Setting up automatic tensioners: a typical example<br />
6. Rotate the installation shaft washer clockwise with<br />
a hex key. Make sure to hold the mounting bolt with<br />
a wrench in order to prevent it from turning when<br />
rotating the installation shaft washer. The tensioner<br />
assembly will move against the belt and the arm will<br />
eventually start to move clockwise (see Figure 3).<br />
Figure 3<br />
Spanner/Wrench<br />
Hexagonal key<br />
Mounting bolt<br />
Hexagonal key<br />
Mounting bolt<br />
Spanner/Wrench<br />
Figure 4<br />
Nut torque<br />
19±3 Nm<br />
7. Continue rotating the installation shaft washer until<br />
the arm pointer is positioned within the nominal<br />
position window on the base plate, then lock the<br />
tensioner in this position by tightening the mounting<br />
nut with 19±3 Nm or torque (see Figure 4).<br />
Verification of the nominal position<br />
8. Remove both the hex key and the wrench. Rotate the<br />
crankshaft two (2) <strong>com</strong>plete revolutions manually<br />
for proper seating of the belt until the crankshaft is<br />
repositioned at the TDC position.<br />
Note: Repositioning the crankshaft to the TDC position<br />
must be done only during the clockwise rotation.<br />
9. Check the position of the arm pointer.<br />
- If the arm pointer still remains within the nominal<br />
position window, the installation is <strong>com</strong>plete.<br />
- If not, go to step #10. The installation needs to be<br />
repeated until the proper position is achieved.<br />
Readjustment<br />
10. Engage the hex key and retain its position while<br />
loosening the mounting bolt with the wrench. The<br />
mounting bolt and the tensioner do not need to<br />
be removed. Rotate the installation shaft washer<br />
counterclockwise with the hex key until the arm<br />
pointer returns to the free-arm position (see Figure<br />
1). Follow steps 5 through 9.<br />
Pointer in<br />
installed position<br />
Final setting<br />
tolerance<br />
91