- Page 1 and 2:
Oracle® Application Server Reports
- Page 3 and 4:
Contents Send Us Your Comments ....
- Page 5 and 6:
4.6 Font Types.....................
- Page 7 and 8:
10 Configuring and Administering Or
- Page 9 and 10:
15.4.4 printer Examples............
- Page 11 and 12:
20.1.3 Formatting the Data ........
- Page 13 and 14:
A.4.74 PAGEGROUP...................
- Page 15 and 16:
B.1.46 REPORTS_NO_HTML_SPACE_REPLAC
- Page 17 and 18:
Send Us Your Comments Oracle Applic
- Page 19 and 20:
Intended Audience Preface This manu
- Page 21 and 22:
Chapter 10, "Configuring and Admini
- Page 23:
Part I Preparing Your Environment P
- Page 26 and 27:
Overview of OracleAS Reports Servic
- Page 28 and 29:
OracleAS Reports Services Component
- Page 30 and 31:
Things to Consider When You Set Up
- Page 32 and 33:
Things to Consider When You Set Up
- Page 34 and 35:
Maintaining High Availability 1-10
- Page 36 and 37:
Starting and Stopping the Reports S
- Page 38 and 39:
Starting and Stopping the Reports S
- Page 40 and 41:
Verifying that the Oracle HTTP Serv
- Page 42 and 43:
OracleAS Reports Services Configura
- Page 44 and 45:
Configuring Reports Server
- Page 46 and 47:
Configuring Reports Server T
- Page 48 and 49:
Configuring Reports Server For exam
- Page 50 and 51:
Configuring Reports Server you may
- Page 52 and 53:
Configuring Reports Server You can
- Page 54 and 55:
Configuring Reports Server confiden
- Page 56 and 57:
Configuring Reports Server in your
- Page 58 and 59:
Configuring Reports Server Descript
- Page 60 and 61:
Configuring Reports Server Trace at
- Page 62 and 63:
Configuring Reports Server sent by
- Page 64 and 65:
Configuring Reports Server Descript
- Page 66 and 67:
Configuring Reports Server Table 3-
- Page 68 and 69:
Configuring Reports Server The valu
- Page 70 and 71:
Configuring Reports Server that you
- Page 72 and 73:
Configuring the Reports Servlet ORA
- Page 74 and 75:
Configuring the Reports Servlet 1.
- Page 76 and 77:
Configuring the Reports Servlet 3.3
- Page 78 and 79:
Configuring the Reports Servlet If
- Page 80 and 81:
Entering Proxy Information /> maxEn
- Page 82 and 83:
Configuring Reports Server with the
- Page 84 and 85:
Configuring Reports Server with the
- Page 86 and 87:
DISPLAY and Printer Dependencies on
- Page 88 and 89:
Setting the default printer for an
- Page 90 and 91:
Using Fonts in the toolkit resource
- Page 92 and 93:
Using Fonts Note: Similarly for PCL
- Page 94 and 95:
Adding Fonts 4.2 Adding Fonts param
- Page 96 and 97:
Font Configuration Files *Font new_
- Page 98 and 99:
Font Configuration Files ■ Font e
- Page 100 and 101:
Font Aliasing 4.4 Font Aliasing Fon
- Page 102 and 103:
Font Aliasing Arial.8.Italic.Medium
- Page 104 and 105:
Troubleshooting Font Issues 4.4.4 F
- Page 106 and 107:
Troubleshooting Font Issues expecti
- Page 108 and 109:
Troubleshooting Font Issues ■ The
- Page 110 and 111:
Font Types (assuming that size 8 is
- Page 112 and 113:
Font Types 4.6.3 Type1 Fonts later
- Page 114 and 115:
Font Types 4-26 Oracle Application
- Page 116 and 117:
UNIX Printing Overview Motif and ch
- Page 118 and 119:
Configuring the Printing Environmen
- Page 120 and 121:
Configuring the Printing Environmen
- Page 122 and 123:
Printer-Related Files 5.4.2 PPD Fil
- Page 124 and 125:
Printer-Related Files 5.4.3 HPD Fil
- Page 126 and 127:
Printer-Related Files 5.4.6 uiprint
- Page 128 and 129:
Printer-Related Files 5.4.7.1.3 Add
- Page 130 and 131:
Debugging Options printer that does
- Page 132 and 133:
Frequently Asked Questions 5.7 Freq
- Page 134 and 135:
Frequently Asked Questions 2. If yo
- Page 136 and 137:
Frequently Asked Questions How do y
- Page 138 and 139:
Frequently Asked Questions 5.7.5 Pr
- Page 140 and 141:
Frequently Asked Questions 5-26 Ora
- Page 142 and 143:
PDF Features Included in Oracle Rep
- Page 144 and 145:
PDF Features Included in Oracle Rep
- Page 146 and 147:
PDF Features Included in Oracle Rep
- Page 148 and 149:
PDF Features Included in Oracle Rep
- Page 150 and 151:
PDF Features Included in Oracle Rep
- Page 152 and 153:
PDF Features Included in Oracle Rep
- Page 154 and 155:
Resolving PDF Font Issues During Cr
- Page 156 and 157:
Generating a Unicode PDF File 9. Ed
- Page 158 and 159:
Generating a Multibyte PDF File 1.
- Page 160 and 161:
Generating a Barcode PDF File 6.6.1
- Page 162 and 163:
Overview of Output Processing desti
- Page 164 and 165:
Registering Destination Types with
- Page 166 and 167:
Registering Destination Types with
- Page 168 and 169:
JDBC Configuration File ■ An XML
- Page 170 and 171: JDBC Configuration File Table 8-1 D
- Page 172 and 173: JDBC Configuration File The drivers
- Page 174 and 175: JDBC Configuration File c. Reports
- Page 176 and 177: JDBC Configuration File d. jdbcpds
- Page 178 and 179: Defining and Running a JDBC Query F
- Page 180 and 181: Defining and Running a JDBC Query T
- Page 182 and 183: Troubleshooting Information ■ p_s
- Page 184 and 185: Troubleshooting Information 8.4.2 T
- Page 186 and 187: Adding Your Own PDS Running Report
- Page 188 and 189: Adding Your Own PDS 8.5.3.2 rwbuild
- Page 190 and 191: About OracleAS Reports Services Sec
- Page 192 and 193: About OracleAS Reports Services Sec
- Page 194 and 195: About OracleAS Reports Services Sec
- Page 196 and 197: Configuring OracleAS Reports Servic
- Page 198 and 199: Configuring OracleAS Reports Servic
- Page 200 and 201: Configuring Out-of-the-Box OracleAS
- Page 202 and 203: Administering OracleAS Single Sign-
- Page 204 and 205: Administering OracleAS Single Sign-
- Page 206 and 207: Administering OracleAS Single Sign-
- Page 208 and 209: Administering OracleAS Single Sign-
- Page 210 and 211: Choosing the connecting entity for
- Page 212 and 213: OracleAS Forms Services Security Co
- Page 214 and 215: Creating Reports Users and Named Gr
- Page 216 and 217: Registering Oracle Reports Componen
- Page 218 and 219: Registering Oracle Reports Componen
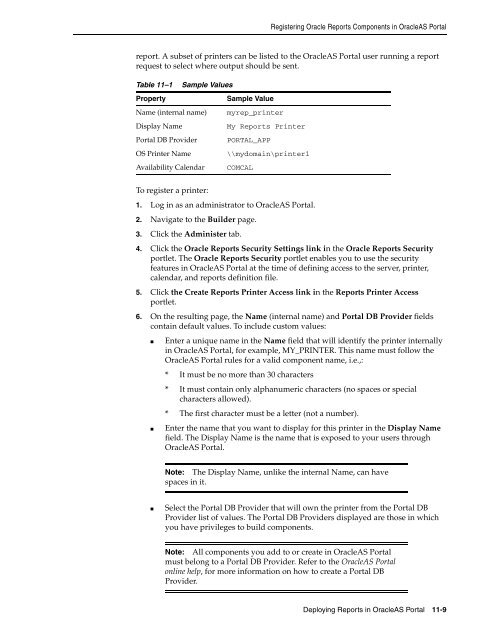
- Page 222 and 223: Registering Oracle Reports Componen
- Page 224 and 225: Registering Oracle Reports Componen
- Page 226 and 227: Registering Oracle Reports Componen
- Page 228 and 229: Registering Oracle Reports Componen
- Page 230 and 231: Registering Oracle Reports Componen
- Page 232 and 233: Registering Oracle Reports Componen
- Page 234 and 235: Registering Oracle Reports Componen
- Page 236 and 237: Setting Up a Cluster 4. Is the numb
- Page 238 and 239: Setting Up a Cluster 12.2.2 Generat
- Page 240 and 241: Setting Up a Cluster 12-6 Oracle Ap
- Page 243 and 244: 13 Running Report Requests This cha
- Page 245 and 246: 13.1.2 JSP 13.1.3 CGI The syntax fo
- Page 247 and 248: Deploying Your Reports ■ A URL To
- Page 249 and 250: 13.3.3 Deploying a JSP report to th
- Page 251 and 252: Deploying Your Reports 13.3.3.2 Dep
- Page 253 and 254: 13.3.4 Running a JSP-Based Web Repo
- Page 255 and 256: 13.4.2 Creating the Report Definiti
- Page 257 and 258: 13.4.4 Adding the Reports Component
- Page 259 and 260: 13.8 Scheduling Reports to Run Auto
- Page 261 and 262: Using a Key Map File An exception t
- Page 263 and 264: 14.1 Overview 14 Using the Oracle R
- Page 265 and 266: Note: Use Internet Explorer to view
- Page 267 and 268: Getting Started 14.2.3.1 getAPIVers
- Page 269 and 270: 14.2.3.4 killJob The killJob(Intege
- Page 271 and 272:
■ The Xerces 1.4.4 parser, xerces
- Page 273 and 274:
} } Installing and Using the Sample
- Page 275 and 276:
15 Creating Advanced Distributions
- Page 277 and 278:
Elements of a Distribution XML File
- Page 279 and 280:
REP-57054: In-Process job terminate
- Page 281 and 282:
Table 15-1 (Cont.) Attributes of th
- Page 283 and 284:
15.3.5 attach Table 15-2 Attributes
- Page 285 and 286:
Or Attached are quarterly resu
- Page 287 and 288:
Elements of a Distribution XML File
- Page 289 and 290:
15.3.9 destype Table 15-6 Attribute
- Page 291 and 292:
15.3.10 property Table 15-7 (Cont.)
- Page 293 and 294:
15.4.2 mail Examples Distribution X
- Page 295 and 296:
15.4.3 file Examples 15.4.2.4.
- Page 297 and 298:
15.4.4 printer Examples Distributio
- Page 299 and 300:
Defining Custom/Pluggable Destina
- Page 301 and 302:
Defining Custom/Pluggable Destinati
- Page 303 and 304:
15.7.2 XML and delimited outputs Li
- Page 305 and 306:
16 Customizing Reports with XML Ext
- Page 307 and 308:
Creating XML Customizations 2. Stor
- Page 309 and 310:
Creating XML Customizati
- Page 311 and 312:
16.2.7 Encoding the URL source="loc
- Page 313 and 314:
Creating XML Data Models select
- Page 315 and 316:
16.3.5 Creating Formulas, Summaries
- Page 317 and 318:
16.4.1 Applying an XML Report Defin
- Page 319 and 320:
Using XML Files at Runtime so, then
- Page 321 and 322:
Debugging XML Report Definitions Ra
- Page 323 and 324:
END IF; END; Debugging XML Report D
- Page 325 and 326:
17 Using Event-Driven Publishing Mo
- Page 327 and 328:
17.1.3 How to Submit a Job The Even
- Page 329 and 330:
Debugging Applications that Use the
- Page 331 and 332:
SRW.ADD_PARAMETER(myPlist,'SERVER',
- Page 333 and 334:
Integrating with Oracle Advanced Qu
- Page 335:
Part III National Language Support
- Page 338 and 339:
NLS Environment Variables 18.1.1 La
- Page 340 and 341:
NLS Environment Variables 18.2.1.1
- Page 342 and 343:
Specifying a Character Set in a JSP
- Page 344 and 345:
Specifying a Character Set in a JSP
- Page 346 and 347:
Unicode Use of a single character s
- Page 348 and 349:
Translating Applications To transla
- Page 351 and 352:
19 Managing and Monitoring OracleAS
- Page 353 and 354:
Figure 19-1 Grid Control Console 2.
- Page 355 and 356:
Starting, Stopping, and Restarting
- Page 357 and 358:
■ Cancelling a Current Job Viewin
- Page 359 and 360:
Viewing and Managing Job Queues 19.
- Page 361 and 362:
Use Oracle Enterprise Manager 10g f
- Page 363 and 364:
Figure 19-7 Home Tab of Reports Ser
- Page 365 and 366:
Figure 19-9 Jobs Tab of Reports Ser
- Page 367 and 368:
Monitoring Server Performance ■ A
- Page 369 and 370:
Viewing and Changing the Reports Se
- Page 371 and 372:
Viewing Port Numbers Table 19-5 (Co
- Page 373 and 374:
20.1 Methodology 20 Tuning Oracle R
- Page 375 and 376:
20.1.1 Performance Analysis Tools M
- Page 377 and 378:
Methodology Viewing the generated t
- Page 379 and 380:
Note: For large queries, it is impe
- Page 381 and 382:
Methodology 20.1.2.1 Non-SQL Data S
- Page 383 and 384:
Note: The only meaningful place to
- Page 385 and 386:
Methodology and their contents to f
- Page 387 and 388:
Methodology See the Oracle9iAS Best
- Page 389 and 390:
Methodology storage, in order to co
- Page 391:
Part V Appendices Part V contains a
- Page 394 and 395:
Command Overview Table A-1 Keywords
- Page 396 and 397:
Command Overview Table A-1 (Cont.)
- Page 398 and 399:
Command Overview A.1.3 rwrun Exampl
- Page 400 and 401:
Command Overview A.1.4 rwbuilder A.
- Page 402 and 403:
Command Overview Example 4: Sending
- Page 404 and 405:
Command Overview Example 1: Running
- Page 406 and 407:
Command Line Syntax A.2 Command Lin
- Page 408 and 409:
Command Line Keywords Description U
- Page 410 and 411:
Command Line Keywords A.4.8 BCC ■
- Page 412 and 413:
Command Line Keywords A.4.12 CC ■
- Page 414 and 415:
Command Line Keywords A.4.15 CMDKEY
- Page 416 and 417:
Command Line Keywords A.4.18 COPIES
- Page 418 and 419:
Command Line Keywords Description U
- Page 420 and 421:
Command Line Keywords Table A-32 Va
- Page 422 and 423:
Command Line Keywords A.4.26 DEST T
- Page 424 and 425:
Command Line Keywords Table A-37 (C
- Page 426 and 427:
Command Line Keywords Running the r
- Page 428 and 429:
Command Line Keywords A.4.31 DUNIT
- Page 430 and 431:
Command Line Keywords Description U
- Page 432 and 433:
Command Line Keywords A.4.36 FORMSI
- Page 434 and 435:
Command Line Keywords Usage Notes A
- Page 436 and 437:
Command Line Keywords A.4.43 JOBNAM
- Page 438 and 439:
Command Line Keywords Description L
- Page 440 and 441:
Command Line Keywords A.4.51 NONBLO
- Page 442 and 443:
Command Line Keywords A.4.55 OLAP_C
- Page 444 and 445:
Command Line Keywords A.4.58 ORIENT
- Page 446 and 447:
Command Line Keywords A.4.61 OUTPUT
- Page 448 and 449:
Command Line Keywords Description U
- Page 450 and 451:
Command Line Keywords A.4.69 P_PRIN
- Page 452 and 453:
Command Line Keywords A.4.74 PAGEGR
- Page 454 and 455:
Command Line Keywords Values ■ YE
- Page 456 and 457:
Command Line Keywords A.4.81 PRINTJ
- Page 458 and 459:
Command Line Keywords A.4.85 REPLYT
- Page 460 and 461:
Command Line Keywords Description U
- Page 462 and 463:
Command Line Keywords A.4.93 SHOWEN
- Page 464 and 465:
Command Line Keywords A.4.96 SHOWMA
- Page 466 and 467:
Command Line Keywords Values A.4.10
- Page 468 and 469:
Command Line Keywords Usage Notes A
- Page 470 and 471:
Command Line Keywords A.4.106 STYPE
- Page 472 and 473:
Command Line Keywords Values ■ YE
- Page 474 and 475:
Command Line Keywords ■ TRACE_APP
- Page 476 and 477:
Command Line Keywords A.4.114 UPGRA
- Page 478 and 479:
Command Line Keywords ■ Use this
- Page 480 and 481:
Command Line Keywords A-88 Oracle A
- Page 482 and 483:
Environment Variables B.1.1 CA_GPRE
- Page 484 and 485:
Environment Variables B.1.10 NLS_DA
- Page 486 and 487:
Environment Variables B.1.20 ORACLE
- Page 488 and 489:
Environment Variables B.1.27 REMOTE
- Page 490 and 491:
Environment Variables Default ARABI
- Page 492 and 493:
Environment Variables Example REPOR
- Page 494 and 495:
Environment Variables Usage Note Th
- Page 496 and 497:
Environment Variables Example REPOR
- Page 498 and 499:
Environment Variables See Also: Scr
- Page 500 and 501:
Environment Variables ■ If you sp
- Page 502 and 503:
Environment Variables B.1.54 REPORT
- Page 504 and 505:
Environment Variables B.1.60 TK_PRI
- Page 506 and 507:
Environment Variables B.1.63 TK90_P
- Page 508 and 509:
Environment Variables B.1.68 XMMITR
- Page 510 and 511:
Batch Registering Report Definition
- Page 512 and 513:
PL/SQL Batch Registering Function 1
- Page 514 and 515:
PL/SQL Batch Registering Function T
- Page 516 and 517:
PL/SQL Batch Registering Function C
- Page 518 and 519:
Glossary-2 detail query When defini
- Page 520 and 521:
Glossary-4 margin An optional repor
- Page 522 and 523:
Glossary-6 RDF file A file that con
- Page 524 and 525:
Glossary-8 SQL A standard interface
- Page 526 and 527:
Glossary-10
- Page 528 and 529:
CGI, 1-1, 1-4 backward compatibilit
- Page 530 and 531:
dateformatmask command keyword, A-2
- Page 532 and 533:
instance attribute, 15-14 name attr
- Page 534 and 535:
L languages Middle Eastern, 18-9 No
- Page 536 and 537:
SRW.APPLY_DEFINITION, 16-3, 16-12,
- Page 538 and 539:
wserver, 2-5 install, 2-3 server, 2
- Page 540:
Web service, 14-1 exposing rwservle


