AZURA Pump P 2.1L user manual
AZURA Pump P 2.1L user manual
AZURA Pump P 2.1L user manual

You also want an ePaper? Increase the reach of your titles
YUMPU automatically turns print PDFs into web optimized ePapers that Google loves.
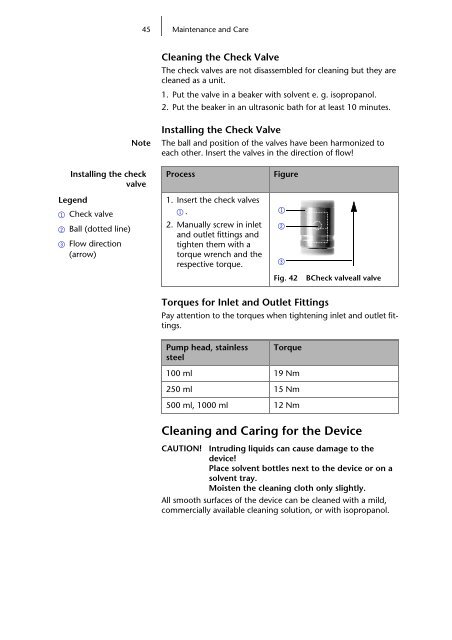
Installing the check<br />
valve<br />
Legend<br />
1 Check valve<br />
2 Ball (dotted line)<br />
3 Flow direction<br />
(arrow)<br />
45 Maintenance and Care<br />
Cleaning the Check Valve<br />
The check valves are not disassembled for cleaning but they are<br />
cleaned as a unit.<br />
1. Put the valve in a beaker with solvent e. g. isopropanol.<br />
2. Put the beaker in an ultrasonic bath for at least 10 minutes.<br />
Installing the Check Valve<br />
Note The ball and position of the valves have been harmonized to<br />
each other. Insert the valves in the direction of flow!<br />
Process Figure<br />
1. Insert the check valves<br />
1.<br />
2. Manually screw in inlet<br />
and outlet fittings and<br />
tighten them with a<br />
torque wrench and the<br />
respective torque.<br />
Torques for Inlet and Outlet Fittings<br />
Pay attention to the torques when tightening inlet and outlet fittings.<br />
<strong>Pump</strong> head, stainless<br />
steel<br />
1<br />
2<br />
Fig. 42 BCheck valveall valve<br />
Cleaning and Caring for the Device<br />
CAUTION! Intruding liquids can cause damage to the<br />
device!<br />
Place solvent bottles next to the device or on a<br />
solvent tray.<br />
Moisten the cleaning cloth only slightly.<br />
All smooth surfaces of the device can be cleaned with a mild,<br />
commercially available cleaning solution, or with isopropanol.<br />
3<br />
Torque<br />
100 ml 19 Nm<br />
250 ml 15 Nm<br />
500 ml, 1000 ml 12 Nm