- Page 1 and 2: HP Scanjet N6310 Getting Started Gu
- Page 3 and 4: HP Scanjet N6310 Getting Started Gu
- Page 5 and 6: Contents 1 Scanner set up Check the
- Page 7 and 8: 1. Windows only: Decide what softwa
- Page 9 and 10: Before you scan (Windows only) You
- Page 11 and 12: 2 Use the scanner This section desc
- Page 13 and 14: Scanner overview 1 Scanner control
- Page 15 and 16: • “Use the transparent material
- Page 17: Wrinkled or creased documents Curle
- Page 21 and 22: Use the transparent materials adapt
- Page 23 and 24: Tips on using the Scan button • T
- Page 25 and 26: TIP: You can also make copies by cl
- Page 27 and 28: • Use the cable that was included
- Page 29 and 30: 1. See the product documentation th
- Page 31 and 32: Automatic document feeder (ADF) spe
- Page 33 and 34: 4. HP products may contain remanufa
- Page 35 and 36: Copyright et licence © Copyright 2
- Page 37 and 38: 1 Configuration du scanner Suivez l
- Page 39 and 40: 2. Branchez l'extrémité étroite
- Page 41 and 42: 1. Cliquez sur Démarrer, pointez s
- Page 43 and 44: Remarque Vous pouvez modifier les p
- Page 45 and 46: icône Nom du bouton Description 1
- Page 47 and 48: Outils 1. Appuyez sur le bouton Con
- Page 49 and 50: • Lors du chargement de pages en
- Page 51 and 52: 6. Introduisez précautionneusement
- Page 53 and 54: Utilisation de l'adaptateur de supp
- Page 55 and 56: Remarque Si vous souhaitez prévisu
- Page 57 and 58: Voir aussi « Chargement d'originau
- Page 59 and 60: Conseil Évitez de connecter le sca
- Page 61 and 62: 1. Consultez la documentation fourn
- Page 63 and 64: Caractéristiques du bac d'alimenta
- Page 65 and 66: emplacera les logiciels qui n'exéc
- Page 67 and 68: Copyright y licencia © 2008 Copyri
- Page 69 and 70:
1 Instalación del escáner Siga es
- Page 71 and 72:
2. Conecte un extremo del cable del
- Page 73 and 74:
1. Haga clic en Inicio, elija Progr
- Page 75 and 76:
Nota Puede modificar la configuraci
- Page 77 and 78:
Icono Nombre del botón Descripció
- Page 79 and 80:
1. Pulse el botón de Configuració
- Page 81 and 82:
• Cuando cargue páginas pequeña
- Page 83 and 84:
Nota No toda la extensión del cris
- Page 85 and 86:
c. Si la tira de negativos tiene me
- Page 87 and 88:
4. Si desea cambiar los ajustes de
- Page 89 and 90:
3 Cuidado y asistencia para el prod
- Page 91 and 92:
1. Pulse el botón de Alimentación
- Page 93 and 94:
4 Especificaciones y garantía Esta
- Page 95 and 96:
Material restringido del producto E
- Page 97 and 98:
Direitos autorais e licença © 200
- Page 99 and 100:
1 Instalação do scanner Siga esta
- Page 101 and 102:
2. Conecte a extremidade pequena do
- Page 103 and 104:
1. Clique em Iniciar, aponte para P
- Page 105 and 106:
Para iniciar uma cópia, clique dua
- Page 107 and 108:
Ícone Nome do botão Descrição 1
- Page 109 and 110:
Nota Configurar Economia de energia
- Page 111 and 112:
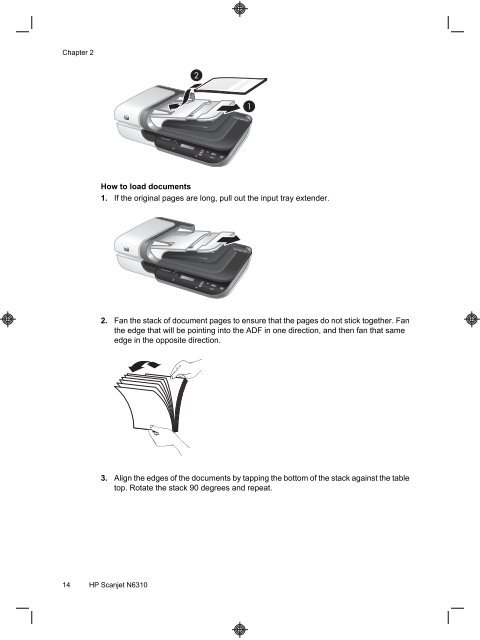
2 1 Como colocar documentos 1. Se a
- Page 113 and 114:
(continuação) Tamanho máximo: 21
- Page 115 and 116:
c. Se a tira de negativos tiver men
- Page 117 and 118:
Para Macintosh: 1. Coloque os origi
- Page 119 and 120:
3 Assistência e suporte ao equipam
- Page 121 and 122:
Desinstale e reinstale o software d
- Page 123 and 124:
4 Especificações e garantia Esta
- Page 125 and 126:
Materiais restritos do produto Este
- Page 127 and 128:
Para clientes en México aplican la